Scenario one: the company is preparing to push an email announcement to all employees. Using a wrapped mail library API and looping over every employee to push the emails will leave the main program stuck in the loop and unable to respond, which is not what we want — we want to be able to carry on with other operations normally after clicking execute. Scenario two: the local backtest database of a quantitative program has to be updated every day. Writing a program that runs once a day works, but it is not efficient, and it also introduces uncertainty through human factors. We want to be able to run an operation on a daily schedule, or an hourly schedule, efficiently and reliably. Summed up, these are two kinds of requirements: asynchronous tasks and scheduled tasks.
1. What Is Celery
Celery is a distributed task scheduling module written in Python, which also supports a task queue for real-time processing.
2. How Celery Works
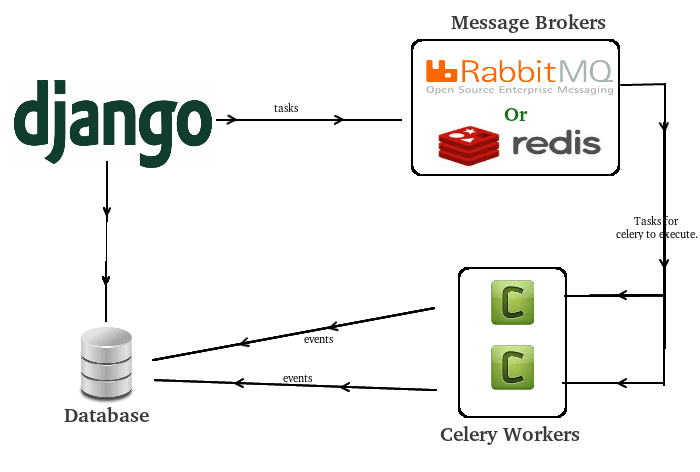
Celery’s principle is to use a task queue: tasks are written into the queue, then taken out one by one, executed, and the results written to a designated database. It is easiest to understand as a producer-consumer model. In Django, asynchronous task code produces a task message, which is passed to the broker; the Celery worker then retrieves the task message, executes the task, and finally stores the returned message and result in the backend. The broker and backend here are usually rabbitMq or redis.
2.1 Producer
Responsible for producing tasks and handing them to the task queue for processing. There are two kinds of producers. One is the Django mentioned above, i.e. the main program — tasks it puts in the queue are executed immediately. The other is the task scheduler, celery beat, which reads the contents of the configuration file and periodically sends task requests to the task queue, thus satisfying the need for scheduled tasks.
2.2 Celery worker
The consumer that executes tasks; typically multiple consumers are run on multiple servers to improve execution efficiency.
2.3 Celery Serialization
Transmitting data between the client and the consumer requires serialization and deserialization. The main options are pickle, json, yaml, and msgpack, among which pickle has not been supported since version 3.2 due to security issues.
3. Building a Celery Task
3.1 Basic Installation
First install Erlang
Then install rabbitmq-server
At http://localhost:15672/ you can view the message queues in rabbitmq
Install celery
| |
tasks.py
| |
| |
4. Using celery in django
4.1 Basic Installation and Configuration
- You need to pip install django-celery and celery. Note the compatibility issues between django and these packages: choosing django – 1.8.3, dajngo-celery – 3.1.17, celery – 3.1 is a good choice.
- You need to add the ‘djcelery’ app to INSTALLED_APPS and run
python manage migrateto write djcelery’s database tables into the database. Celery’s background tasks and scheduled tasks can both be found in the corresponding tables; if you want to write or modify tasks, you can operate on these tables directly.
4.2 Application
In use, it is recommended to put the configuration information in a separate config file, such as broker, backend, timeout, and serialization settings. Register the task functions in a separate celery file. This way the directory will contain four files: tasks.py, config.py, celery.py, and __init__.py. Among them tasks.py mainly holds the asynchronous tasks; if you are working directly with a view function, you can simply add the decorator in front of the relevant view function.
4.3 Finally, How to Start Celery Tasks
- Using task tasks
| |
- Periodic tasks
| |
