1. Basic Introduction to Etcd
Etcd is a distributed Key/Value storage system. Through distributed locks, leader election, and write barriers it achieves distributed coordination, offering highly available, persistent data storage and retrieval services.
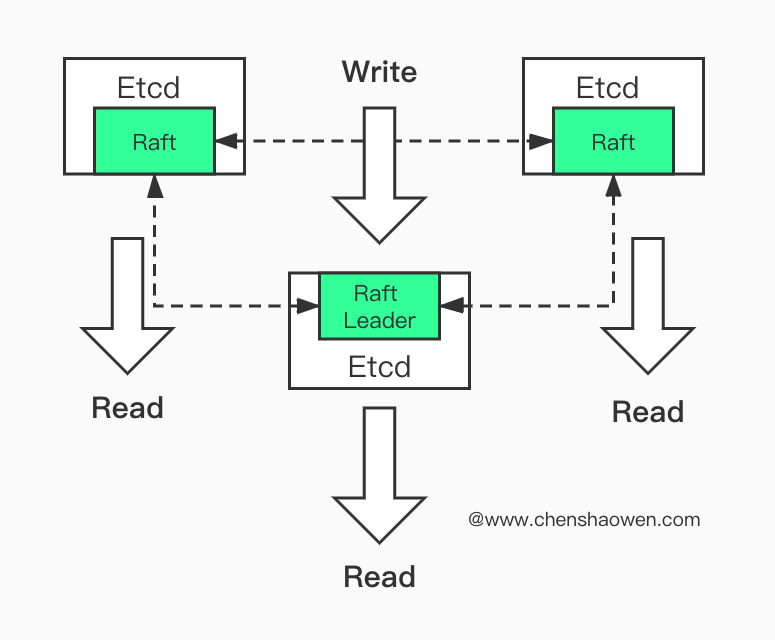
Every Etcd node stores a complete copy of the data, and at any moment there is at most one leader. The leader handles all write requests from clients and synchronizes them to the other nodes via the Raft protocol.
Etcd persists data in the WAL (write ahead log) format: records are written to the WAL before being committed, and after a snapshot is taken (by default every 10,000 records) the WAL file is deleted.
In memory, Etcd indexes keys with a B-tree; on disk, it uses a B+ tree to store values and record their historical versions.
2. Etcd Node Count Requirements
The more Etcd nodes there are, the stronger the fault tolerance and the worse the write performance. The officially recommended etcd cluster sizes are 3, 5, and 7 nodes. An Etcd cluster needs at least [N/2] + 1 nodes working to keep the cluster healthy. Below is the correspondence between cluster node count and maximum tolerable node failures:
| Nodes | Max Failures Tolerated |
|---|
| 1 | 0 |
| 3 | 1 |
| 4 | 1 |
| 5 | 2 |
| 6 | 2 |
| 7 | 3 |
| 8 | 3 |
| 9 | 4 |
An odd number of nodes and an even number of nodes have the same fault-tolerance capacity.
3. Hardware Environment Requirements
Etcd does not consume much memory or CPU; having enough is sufficient.
The minimum time for one Etcd request = the network round-trip latency between member nodes + the latency to persist the data after it is received. Therefore, Etcd’s performance is mainly constrained by two things:
The member nodes of a multi-node Etcd cluster should be deployed in the same data center as much as possible to reduce network latency. Within the same data center, the network conditions between different nodes are usually very good; if you need to test them you can use the ping or tcpdump commands for analysis. Below we mainly discuss the recommended configuration and methods for testing disk IO.
3.2 Recommended CPU and Memory Configuration
| Cluster Node | Data Size | vCPUs | Memory (GB) | Max concurrent IOPS | Disk bandwidth (MB/s) |
|---|
| 50 | no more than 100 MB | 2 | 8 | 3600 | 56.25 |
| 250 | no more than 500 MB | 4 | 16 | 6000 | 93.75 |
| 1000 | no more than 1 GB | 8 | 32 | 8000 | 125 |
| 3000 | more than 1 GB | 16 | 64 | 16,000 | 250 |
3.3 How to Test Disk IOPS
Etcd is very sensitive to disk write latency; typically it requires more than 50 IOPS, and for heavily loaded clusters it should reach 500 IOPS. Common disk benchmark tools are diskbench and fio. Here we take using fio on CentOS as an example:
1
2
3
4
5
| fdisk -l
Disk /dev/vda: 107.4 GB, 107374182400
...
Disk /dev/vdb: 34.4 GB, 34359738368
|
1
2
3
| fio -filename=/dev/vda -direct=1 -iodepth 64 -thread -rw=randwrite -ioengine=libaio -bs=4K -numjobs=8 -runtime=120 -group_reporting -name=test1
write: IOPS=1288, BW=5153KiB/s (5277kB/s)(605MiB/120206msec)
|
1
2
3
| fio -filename=/dev/vda -direct=1 -iodepth 64 -thread -rw=write -ioengine=libaio -bs=512K -numjobs=8 -runtime=120 -group_reporting -name=test2
write: IOPS=102, BW=51.1MiB/s (53.6MB/s)(2453MiB/48023msec)
|
Here, filename is the device under test, and more parameters can be found at the GitHub links above. The IOPS obtained here is 1288, and the disk bandwidth is 53.6 MB/s.
4. Installing Etcdctl
 1
 2
 3
 4
 5
 6
 7
 8
 9
10
| export ETCD_VER=v3.4.10
export ETCD_DIR=etcd-download
export DOWNLOAD_URL=https://github.com/coreos/etcd/releases/download
mkdir ${ETCD_DIR}
cd ${ETCD_DIR}
wget ${DOWNLOAD_URL}/${ETCD_VER}/etcd-${ETCD_VER}-linux-amd64.tar.gz
tar -xzvf etcd-${ETCD_VER}-linux-amd64.tar.gz
cp etcd-${ETCD_VER}-linux-amd64/etcdctl /usr/local/bin/
|
When using Etcdctl you need node certificates. There are two ways to provide them:
- On the command line
1
| ETCDCTL_API=3 etcdctl --cacert=/etc/ssl/etcd/ssl/ca.pem --cert=/etc/ssl/etcd/ssl/node-node1.pem --key=/etc/ssl/etcd/ssl/node-node1-key.pem endpoint health
|
or
1
2
3
4
5
| ETCDCTL_API=3 etcdctl \
--cacert=/etc/kubernetes/pki/etcd/ca.crt \
--cert=/etc/kubernetes/pki/etcd/server.crt \
--key=/etc/kubernetes/pki/etcd/server.key \
endpoint health
|
This means every Etcdctl command has to include the certificate and version parameters.
- Injecting via environment variables
1
2
3
4
| export ETCDCTL_API=3
export ETCDCTL_CACERT=/etc/ssl/etcd/ssl/ca.pem
export ETCDCTL_CERT=/etc/ssl/etcd/ssl/node-node1.pem
export ETCDCTL_KEY=/etc/ssl/etcd/ssl/node-node1-key.pem
|
or
1
2
3
4
| export ETCDCTL_API=3
export ETCDCTL_CACERT=/etc/kubernetes/pki/etcd/ca.crt
export ETCDCTL_CERT=/etc/kubernetes/pki/etcd/server.crt
export ETCDCTL_KEY=/etc/kubernetes/pki/etcd/server.key
|
Then set ENDPOINTS as well
1
2
| export ETCDCTL_ENDPOINTS=$(kubectl get nodes -l node-role.kubernetes.io/control-plane -o jsonpath='{range .items[*]}https://{.status.addresses[?(@.type=="InternalIP")].address}:2379{","}{end}' | sed 's/,$//')
echo $ETCDCTL_ENDPOINTS
|
You can put these environment variables in /etc/profile, then source /etc/profile, and afterward use the commands below directly.
1
| etcdctl endpoint health
|
5. Common Etcdctl Operations Tasks
- Check whether a node is the Leader
1
| curl http://127.0.0.1:2381/metrics |grep etcd_server_is_leader
|
Try to operate on slave nodes first so you do not disrupt the cluster’s normal operation.
- Designate a new leader node
1
| etcdctl member list --write-out=table
|
1
2
3
4
5
6
| unset ETCDCTL_API ETCDCTL_ENDPOINTS ETCDCTL_CACERT ETCDCTL_CERT ETCDCTL_KEY
etcdctl move-leader 19d819470b65c30a \
--endpoints=https:// \
--cacert=/etc/kubernetes/pki/etcd/ca.crt \
--cert=/etc/kubernetes/pki/etcd/server.crt \
--key=/etc/kubernetes/pki/etcd/server.key
|
Here you must specify the certificate and endpoints as parameters; you cannot use environment variables, otherwise it will error out.
1
| etcdctl endpoint status --write-out=table
|
1
| etcdctl member list --write-out=table
|
- Defragmentation, takes effect cluster-wide
- Data compaction, takes effect on a single node
1
2
3
| rev=$(etcdctl endpoint status --write-out="json" | egrep -o '"revision":[0-9]*' | egrep -o '[0-9].*')
echo $rev
etcdctl compact $rev
|
- Adding and removing nodes
Add a node
1
2
3
4
5
6
| etcdctl member add master-03 \
--peer-urls=https://10.0.0.3:2380 \
--endpoints=https://10.0.0.1:2379,https://10.0.0.2:2379,https://10.0.0.3:2379 \
--cacert=/etc/kubernetes/pki/etcd/ca.crt \
--cert=/etc/kubernetes/pki/etcd/server.crt \
--key=/etc/kubernetes/pki/etcd/server.key
|
Remove a node
1
| etcdctl member remove 9855cd41eff59e2b
|
Backup
1
| etcdctl snapshot save snapshot-xxx.db
|
When restoring, you need to stop all apiserver and etcd instances, delete the current etcd data, then copy the backup data to each etcd node and run the command
1
| etcdctl snapshot restore snapshot-xxx.db
|
1
| etcdctl endpoint health
|
- View the revision of all nodes
1
| etcdctl endpoint status --write-out=json | jq -r '.[] | "\(.endpoint) \(.Status.header.revision)"'
|
If etcd has experienced an anomaly it may trigger an alarm; you can clear the alarm and resume use with the command below
- Create, read, update, delete
A specific Key
1
| etcdctl get /registry/namespaces/default
|
Query by prefix
1
| etcdctl get / --prefix --keys-only
|
Add/modify
1
| etcdctl put key newVaule
|
6. Expanding the etcd DB Storage Size
- Expanding the etcd DB storage size (Pod version)
1
| vim /etc/kubernetes/manifests/etcd.yaml
|
Add the following parameter, changing the default from 2GB to 8GB.
1
| - --quota-backend-bytes=8589934592
|
It is also worth adjusting the monitoring address while you are at it
1
| - --listen-metrics-urls=http://0.0.0.0:2381
|
Restart etcd
1
2
| mv /etc/kubernetes/manifests/etcd.yaml ./
mv ./etcd.yaml /etc/kubernetes/manifests/
|
- Expanding the etcd DB storage size (Systemd version)
Add the following parameter, changing the default from 2GB to 8GB.
1
| ETCD_QUOTA_BACKEND_BYTES=8589934592
|
It is also worth adjusting the monitoring address while you are at it, listening on 0.0.0.0.
1
| ETCD_LISTEN_METRICS_URLS=http://0.0.0.0:2381
|
Restart etcd
1
2
3
| systemctl daemon-reload
systemctl restart etcd
systemctl status etcd
|
7. Changing the etcd Storage Directory
1
2
3
4
5
| lsblk -d -o NAME,ROTA,SIZE,MODEL
NAME ROTA SIZE MODEL
vda 1 100G
nvme0n1 0 1.7T SAMSUNG MZQL21T9HCJR-00B7C
|
1 means a mechanical hard disk, 0 means a solid-state disk; etcd needs to be migrated onto a solid-state disk.
or
1
| mv /etc/kubernetes/manifests/etcd.yaml /etc/kubernetes/etcd.yaml
|
It would be even better if you could also stop the apiserver on the current node, because the apiserver connects directly to the current node’s etcd, and access to the apiserver across the cluster may become abnormal.
- Move the data to /data-etcd
1
| cp -a /var/lib/etcd/* /data-etcd/
|
- Change the etcd storage directory to /data-etcd
or
1
| vim /etc/kubernetes/etcd.yaml
|
1
2
3
4
| - hostPath:
path: /data-etcd
type: DirectoryOrCreate
name: etcd-data
|
or
1
| mv /etc/kubernetes/etcd.yaml /etc/kubernetes/manifests/etcd.yaml
|
8. Changing the wal Directory
More than 90% of disk IO is wal writes.
or
1
| mv /etc/kubernetes/manifests/etcd.yaml /etc/kubernetes/etcd.yaml
|
- Move the data to /data/etcd-wal
1
2
| cp -a /var/lib/etcd/member/wal /data/
mv /data/wal /data/etcd-wal
|
- Add a new etcd storage directory pointing at /data/
or
1
| vim /etc/kubernetes/etcd.yaml
|
 1
 2
 3
 4
 5
 6
 7
 8
 9
10
11
| - command:
- etcd
- --wal-dir=/data/etcd-wal
volumeMounts:
- mountPath: /data/etcd-wal
name: etcd-wal
volumes:
- hostPath:
path: /data/etcd-wal
type: DirectoryOrCreate
name: etcd-wal
|
or
1
| mv /etc/kubernetes/etcd.yaml /etc/kubernetes/manifests/etcd.yaml
|
9. Viewing Etcd Certificates
1
2
3
4
5
6
7
| ETCD_CERT_DIR="/etc/kubernetes/pki/etcd"
for cert in "$ETCD_CERT_DIR"/*.crt; do
echo "===== $cert ====="
openssl x509 -in "$cert" -noout -dates -text | grep -E 'DNS|IP|notAfter|notBefore'
echo
done
|
10. Updating etcd Certificates
I once ran into the error {“level”:“warn”,“ts”:“2025-12-15T01:37:34.735Z”,“caller”:“embed/config_logging.go:160”,“msg”:“rejected connection”,“remote-addr”:“10.10.101.131:28508”,“server-name”:"",“ip-addresses”:[“10.10.101.196”,“127.0.0.1”,"::1"],“dns-names”:[“mycluster-master-01”,“localhost”],“error”:“tls: "10.10.101.131" does not match any of DNSNames ["mycluster-master-01" "localhost"]”}, and updating the certificate solved it.
This needs to be done on every node.
1
2
3
| cp -a /etc/kubernetes/pki/etcd /etc/kubernetes/pki/etcd.bak.$(date +%F)
ls -l /etc/kubernetes/pki/etcd.bak.*
|
- Clean up the old certificates
1
| rm -rf /etc/kubernetes/pki/etcd/{healthcheck-client.key,peer.key,server.key,healthcheck-client.crt,peer.crt,server.crt}
|
- Create the new certificate configuration file
Each node’s InitConfiguration differs, while the ClusterConfiguration is the same.
 1
 2
 3
 4
 5
 6
 7
 8
 9
10
11
12
13
14
15
16
17
18
19
20
21
22
23
24
25
26
27
28
29
30
31
32
33
34
35
| cat > /root/kubeadm-etcd-cert.yaml <<EOF
apiVersion: kubeadm.k8s.io/v1beta3
kind: InitConfiguration
nodeRegistration:
name: mycluster-worker-03
localAPIEndpoint:
advertiseAddress: 10.0.0.19
---
apiVersion: kubeadm.k8s.io/v1beta3
kind: ClusterConfiguration
etcd:
local:
serverCertSANs:
- 127.0.0.1
- localhost
- 10.0.0.196
- 10.0.0.31
- 10.0.0.48
- mycluster-master-01
- mycluster-master-02
- mycluster-master-03
- mycluster-worker-03
- 10.0.0.19
peerCertSANs:
- 127.0.0.1
- localhost
- 10.0.0.196
- 10.0.0.31
- 10.0.0.48
- mycluster-master-01
- mycluster-master-02
- mycluster-master-03
- mycluster-worker-03
- 10.0.0.19
EOF
|
An etcd instance only needs to share ca.crt and ca.key; the SANs of the other certificates differ per node. Using the same ClusterConfiguration here is not a best practice.
- Generate the certificates
1
2
3
4
| kubeadm init phase certs etcd-server --config=/root/kubeadm-etcd-cert.yaml
kubeadm init phase certs etcd-peer --config=/root/kubeadm-etcd-cert.yaml
kubeadm init phase certs etcd-healthcheck-client
kubeadm init phase certs apiserver-etcd-client
|
The certificates generated this way are valid for one year.
1
2
| mv /etc/kubernetes/manifests/etcd.yaml /etc/kubernetes/etcd.yaml
mv /etc/kubernetes/etcd.yaml /etc/kubernetes/manifests/etcd.yaml
|
1
| systemctl restart kubelet
|
Without restarting kubelet the etcd static Pod may not be updated; sometimes you need to force-delete the previous etcd Pod before it updates.
1
2
3
4
5
6
| ETCDCTL_API=3 etcdctl \
--endpoints=https://127.0.0.1:2379 \
--cacert=/etc/kubernetes/pki/etcd/ca.crt \
--cert=/etc/kubernetes/pki/etcd/healthcheck-client.crt \
--key=/etc/kubernetes/pki/etcd/healthcheck-client.key \
endpoint health
|
11. Adding a New etcd Node
- Set environment variables
1
2
| export ETCD_NODE_NAME="mycluster-worker-03"
export ETCD_NODE_IP="10.0.0.19"
|
- Copy the certificates to the new node
1
| rsync -avz /etc/kubernetes/pki/ root@${ETCD_NODE_NAME}:/etc/kubernetes/pki/
|
- Copy the static Pod to the new node
1
| scp /etc/kubernetes/manifests/etcd.yaml ${ETCD_NODE_NAME}:/etc/kubernetes/manifests/
|
On the new node, modify the etcd.yaml file to add the new node’s IP and node name.
1
| vim /etc/kubernetes/manifests/etcd.yaml
|
1
2
3
4
5
6
7
8
| - etcd
- --advertise-client-urls=https://10.0.0.19:2379
- --initial-advertise-peer-urls=https://10.0.0.19:2380
- --listen-client-urls=https://127.0.0.1:2379,https://10.0.0.19:2379
- --listen-peer-urls=https://10.0.0.19:2380
- --name=mycluster-worker-03
- --initial-cluster-state=existing
- --initial-cluster=节点名称=https://节点IP:2380,....
|
Here you need to change the copied node name and IP to the new node’s information, and at the same time add the new node’s information to initial-cluster.
- Add the node to the previous etcd cluster
1
| ETCDCTL_API=3 etcdctl member add ${ETCD_NODE_NAME} --peer-urls=https://${ETCD_NODE_IP}:2380
|
- Check the new node’s status
1
| etcdctl member list --write-out=table
|
1
2
3
4
5
6
7
8
| +------------------+---------+------------------------------+---------------------------+---------------------------+------------+
| ID | STATUS | NAME | PEER ADDRS | CLIENT ADDRS | IS LEARNER |
+------------------+---------+------------------------------+---------------------------+---------------------------+------------+
| 1dedee291bb2dbf4 | started | mycluster-master-01 | https://10.0.0.196:2380 | https://10.0.0.196:2379 | false |
| 3fc9d9f2f70c4eb1 | started | mycluster-master-03 | https://10.0.0.48:2380 | https://10.0.0.48:2379 | false |
| 4e5bde4408acfe80 | started | mycluster-master-02 | https://10.0.0.31:2380 | https://10.0.0.31:2379 | false |
| f81188de9fede0d3 | started | mycluster-worker-03 | https://10.0.0.19:2380 | https://10.0.0.19:2379 | false |
+------------------+---------+------------------------------+---------------------------+---------------------------+------------+
|
12. Installing etcdhelper
Etcdctl cannot directly view data content; you need the Etcdhelper tool for that.
1
2
3
4
5
| git clone https://github.com/openshift/origin.git
cd origin
go env -w GOPROXY=https://mirrors.aliyun.com/goproxy/,direct
go build tools/etcdhelper/etcdhelper.go
mv etcdhelper /usr/local/bin/
|
1
| etcdhelper -cacert /etc/kubernetes/pki/etcd/ca.crt -key /etc/kubernetes/pki/etcd/server.key -cert /etc/kubernetes/pki/etcd/server.crt get /registry/pods/xxx/xxx
|
This gives you the JSON-formatted data in Etcd.
13 Troubleshooting
13.1 wal max entry size limit exceeded
1
| {"level":"fatal","ts":"2026-06-17T07:37:46.773Z","caller":"etcdmain/etcd.go:204","msg":"discovery failed","error":"wal: max entry size limit exceeded, recBytes: 7935, fileSize(64008192) - offset(64006032) - padBytes(1) = entryLimit(2159)","stacktrace":"go.etcd.io/etcd/server/v3/etcdmain.startEtcdOrProxyV2\n\tgo.etcd.io/etcd/server/v3/etcdmain/etcd.go:204\ngo.etcd.io/etcd/server/v3/etcdmain.Main\n\tgo.etcd.io/etcd/server/v3/etcdmain/main.go:40\nmain.main\n\tgo.etcd.io/etcd/server/v3/main.go:32\nruntime.main\n\truntime/proc.go:225
|
You need to stop the etcd service, then delete the wal file under the etcd data directory; then remove this node from the cluster and rejoin it; then start the etcd service again.
13.2 First node cannot join the cluster normally after its data is cleared
You need to copy the following configurations from the other nodes to the first node, so it does not initialize as a new cluster.
1
2
| - --initial-cluster=master-01=https://10.0.0.1:2380,master-02=https://10.0.0.2:2380,master-03=https://10.0.0.3:2380
- --initial-cluster-state=existing
|
14. Optimizing Parameter Configuration
- Increase the snapshot interval
The default is –snapshot-count=10000; it is recommended to change it to 100000.
1
| - --snapshot-count=100000
|
- Loosen the timeouts to avoid frequent leader elections
1
2
| - --election-timeout=5000
- --heartbeat-interval=500
|
Automatically frees the space of expired key-value pairs, preventing the etcd database file (db file) from growing without shrinking, which would consume disk space too quickly and degrade query performance.
1
| - --auto-compaction-retention=1
|
15. Monitoring Metrics
- WAL log fsync latency exceeds the threshold (P99 > 10ms)
histogram_quantile(0.99, sum(rate(etcd_disk_wal_fsync_duration_seconds_bucket[5m])) by (le, instance)) > 0.01
- DB backend commit latency exceeds the threshold (P99 > 20ms)
histogram_quantile(0.99, sum(rate(etcd_disk_backend_commit_duration_seconds_bucket[5m])) by (le, instance)) > 0.02
- Slow operations surge (slow operations per second > 5)
sum(rate(etcd_server_slow_operations_total[5m])) by (instance) > 5
- Too many queued proposals (steadily piling up > 10)
etcd_server_proposals_pending > 10
- High proposal failure rate (failures per second > 1)
sum(rate(etcd_server_proposals_failed_total[5m])) by (instance) > 1
- The cluster has no Leader
etcd_server_has_leader == 0
- Frequent Leader changes (leader switches > 3 within 15 minutes)
sum(increase(etcd_server_leader_changes_seen_total[15m])) by (instance) > 3
- Raft heartbeat send failures (failures increasing by more than 10 per minute)
sum(increase(etcd_server_heartbeat_send_failures_total[1m])) by (instance) > 10
16. References
