KubeSphere DevOps consists of two parts: S2I and Pipeline. In the community, OpenShift provides an application packaging tool called S2I; for details, see Building Cloud-Native Applications with S2I
. KubeSphere turned it into a service, using a CRD managed by a separate Operator, and its functionality is fairly self-contained. In 3.0, however, Pipeline is still tightly coupled with KubeSphere Core, which makes setting up an environment and debugging it somewhat complex. This post is mainly a guide for developers maintaining and doing secondary development on KubeSphere DevOps 3.0.
1. DevOps Pipeline Architecture
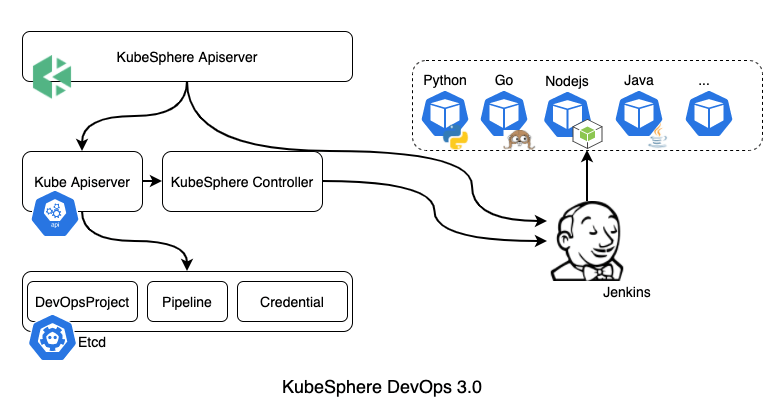
The diagram below shows the overall architecture of the pipeline:
1.1 Storage Model
| Product Concept | Kubernetes Object | Jenkins Object |
|---|---|---|
| DevOps Project | DevopsProject | Folder |
| Pipeline | Pipeline | Pipeline/Multibranch Pipeline |
| Credential | Credential | Credentials under a folder |
1.2 Data Flow
Two categories are mainly involved: one is create-type operations, and the other is trigger-type operations.
Create-type operations mainly cover the creation of three CRD types: DevopsProject, Pipeline, and Credential. Through the frontend, the user calls the ks-apiserver API to create the corresponding resources, which are stored in Etcd; then ks-controller-manager continuously syncs these objects to Jenkins.
Trigger-type operations are mainly instantaneous actions such as executing or reviewing a pipeline. Through the frontend, the user calls ks-apiserver, which performs data transformation and calls the Jenkins API directly.
2. Components Related to the DevOps Pipeline
2.1 System Core Components
- ks-apiserver
ks-apiserver is the API entry point for accessing services. In 3.0, ks-apigateway and ks-account were merged into ks-apiserver. As a result, ks-apiserver carries the functionality of these two components.
- ks-controller-manager
In 3.0, DevOps is still tightly coupled with the KubeSphere Core codebase, and there is no separate Operator running to handle the related CRD resources. All processing of DevOps CRD resources takes place in ks-controller-manager.
2.2 Jenkins Pipeline
- ks-jenkins
Jenkins is installed and maintained using Helm; the related configuration can be found in the ks-installer repository on GitHub.
The Jenkins image used is the official one, with no customization.
- uc-jenkins-update-center
uc is the service that provides Jenkins plugin downloads. There are two reasons uc is needed: on the one hand, to adapt to offline environments and because downloads from the official online address are slow; on the other hand, because there are self-developed plugins that need to be integrated.
What uc provides is just an Nginx download service, and the related image contents exist only to store Jenkins plugins.
3. How to Set Up a Pipeline Development Environment
3.1 Install the Basic Git, Go, and Kubebuilder Environment Locally
This will not be described in detail here; OS X is used as the example.
- Install Git
| |
Check the version
| |
- Install Golang
| |
Check the version
| |
- Install Kubebuilder
| |
Check the version
| |
3.2 Install and Configure Local Access
- Install a Kubernetes cluster
The recommended installation tool is Kubekey. Today’s mainstream cluster installation tools are secondary wrappers around Kubeadm. Kubekey’s advantage is that installation is fast in China and configuration is simple. What takes half an hour with Kubeadm, Kubekey solves in two minutes, and it also integrates quite a few plugins. This also fits the idea I advocate: document your skills, tool your documentation, productize your tools, and service your products.
During installation, one parameter needs attention.
| |
Since kube-apiserver communicates over https, the domain here is written into certSANs to generate the certificate. Only access via an address in certSANs is legitimate.
- Configure hosts in the development environment
After completing the Kubernetes cluster installation, configure hosts in the development environment, and you can then remotely access kube-apiserver directly via the domain. Below is my local /etc/hosts configuration, with three clusters in total:
| |
- Configure kubeconfig in the development environment
To keep it simple, you can just copy the file from the server and save it locally. Here is a script that can quickly switch between multiple environments. Note that you should replace your_password with your remote login password.
| |
To use it, run on_k8s k1 to switch to the k1 environment, or on_k8s k2 to switch to the k2 environment.
- Verify that the configuration succeeded
| |
3.3 Clone the KubeSphere Repository Code
Star & fork the GitHub project kubesphere/kubesphere . For the Git commit workflow, refer to the documentation: A Complete Git Submission Process .
- Clone the code
| |
- Enter the project directory
| |
3.4 Configure the Webhook Certificate
Run the following commands to generate the certificate in the $TMPDIR directory.
| |
| |
3.5 Configure kubesphere.yaml
- In the project root directory, add a kubesphere.yaml file.
| |
Here I use the remote environment’s access address directly, which is more efficient than using telepresence to access via the cluster service address. The relevant configuration values in kubesphere.yaml can be obtained from the output of kubectl get cm kubesphere-config -n kubesphere-system -o yaml, and pasted into the development environment.
It is worth noting that 3.0 uses an external Sonarqube, so it needs to be configured separately according to the official documentation. The kubeconfig field points to the kubeconfig file path in the development environment, whereas the online environment uses a serviceaccount. S2I relies on the S3 service to store binary files; the pipeline does not need S3.
3.6 Run the Test Services Locally
- Run ks-apiserver
| |
After the service starts, it prints Start listening on :9090, which indicates that ks-apiserver is listening on port 9090 and can be accessed.
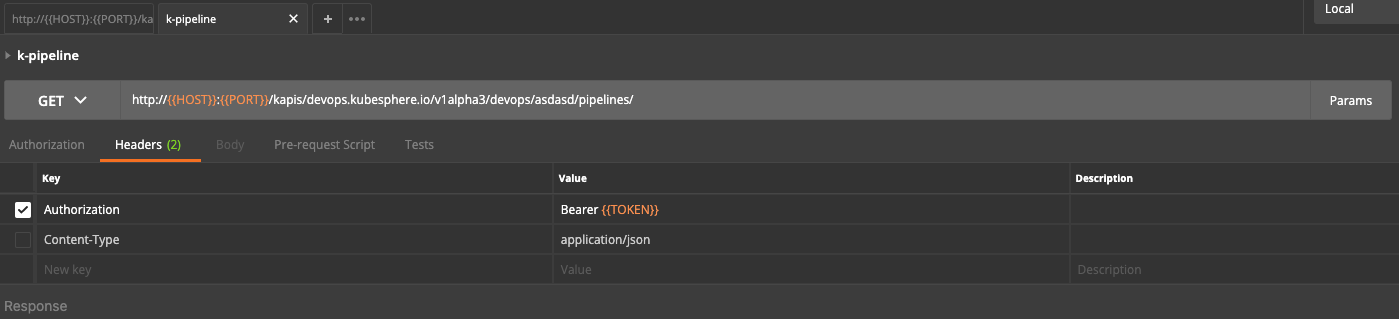
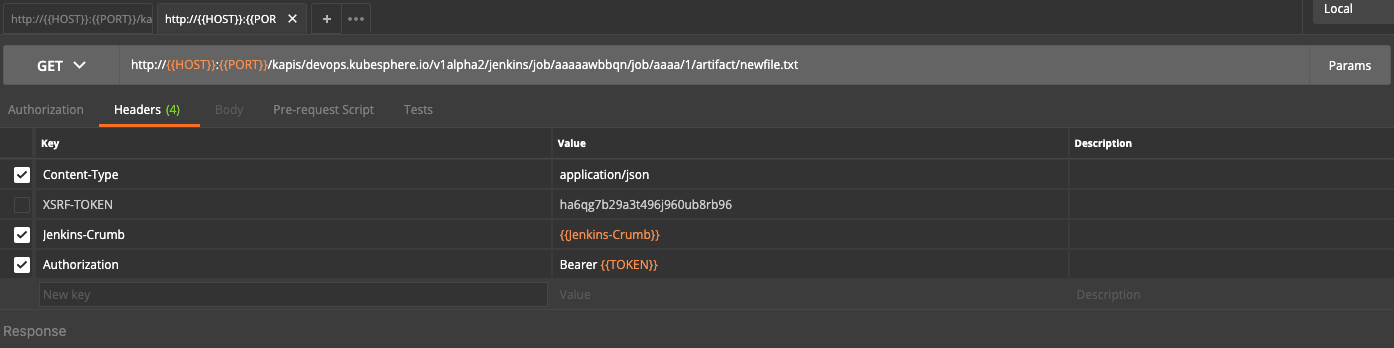
When accessing it through Postman, you need to include the cluster frontend Token; you can also use the permanent Token from kubesphere-config, or change mode to AlwaysAllow to turn off authentication.
In Postman you can define variables and reference them via {{ VAR_NAME }}, which is very convenient. Below are examples of two kinds of API calls:
One is the CRUD of CRD resources, which just needs the Token.
The other is pass-through to the Jenkins API, which needs not only the Token but also the Jenkins Crumb. When accessing through the page, these parameters are all available in the Cookies.
- Run ks-controller-manager
To avoid interference, first pause the ks-controller-manager in the cluster.
| |
Run ks-controller-manager locally
| |
4. How to Release to a Cluster Environment
It is recommended to change the imagePullPolicy of the relevant services to Always, ensuring that the latest image is used every time.
4.1 Update Plugins
Set up the following directory structure:
| |
Dockerfile contents
FROM busybox:1.29.3

COPY webroot/ /webroot/
For the contents of webroot, you can first run docker run -it -d kubesphere/jenkins-uc:v3.0.0 to get the container ID, then use the docker cp {UC_ContainerID}:/webroot ./ command to copy the plugins, and freely replace, add, or remove the offline plugins among them.
Finally, package with the docker build . -t shaowenchen/jenkins-uc:latest command and push the image. Then run the command kubectl -n kubesphere-devops-system edit deploy uc-jenkins-update-center, change the uc service image to shaowenchen/jenkins-uc:latest, and restart the deploy.
Note that Jenkins only accesses uc to fetch plugins during its first initialization. The initial plugin list can be viewed in kubectl -n kubesphere-devops-system get cm ks-jenkins -o yaml.
4.2 Update ks-apiserver or ks-controller-manger
- Compile ks-apiserver
| |
- Build and push the ks-apiserver image
docker build -f build/ks-apiserver/Dockerfile -t shaowenchen/ks-apiserver:latest .
docker push shaowenchen/ks-apiserver:latest
- Update the ks-apiserver service
Run the command and update the image to shaowenchen/ks-apiserver:latest.
| |
- Compile ks-controller-manager
| |
- Build and push the ks-controller-manager image
docker build -f build/ks-controller-manager/Dockerfile -t shaowenchen/ks-controller-manager:latest .
docker push shaowenchen/ks-controller-manager:latest
- Update the ks-controller-manger service
Run the command and update the image to shaowenchen/ks-controller-manager:latest.
| |
5. About the Authentication Plugin
The kubesphere-token-auth-plugin exists mainly to integrate KubeSphere’s permission system and keep Jenkins consistent with it. As shown below, whether it is a CRD resource type or a trigger action type, when calling Jenkins it must go through ks-apiserver for token review.
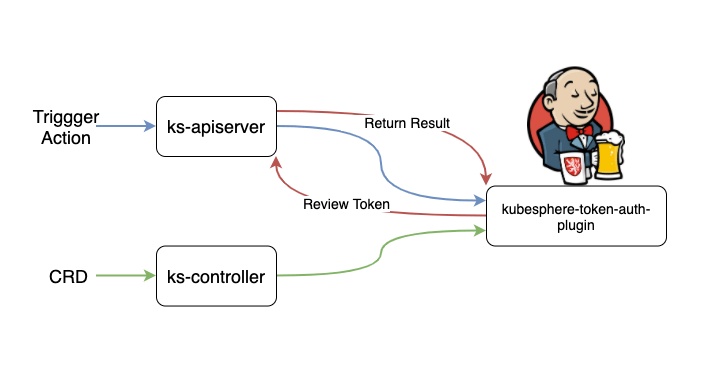
In KubeSphere, the Token is of bearer type, but the plugin is an extension based on Basic authentication, so a conversion is required. The code is as follows:
| |
The logic in the plugin is mainly to call the ks-apiserver authentication API, which returns a legitimate user.
6. Backend Code Structure and Logic
6.1 Code Directory
The code paths use https://github.com/kubesphere/kubesphere/tree/release-3.0 as the example.
- pkg/apiserver/apiserver.go
All the APIs exposed externally by ks-apiserver must be registered here, along with their GVR configuration, etc.
- pkg/kapis/devops
KubeSphere provides APIs with the /kapis prefix; here each URL also needs a more detailed description and handling, which usually calls many function methods in models. The API documentation is also described here.
- pkg/models/devops
Operations on the data layer are aggregated in models. Many methods for operating on data are provided here.
- pkg/controller/devopscredential
The controller handling part for credential.
- pkg/controller/devopsproject
The controller handling part for devopsproject.
- pkg/controller/pipeline
The controller handling part for pipeline.
- pkg/simple/client/devops
The code above is relatively easy to understand; this part is somewhat harder. Its main function is to provide function methods for operating on Jenkins. During implementation, an Interface was abstracted, in the hope of being able to integrate with different orchestration tools.
Having briefly described the code directories, it may still not be clear enough. Let’s look at the code together through the call logic below.
6.2 Code Logic for CRD Types
Take creating a DevOps project as an example.
The frontend calls /kapis/devops.kubesphere.io/v1alpha3/workspaces/liuxin-test/devops/ , passing parameters
The backend handles it at https://github.com/kubesphere/kubesphere/blob/release-3.0/pkg/kapis/devops/v1alpha3/register.go#L154 , writing to Etcd through the generated client
ks-controller-manager handles it at https://github.com/kubesphere/kubesphere/blob/release-3.0/pkg/controller/devopsproject/devopsproject_controller.go#L205 ; running this step by step lets you trace the entire chain. Ultimately it calls the interface in pkg/simple/client/devops to create a folder in Jenkins.
6.3 Code Logic for Trigger Types
Take triggering a code scan as an example.
The frontend calls kapis/devops.kubesphere.io/v1alpha2/devops/test2-projectwvb2n/pipelines/test1-pipeline/scan/ , passing parameters
The backend handles it at https://github.com/kubesphere/kubesphere/blob/release-3.0/pkg/kapis/devops/v1alpha2/register.go#L479 ; here ks-controller-manager is not needed. Running it step by step for debugging reveals that it still enters pkg/simple/client/devops and then assembles xml to call the Jenkins API .
7. Frontend Code Structure and Logic
The frontend code structure is clear and very intuitive, and the file names correspond to the pages. The explanation below uses the repository at https://github.com/kubesphere/console/tree/release-3.0 as an example. In addition, the frontend uses the React framework.
7.1 Code Directory
The main logic is all in the src/pages/devops directory.
- components
Pipeline-related components. Public components for the entire project are in src/components.
- containers
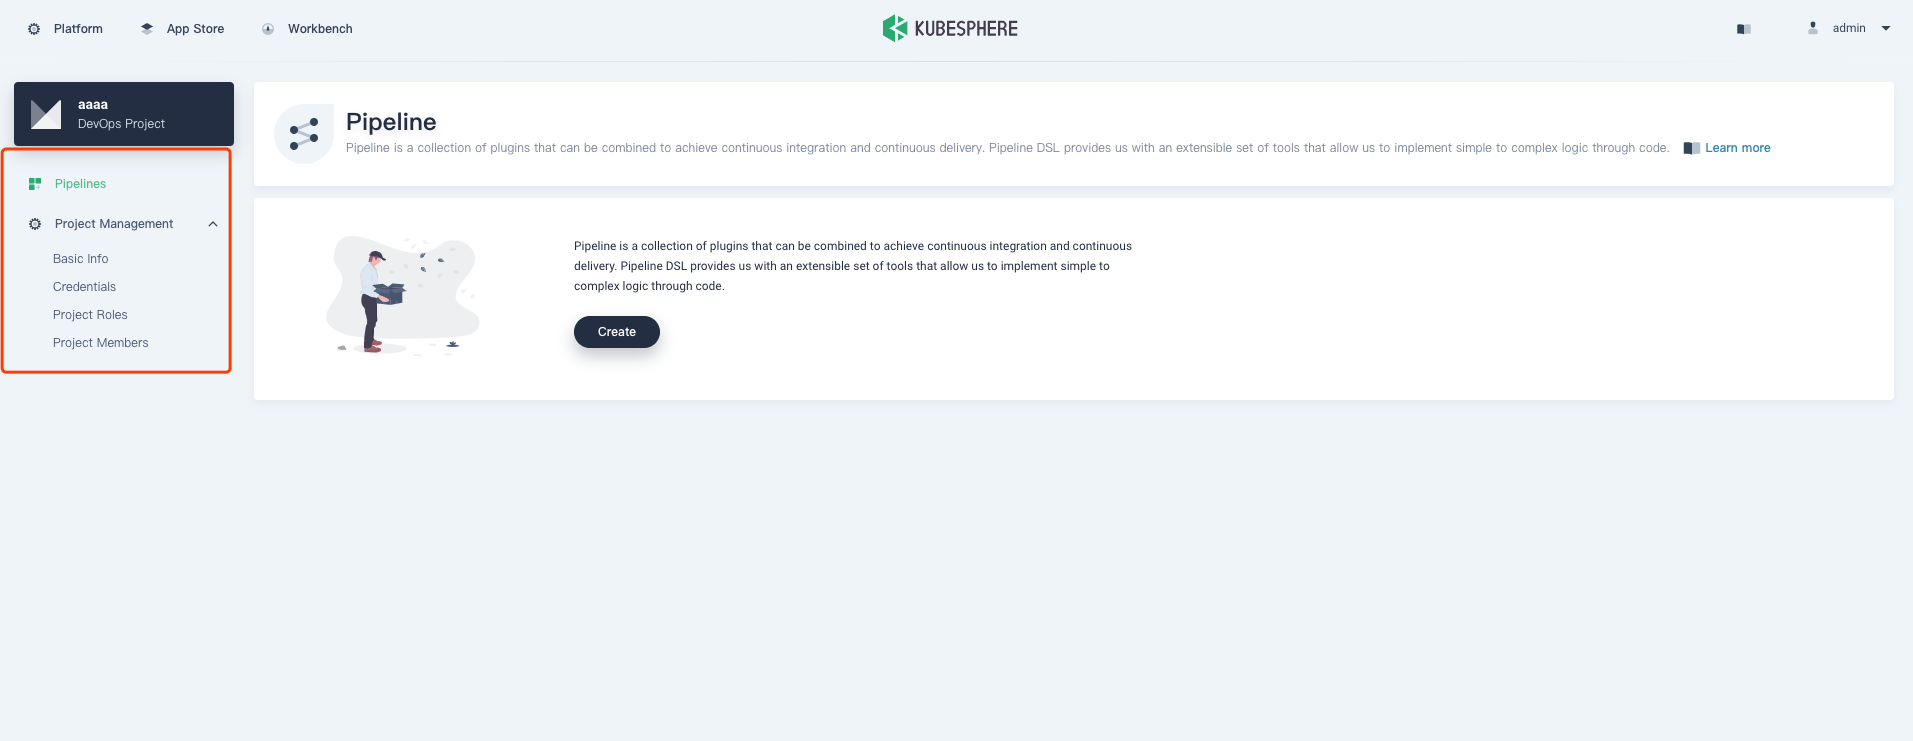
Corresponds to the pipeline-related pages. As shown below, the tabs on the left correspond one to one with the file names in the folder, including the graphical pipeline editing page.
- routes
Routing configuration for the single-page application.
7.2 Environment Setup
Please refer to the documentation of https://github.com/kubesphere/console .
