In a PD disaggregated deployment, heterogeneous GPU models are often used to deploy the model across machines, which multiplies the cross-machine communication pressure. RDMA devices are usually brought in to accelerate kvcache transfer between nodes so as to achieve a lower FTTL. This post describes how to test eRDMA devices and deploy a PD disaggregation application.
1. Driver
1.1 Installing the Driver
1
2
3
4
5
6
| apt-get update -y
apt-get install -y pkg-config
wget http://mirrors.aliyun.com/erdma/kernel-fix/deb/MLNX_OFED_SRC-debian-24.10-3.2.5.0.tgz
tar -xvf MLNX_OFED_SRC-debian-24.10-3.2.5.0.tgz && cd MLNX_OFED_SRC-24.10-3.2.5.0 && curl -O http://mirrors.aliyun.com/erdma/kernel-fix/deb/ofed_debian.conf
rm -rf SOURCES/mlnx-ofed-kernel_24.10.OFED.24.10.3.2.5.1.orig.tar.gz
wget http://mirrors.aliyun.com/erdma/kernel-fix/deb/mlnx-ofed-kernel_24.10.egs.1.OFED.24.10.3.2.5.1.orig.tar.gz -O SOURCES/mlnx-ofed-kernel_24.10.egs.1.OFED.24.10.3.2.5.1.orig.tar.gz
|
If you are on ubuntu 22.04, run the following commands
1
2
| wget http://mirrors.aliyun.com/erdma/env_setup.sh
bash env_setup.sh --egs
|
If you are on ubuntu 24.04, run the following commands
1
2
| rm -rf /lib/modules/`uname -r`/updates/dkms/erdma.ko
curl -O http://mirrors.aliyun.com/erdma/env_setup.sh && bash env_setup.sh --url "http://mirrors.aliyun.com/erdma/erdma_installer-1.4.3.tar.gz"
|
1.2 Driver Mode
eRDMA has two kernel driver installation modes:
- Standard: standard mode, supports only RDMA_CM link establishment
RDMA_CM is used to manage the establishment, maintenance, and teardown of RDMA connections, and is commonly used in scenarios such as MPI, SMC-R, and PolarDB SCC
- Compat: compatibility mode, supports both RDMA_CM and OOB link establishment.
It additionally occupies 16 TCP ports in the range 30608~30623, used by applications in OOB scenarios such as TensorFlow, NCCL, and BRPC
1
2
3
| sh -c "echo 'options erdma compat_mode=Y' >> /etc/modprobe.d/erdma.conf"
rmmod erdma
modprobe erdma compat_mode=Y
|
In standard mode, a speed test reports the error Failed to modify QP to RTS, Unable to Connect the HCA's through the link, so you need to switch to compatibility mode.
1
2
3
4
5
| ibv_devices
device node GUID
------ ----------------
erdma_0 02163efffe5233a9
|
1
2
3
| ls /dev/infiniband
rdma_cm uverbs0
|
1
| lsmod | egrep 'erdma|ib_core|rdma|mlx|iw'
|
 1
 2
 3
 4
 5
 6
 7
 8
 9
10
11
12
13
14
15
16
17
18
19
| ibv_devinfo
hca_id: erdma_0
transport: eRDMA (1)
fw_ver: 0.2.0
node_guid: 0216:3eff:fe52:33a9
sys_image_guid: 0216:3eff:fe52:33a9
vendor_id: 0x1ded
vendor_part_id: 4223
hw_ver: 0x0
phys_port_cnt: 1
port: 1
state: PORT_ACTIVE (4)
max_mtu: 4096 (5)
active_mtu: 4096 (5)
sm_lid: 0
port_lid: 0
port_lmc: 0x00
link_layer: Ethernet
|
PORT_ACTIVE means the port is active.
 1
 2
 3
 4
 5
 6
 7
 8
 9
10
11
12
13
14
15
16
17
18
19
20
21
22
23
24
25
26
27
28
29
30
31
32
33
34
35
36
37
38
39
40
41
42
43
44
45
46
47
48
49
50
51
52
53
54
55
56
57
58
59
60
61
62
63
64
65
66
67
68
69
70
71
72
73
74
75
76
77
78
79
80
81
82
83
84
85
86
87
88
89
| ibv_devinfo -d erdma_0 -v
hca_id: erdma_0
transport: eRDMA (1)
fw_ver: 0.2.0
node_guid: 0216:3eff:fe52:33a9
sys_image_guid: 0216:3eff:fe52:33a9
vendor_id: 0x1ded
vendor_part_id: 4223
hw_ver: 0x0
phys_port_cnt: 1
max_mr_size: 0x1000000000
page_size_cap: 0x7ffff000
max_qp: 15359
max_qp_wr: 8192
device_cap_flags: 0x00208000
MEM_MGT_EXTENSIONS
Unknown flags: 0x8000
max_sge: 1
max_sge_rd: 1
max_cq: 30719
max_cqe: 1048576
max_mr: 30720
max_pd: 131072
max_qp_rd_atom: 128
max_ee_rd_atom: 0
max_res_rd_atom: 1966080
max_qp_init_rd_atom: 128
max_ee_init_rd_atom: 0
atomic_cap: ATOMIC_GLOB (2)
max_ee: 0
max_rdd: 0
max_mw: 128
max_raw_ipv6_qp: 0
max_raw_ethy_qp: 0
max_mcast_grp: 0
max_mcast_qp_attach: 0
max_total_mcast_qp_attach: 0
max_ah: 0
max_fmr: 0
max_srq: 0
max_pkeys: 0
local_ca_ack_delay: 0
general_odp_caps:
rc_odp_caps:
NO SUPPORT
uc_odp_caps:
NO SUPPORT
ud_odp_caps:
NO SUPPORT
xrc_odp_caps:
NO SUPPORT
completion_timestamp_mask not supported
core clock not supported
device_cap_flags_ex: 0x208000
tso_caps:
max_tso: 0
rss_caps:
max_rwq_indirection_tables: 0
max_rwq_indirection_table_size: 0
rx_hash_function: 0x0
rx_hash_fields_mask: 0x0
max_wq_type_rq: 0
packet_pacing_caps:
qp_rate_limit_min: 0kbps
qp_rate_limit_max: 0kbps
tag matching not supported
num_comp_vectors: 16
port: 1
state: PORT_ACTIVE (4)
max_mtu: 4096 (5)
active_mtu: 4096 (5)
sm_lid: 0
port_lid: 0
port_lmc: 0x00
link_layer: Ethernet
max_msg_sz: 0xffffffff
port_cap_flags: 0x00090000
port_cap_flags2: 0x0000
max_vl_num: invalid value (0)
bad_pkey_cntr: 0x0
qkey_viol_cntr: 0x0
sm_sl: 0
pkey_tbl_len: 1
gid_tbl_len: 1
subnet_timeout: 0
init_type_reply: 0
active_width: 4X (2)
active_speed: 25.0 Gbps (32)
|
Here you can see that the eRDMA speed configured for a single card is 25.0 Gbps; the more cards, the faster the aggregate, until the upper limit is reached.
3.1 Speed Test
- Install the perftest tools
1
| apt install perftest -y
|
1
| ib_write_bw -d erdma_0 -F -q 16 --run_infinitely --report_gbits -p 18515
|
1
| ib_write_bw -d erdma_0 -F -q 16 --run_infinitely --report_gbits -p 18515 <server_ip>
|
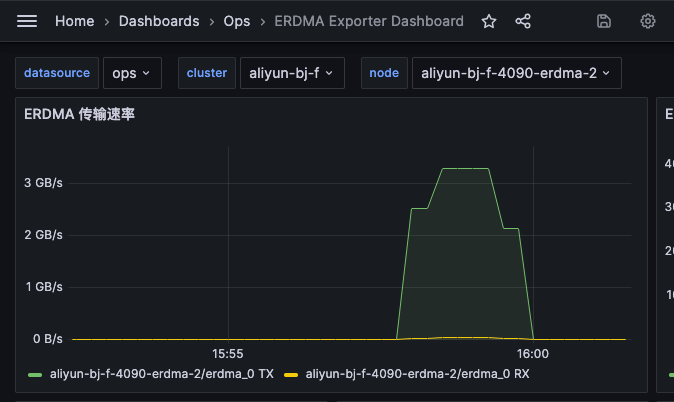
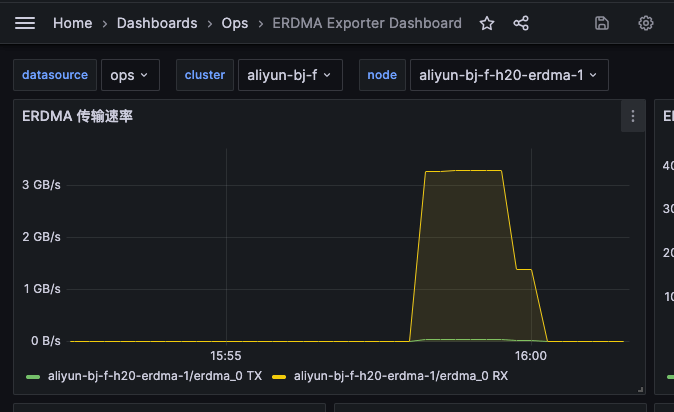
The nominal speed of eRDMA is 25.0 Gbps, and the measured speed is 3GB/s, close to the nominal speed.
3.2 Latency Test
R means use RDMA_CM to establish the connection; a means run the test across all message sizes, from 2 to 2^23 bytes; F means force overwrite of any existing connection.
1
| ib_write_lat -R -a -F <server_ip>
|
4. Observing eRDMA
1
| eadm stat -d erdma_0 -l
|
- Deploy the eRDMA exporter
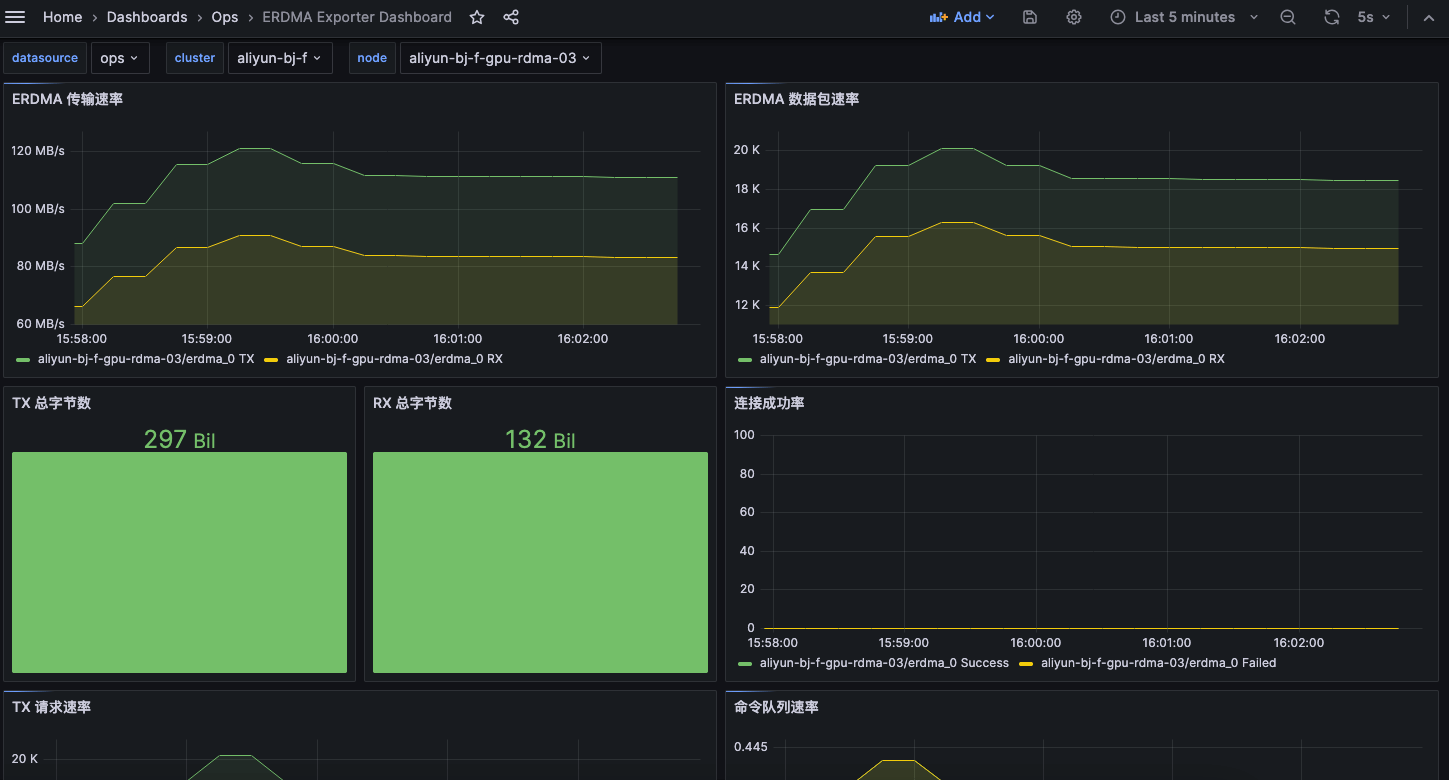
To be able to view eRDMA performance in charts, I wrote an eRDMA exporter, https://github.com/shaowenchen/erdma-exporter. Import the dashboard and you can view charts like this:
5. PD Application Testing
1
2
3
| apt install nfs-common -y
mkdir -p /data/models
mount -t nfs <nfs_ip>:/data/nfs /data/models
|
- Start the vLLM container environment
Run a vLLM container environment on the 4090 and on the h20 respectively, starting the container with nerdctl and mounting the model directory.
 1
 2
 3
 4
 5
 6
 7
 8
 9
10
11
12
13
| nerdctl run -it \
--security-opt apparmor=unconfined \
--security-opt seccomp=unconfined \
--gpus all \
--ipc=host \
--privileged --cap-add=SYS_ADMIN \
--ulimit memlock=-1 \
--ulimit stack=67108864 \
--name vllm \
--network=host \
--volume /data/models:/data/models \
--entrypoint /bin/bash \
vllm/vllm-openai:v0.10.1.1
|
- Install the user-space driver
1
2
3
4
| wget -qO - http://mirrors.aliyun.com/erdma/GPGKEY | sudo gpg --dearmour -o /etc/apt/trusted.gpg.d/erdma.gpg
echo "deb [ ] http://mirrors.aliyun.com/erdma/apt/ubuntu jammy/erdma main" | sudo tee /etc/apt/sources.list.d/erdma.list
apt update
apt install eadm libibverbs1 ibverbs-providers ibverbs-utils librdmacm1 -y
|
NIXL does not work, because it does not support UD link establishment; the official documentation uses Mooncake
1
| pip3 install vllm==0.11.0 lmcache==0.3.9 mooncake-transfer-engine==0.3.7 -i https://mirrors.aliyun.com/pypi/simple
|
1
2
3
4
| mooncake_master -port 50052 -max_threads 64 -metrics_port 9004 \
--enable_http_metadata_server=true \
--http_metadata_server_host=0.0.0.0 \
--http_metadata_server_port=8080
|
Then start another bash into the P node and run the following commands
 1
 2
 3
 4
 5
 6
 7
 8
 9
10
11
12
13
14
15
16
17
18
19
20
| cat > /mnt/mooncake-prefiller-config.yaml << 'EOF'
chunk_size: 256
remote_url: "mooncakestore://<4090-ip>:50052/"
remote_serde: "naive"
local_cpu: False
max_local_cpu_size: 1
extra_config:
local_hostname: "<4090-ip>"
metadata_server: "http://<4090-ip>:8080/metadata"
protocol: "rdma"
device_name: "erdma_0" # 多个RDMA设备可以通过逗号隔开
master_server_address: "<4090-ip>:50052"
global_segment_size: 524288000
local_buffer_size: 524288000
transfer_timeout: 1
save_chunk_meta: False
EOF
LMCACHE_CONFIG_FILE=/mnt/mooncake-prefiller-config.yaml vllm serve /data/models/Qwen2.5-7B-Instruct --tensor-parallel-size 1 --port 7100 --kv-transfer-config '{"kv_connector":"LMCacheConnectorV1","kv_role":"kv_producer"}'
|
 1
 2
 3
 4
 5
 6
 7
 8
 9
10
11
12
13
14
15
16
17
18
19
20
| cat > /mnt/mooncake-decoder-config.yaml << 'EOF'
chunk_size: 256
remote_url: "mooncakestore://<4090-ip>:50052/"
remote_serde: "naive"
local_cpu: False
max_local_cpu_size: 1
extra_config:
local_hostname: "<h20-ip>"
metadata_server: "http://<4090-ip>:8080/metadata"
protocol: "rdma"
device_name: "erdma_0"
master_server_address: "<4090-ip>:50052"
global_segment_size: 524288000
local_buffer_size: 524288000
transfer_timeout: 1
save_chunk_meta: False
EOF
LMCACHE_CONFIG_FILE=/mnt/mooncake-decoder-config.yaml vllm serve /data/models/Qwen2.5-7B-Instruct --tensor-parallel-size 1 --port 7200 --kv-transfer-config '{"kv_connector":"LMCacheConnectorV1","kv_role":"kv_consumer"}'
|
 1
 2
 3
 4
 5
 6
 7
 8
 9
10
11
12
| wget https://raw.githubusercontent.com/LMCache/LMCache/v0.3.9/examples/disagg_prefill/disagg_proxy_server.py
# 使用mooncake作为后端存储时需要注释掉脚本中一处KVCache就绪等待逻辑
# 找到以下两行:
# # Wait until decode node signals that kv is ready
# await wait_decode_kv_ready(req_id, num_tp_rank)
# 将第二行注释掉,改为:
# # await wait_decode_kv_ready(req_id, num_tp_rank)
# 目前这行是第 368 行
# 启动proxy server
python3 disagg_proxy_server.py --host localhost --port 9000 --prefiller-host <4090-ip> --prefiller-port 7100 --decoder-host <h20-ip> --decoder-port 7200
|
1
2
3
4
5
6
7
8
9
| vllm bench serve --port 9000 \
--model /data/models/Qwen2.5-7B-Instruct \
--dataset-name random \
--random-input-len 512 \
--random-output-len 4096 \
--random-range-ratio 0.2 \
--request-rate inf \
--max-concurrency 32 \
--num-prompts 1000
|
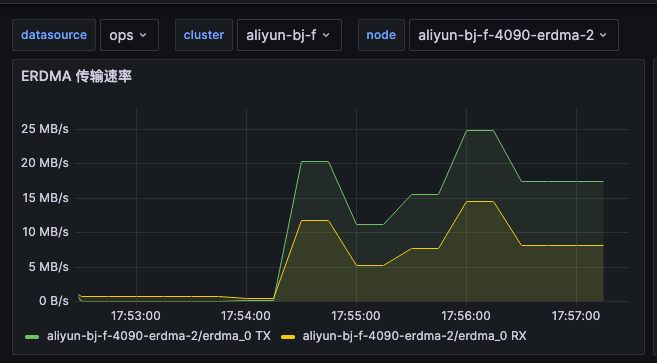
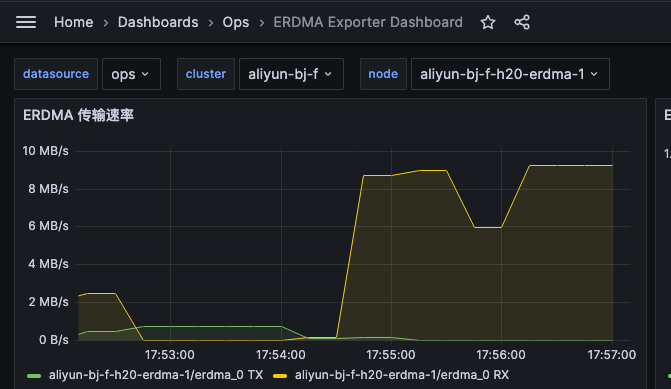
The prefill node is mainly sending, and the decoder node is mainly receiving.
6. References
