1. Storage Options
There are three storage approaches:
- Isolate by directory and share a single JuiceFS
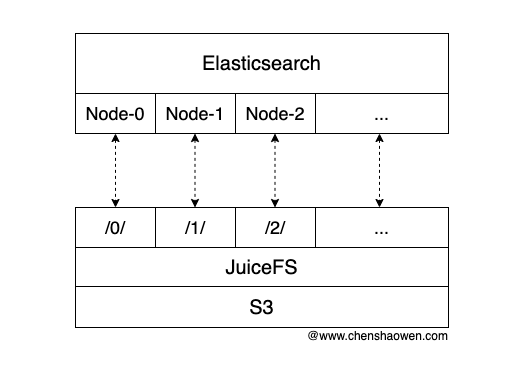
Elasticsearch nodes share one JuiceFS instance, mounting different Elasticsearch nodes through subdirectories.
/0/ corresponds to node Node-0
/1/ corresponds to node Node-1
/2/ corresponds to node Node-2
The main advantage of this approach is that it is easy to scale and simple to configure.
- Isolate node data with JuiceFS
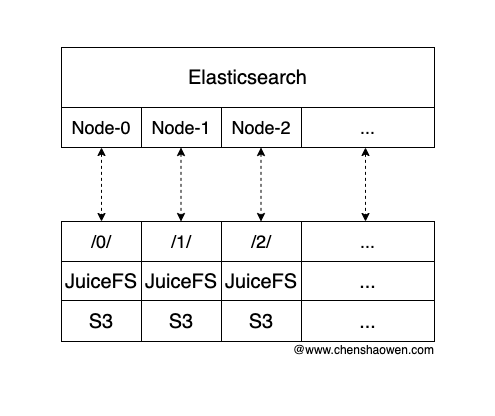
Every Elasticsearch node connects to an independent JuiceFS instance, so each node has its own storage backend.
Bucket-0 corresponds to node Node-0
Bucket-1 corresponds to node Node-1
Bucket-2 corresponds to node Node-2
The main advantage of this approach is higher reliability and better performance.
- Combine with SSD for hot/cold data separation
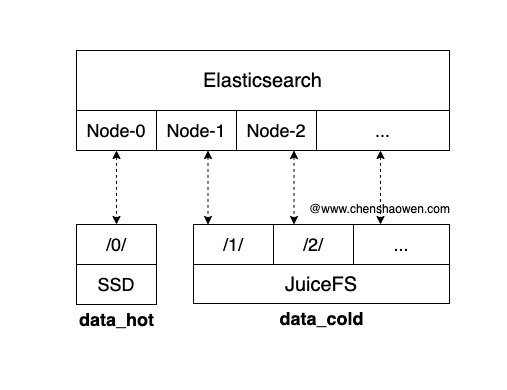
JuiceFS does not match SSD in performance, so a hybrid approach — hot data on SSD, cold data on JuiceFS — is also a good choice.
The main advantage of this approach is that it balances cost and performance, but operations become more complex.
The current business requirement is to use Elasticsearch to query warm and cold data. The data volume is fairly large, reaching 10 TB of text data, and a 10-second API response time is acceptable, so the directory-isolation approach was adopted.
2. Creating the PVC That Elasticsearch Needs
2.1. Setting Environment Variables
- Set the bucket information
1
2
3
4
5
6
| export ACCESS_KEY=xxx
export SECRET_KEY=xxx
export BUCKET=xxx
export ENDPOINT=ks3-cn-beijing-internal.ksyun.com
export BUCKET_ENPOINT=$BUCKET.$ENDPOINT
export PROVIDER=ks3
|
1
2
| export REDIS_PASSWORD=xxx
export REDIS_ENDPOINT=x.x.x.x:6379/0
|
- Set the Elasticsearch PVC
1
2
| export NAMESPACE=xxx
export PVC_NAME=elasticsearch-data-es-jfs-test-es-default-0
|
Note here that PVC_NAME is generated by the ECK Operator from the Elasticsearch name. The Elasticsearch instance created here is named es-jfs-test, so PVC_NAME is elasticsearch-data-es-jfs-test-es-default-0, which represents the storage volume of the first node.
1
2
3
4
5
| juicefs format \
--storage $PROVIDER \
--bucket $BUCKET_ENPOINT \
redis://:$REDIS_PASSWORD@$REDIS_ENDPOINT \
es-jfs-test
|
2.3 Creating the PVC
 1
 2
 3
 4
 5
 6
 7
 8
 9
10
11
12
13
14
15
16
17
18
19
20
21
22
23
24
25
26
27
28
29
30
31
32
| kubectl apply -f - <<EOF
apiVersion: data.fluid.io/v1alpha1
kind: Dataset
metadata:
name: $PVC_NAME
namespace: $NAMESPACE
spec:
accessModes:
- ReadWriteMany
mounts:
- name: es-jfs-test
mountPoint: "juicefs://0/"
options:
bucket: $BUCKET_ENPOINT
storage: $PROVIDER
encryptOptions:
- name: metaurl
valueFrom:
secretKeyRef:
name: es-jfs-test
key: metaurl
- name: access-key
valueFrom:
secretKeyRef:
name: es-jfs-test
key: access-key
- name: secret-key
valueFrom:
secretKeyRef:
name: es-jfs-test
key: secret-key
EOF
|
Note that the MountPoint format is juicefs://0/, which means the first node. When creating the second node, it should be changed to juicefs://1/.
 1
 2
 3
 4
 5
 6
 7
 8
 9
10
11
12
13
14
15
16
17
18
19
20
21
22
23
24
25
26
| kubectl apply -f - <<EOF
apiVersion: data.fluid.io/v1alpha1
kind: JuiceFSRuntime
metadata:
name: $PVC_NAME
namespace: $NAMESPACE
spec:
replicas: 1
juicefsVersion:
image: juicedata/juicefs-fuse
imageTag: ce-v1.1.0
fuse:
image: juicedata/juicefs-fuse
imageTag: ce-v1.1.0
cleanPolicy: OnDemand
worker:
resources:
limits:
cpu: 15
memory: 200Gi
tieredstore:
levels:
- mediumtype: SSD
path: /cache
quota: 40960 # 40GiB
EOF
|
Creating a test Pod is not just to verify that the PVC can be mounted correctly, but also to bring the PVC into the Bound state ahead of time, so that Elasticsearch does not create the PVC again.
 1
 2
 3
 4
 5
 6
 7
 8
 9
10
11
12
13
14
15
16
17
18
| kubectl apply -f - <<EOF
apiVersion: v1
kind: Pod
metadata:
name: $PVC_NAME
namespace: $NAMESPACE
spec:
containers:
- name: demo
image: shaowenchen/demo:ubuntu
volumeMounts:
- mountPath: /data/jfs
name: data
volumes:
- name: data
persistentVolumeClaim:
claimName: $PVC_NAME
EOF
|
Reference Creating a PVC backed by JuiceFS in Kubernetes
3. Deploying Elasticsearch
Below is a simplified deployment procedure.
3.1 Installing the ECK Operator
Because the latest version of the ECK Operator does not support Kubernetes v1.26.9, the version installed here is ECK Operator v2.11.1.
1
| kubectl create -f https://raw.githubusercontent.com/shaowenchen/ops-hub/master/observation/v2.11.1-eck-crds.yaml
|
1
| kubectl apply -f https://raw.githubusercontent.com/shaowenchen/ops-hub/master/observation/v2.11.1-eck-operator.yaml
|
3.2 Deploying the Elasticsearch Instance
Note that count here is set to 1, meaning there is only one node. If you need to use multiple nodes, you must create the corresponding PVCs in advance and make sure they are in the Bound state.
 1
 2
 3
 4
 5
 6
 7
 8
 9
10
11
12
13
14
15
16
17
18
19
20
21
22
23
24
25
26
27
28
29
30
31
32
33
34
35
36
37
38
39
40
41
42
43
44
45
46
47
48
| cat <<EOF | kubectl apply -f -
apiVersion: elasticsearch.k8s.elastic.co/v1
kind: Elasticsearch
metadata:
namespace: data-center
name: es-jfs-test
spec:
version: 8.3.2
image: elasticsearch:8.3.2
http:
tls:
selfSignedCertificate:
disabled: true
nodeSets:
- name: default
count: 3
config:
node.store.allow_mmap: false
podTemplate:
spec:
initContainers:
- name: sysctl
securityContext:
privileged: true
runAsUser: 0
command: ['sh', '-c', 'sysctl -w vm.max_map_count=262144']
- name: install-plugins
command:
- sh
- -c
- |
bin/elasticsearch-plugin install --batch https://get.infini.cloud/elasticsearch/analysis-ik/8.3.2
securityContext:
runAsUser: 0
runAsGroup: 0
containers:
- name: elasticsearch
env:
- name: "ES_JAVA_OPTS"
value: "-Xms30g -Xmx30g"
resources:
requests:
cpu: 10
memory: 20Gi
limits:
cpu: 50
memory: 500Gi
EOF
|
3.3 Viewing the Elasticsearch Password
1
2
3
| kubectl -n $NAMESPACE get secret es-jfs-test-es-elastic-user -o go-template='{{.data.elastic | base64decode}}'
xxx
|
The default username is elastic
4. Deploying Metricbeat
To be able to see Elasticsearch metric data in Kibana, Metricbeat needs to be deployed.
 1
 2
 3
 4
 5
 6
 7
 8
 9
10
11
12
13
14
15
16
17
18
19
20
21
22
23
24
25
26
27
28
29
30
31
32
33
34
35
36
| kubectl apply -f - <<EOF
apiVersion: beat.k8s.elastic.co/v1beta1
kind: Beat
metadata:
name: es-jfs-test
namespace: $NAMESPACE
spec:
type: metricbeat
version: 8.3.2
elasticsearchRef:
name: es-jfs-test
config:
metricbeat:
autodiscover:
providers:
- type: kubernetes
scope: cluster
hints.enabled: true
templates:
- config:
- module: kubernetes
metricsets:
- event
period: 10s
processors:
- add_cloud_metadata: {}
logging.json: true
deployment:
podTemplate:
spec:
serviceAccountName: metricbeat
automountServiceAccountToken: true
# required to read /etc/beat.yml
securityContext:
runAsUser: 0
EOF
|
 1
 2
 3
 4
 5
 6
 7
 8
 9
10
11
12
13
14
15
16
17
18
19
20
21
22
23
24
25
26
27
28
29
30
31
32
33
34
35
36
37
38
| kubectl apply -f - <<EOF
apiVersion: rbac.authorization.k8s.io/v1
kind: ClusterRole
metadata:
name: metricbeat
rules:
- apiGroups: [""]
resources:
- nodes
- namespaces
- events
- pods
verbs: ["get", "list", "watch"]
- apiGroups: ["batch"]
resources:
- jobs
verbs: ["get", "list", "watch"]
- apiGroups: ["extensions"]
resources:
- replicasets
verbs: ["get", "list", "watch"]
- apiGroups: ["apps"]
resources:
- statefulsets
- deployments
- replicasets
verbs: ["get", "list", "watch"]
- apiGroups:
- ""
resources:
- nodes/stats
verbs:
- get
- nonResourceURLs:
- /metrics
verbs:
- get
EOF
|
1
2
3
4
5
6
7
| kubectl apply -f - <<EOF
apiVersion: v1
kind: ServiceAccount
metadata:
name: metricbeat
namespace: $NAMESPACE
EOF
|
 1
 2
 3
 4
 5
 6
 7
 8
 9
10
11
12
13
14
| kubectl apply -f - <<EOF
apiVersion: rbac.authorization.k8s.io/v1
kind: ClusterRoleBinding
metadata:
name: metricbeat
subjects:
- kind: ServiceAccount
name: metricbeat
namespace: $NAMESPACE
roleRef:
kind: ClusterRole
name: metricbeat
apiGroup: rbac.authorization.k8s.io
EOF
|
5. Deploying Kibana
 1
 2
 3
 4
 5
 6
 7
 8
 9
10
11
12
13
14
15
16
17
| cat <<EOF | kubectl apply -f -
apiVersion: kibana.k8s.elastic.co/v1
kind: Kibana
metadata:
namespace: $NAMESPACE
name: es-jfs-test
spec:
version: 8.3.2
count: 1
image: elastic/kibana:8.3.2
elasticsearchRef:
name: es-jfs-test
http:
tls:
selfSignedCertificate:
disabled: true
EOF
|
Edit the Kibana Service and change the type to NodePort.
1
| kubectl -n $NAMESPACE edit svc es-jfs-test-kb-http
|
You can now log in to Kibana with the password of the elastic user above.
6. Inspecting the JuiceFS File Directory
To get an intuitive look at Elasticsearch’s file directory, I mounted the JuiceFS above on a test host for verification.
- Mount JuiceFS on the test host
1
2
3
4
5
6
| juicefs mount -d \
--storage $PROVIDER \
--bucket $BUCKET_ENPOINT \
redis://:$REDIS_PASSWORD@$REDIS_ENDPOINT \
es-jfs-test \
/data/ops/es-jfs-test
|
- View the directory structure
 1
 2
 3
 4
 5
 6
 7
 8
 9
10
11
12
13
14
15
16
17
18
19
20
21
22
23
24
| tree -L 2
.
├── 0
│ ├── indices
│ ├── mytest
│ ├── node.lock
│ ├── nodes
│ ├── snapshot_cache
│ ├── _state
│ └── test
├── 1
│ ├── indices
│ ├── node.lock
│ ├── nodes
│ ├── snapshot_cache
│ └── _state
└── 2
├── indices
├── node.lock
├── nodes
├── snapshot_cache
└── _state
12 directories, 8 files
|
After the deployment was complete, the business side started importing data for testing.
7. Summary
AI-related machines have very high CPU and memory specifications, but people usually only pay attention to the utilization of the GPU and NPU compute cards. This leads to very low CPU and memory utilization on AI compute machines.
Recently there was a business requirement to query large volumes of corpus data after tokenization with Elasticsearch, but the team was very cost-sensitive and unwilling to use SSD as the data storage for Elasticsearch.
This post mainly records the process of connecting Elasticsearch to JuiceFS storage, in the hope that it helps everyone get up and running quickly.
8. References
https://github.com/elastic/cloud-on-k8s/tree/2.11
https://www.elastic.co/guide/en/cloud-on-k8s/2.11/k8s-quickstart.html
