1. What SR-IOV Technology Is
SR-IOV (Single Root I/O Virtualization) is a virtualization technology that lets virtual machines and containers access physical hardware resources directly, improving I/O performance and reducing host CPU consumption.
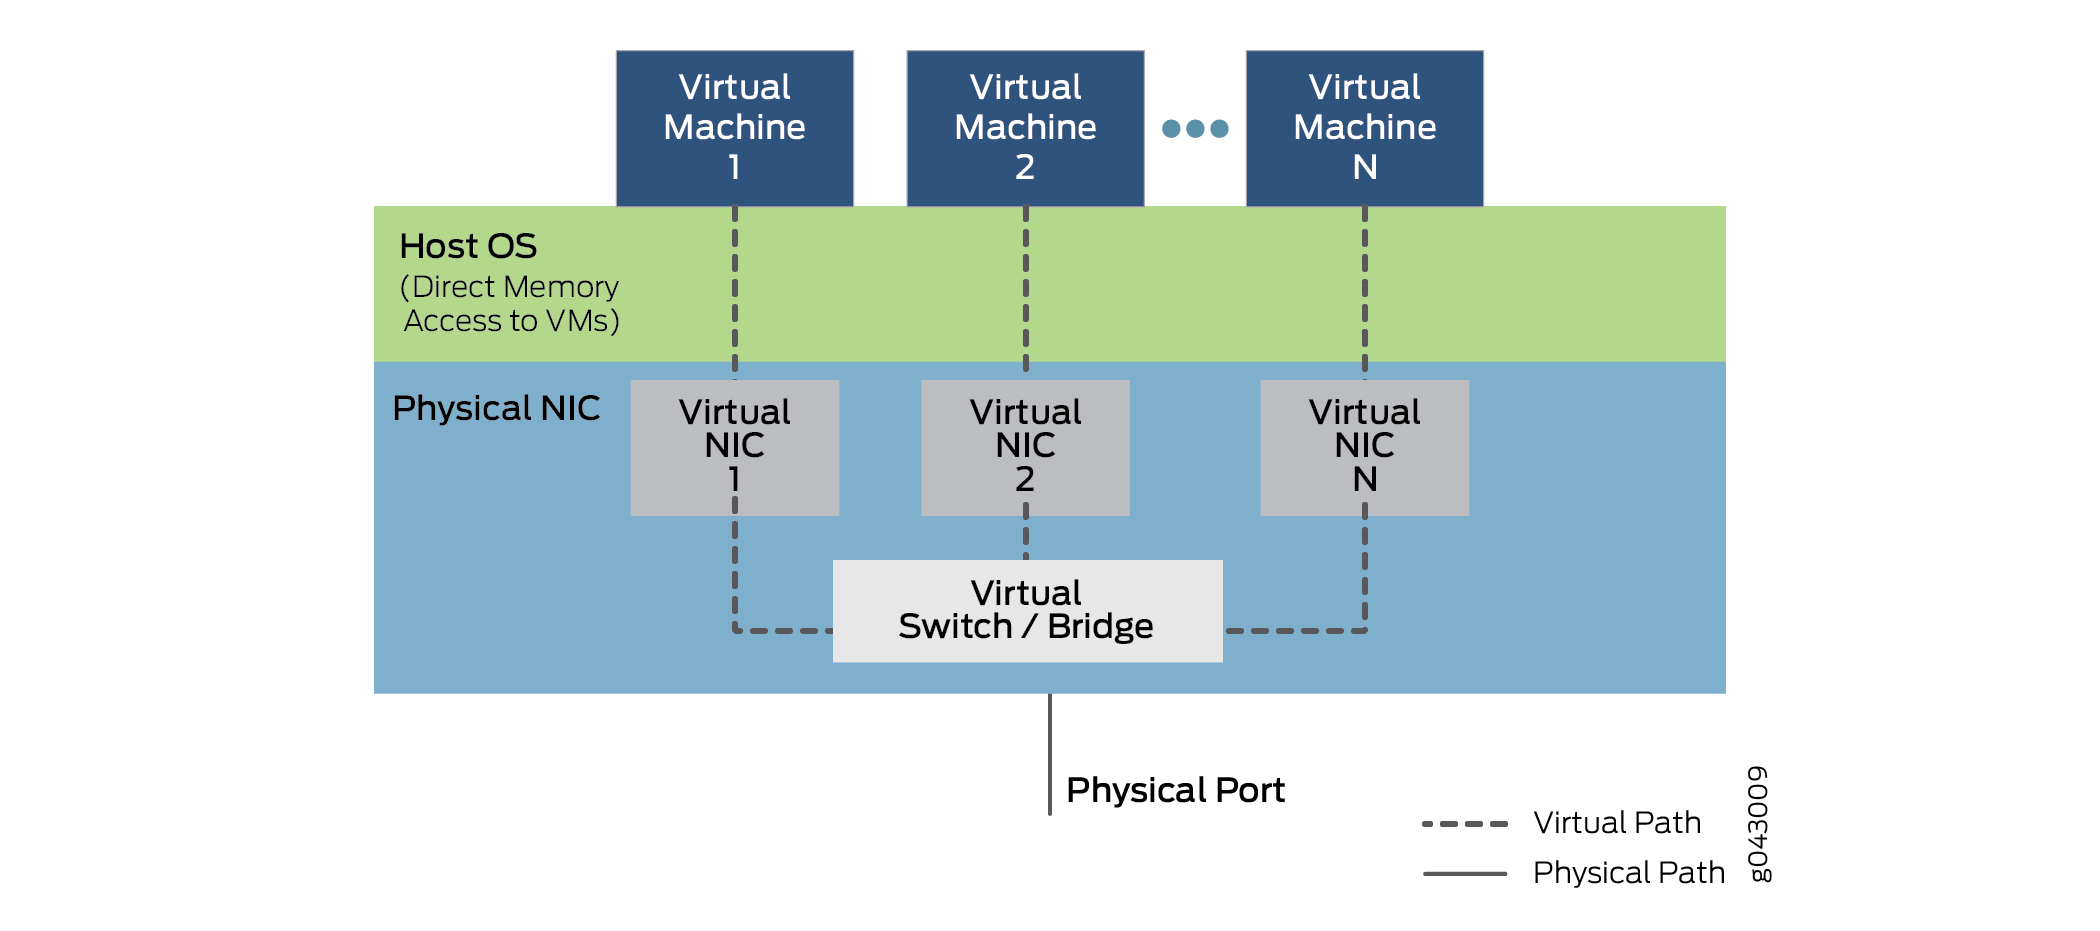
As shown in the figure above, SR-IOV partitions a single physical device (for example a network interface card, NIC) into multiple Virtual Functions (VFs). Each VF can be assigned to a different virtual machine or container and used like an independent device.
2. Enabling SR-IOV Software and Hardware Support
Press Del, F2, or a similar key at boot to enter the BIOS setup screen; the relevant configuration is usually under Advanced \ System Configuration \ Virtualization.
VT-d is directed I/O virtualization, commonly known as virtualization passthrough. It allows the host to hand jurisdiction over certain hardware resources (such as disks, graphics cards, and NICs) directly to a virtual machine.
SR-IOV (Single Root I/O Virtualization) is a PCIe device virtualization technology that allows a single physical PCIe device (such as a NIC) to be divided into multiple Virtual Functions (VFs).
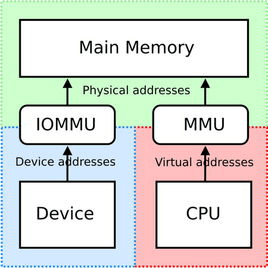
With IOMMU enabled, the system can allocate an independent device address space to each virtual machine, providing memory isolation and protection for devices and preventing memory address conflicts between virtual machines.
Edit the Grub configuration
Add intel_iommu=on iommu=pt to GRUB_CMDLINE_LINUX.
Generate the Grub configuration
1
| grub-mkconfig -o /boot/grub/grub.cfg
|
Reboot the system
Check whether IOMMU is enabled
1
| dmesg | grep -e DMAR -e IOMMU
|
3. Inspecting Local Network Devices
1
2
3
4
5
6
7
| lspci -v | grep -i SR-IOV
Capabilities: [bcc] Single Root I/O Virtualization (SR-IOV)
Capabilities: [160] Single Root I/O Virtualization (SR-IOV)
Capabilities: [160] Single Root I/O Virtualization (SR-IOV)
Capabilities: [160] Single Root I/O Virtualization (SR-IOV)
Capabilities: [160] Single Root I/O Virtualization (SR-IOV)
|
Of these, the single [bcc] entry is the SR-IOV device of the NVIDIA graphics card, and the remaining four [160] entries are Intel NICs.
3.1 Inspecting NICs
1
2
3
| ls /sys/class/net/
eth0 eth1 bond1 lo calixxx ...
|
Here, ethX is a real physical NIC, bondX is a network bonding interface, lo is the local loopback network interface, and calixxx is the network interface that the Calico network plugin provides for containers.
Network bonding is a way to combine multiple physical network interfaces into a single logical interface.
- Check which NICs the bond is bound to
 1
 2
 3
 4
 5
 6
 7
 8
 9
10
11
12
13
14
| cat /proc/net/bonding/bond1
Ethernet Channel Bonding Driver: v3.7.1 (April 27, 2011)
...
Slave Interface: eth5
MII Status: up
Speed: 10000 Mbps
...
Slave Interface: eth4
MII Status: up
Speed: 10000 Mbps
...
|
This means bond1 has bound the two NICs eth5 and eth4, aggregating them into one virtual NIC that provides 20 Gbps of bandwidth.
3.2 Creating SR-IOV VFs
SR-IOV targets physical NICs, not bond-bound NICs, so you must use an ethX NIC.
- Check whether SR-IOV was already enabled
1
2
3
| cat /sys/class/net/eth0/device/sriov_numvfs
0
|
1
| echo 2 > /sys/class/net/eth0/device/sriov_numvfs
|
1
2
3
4
| lspci | grep Virtual
3d:02.0 Ethernet controller: Intel Corporation Ethernet Virtual Function 700 Series (rev 09)
3d:02.1 Ethernet controller: Intel Corporation Ethernet Virtual Function 700 Series (rev 09)
|
This creates 2 SR-IOV VFs on the NIC.
1
2
3
4
5
6
7
| ip link show eth0
4: eth0: <BROADCAST,MULTICAST> mtu 1500 qdisc noop state DOWN mode DEFAULT group default qlen 1000
link/ether 90:f7:b2:4b:dc:3d brd ff:ff:ff:ff:ff:ff
vf 0 link/ether 2e:3a:41:bc:02:cc brd ff:ff:ff:ff:ff:ff, spoof checking on, link-state auto, trust off
vf 1 link/ether 5a:d4:e4:45:83:7b brd ff:ff:ff:ff:ff:ff, spoof checking on, link-state auto, trust off
altname enp61s0f0
|
3.3 Deleting SR-IOV VFs
1
| echo 0 > /sys/class/net/eth0/device/sriov_numvfs
|
4 Using SR-IOV under K8s
4.1 How to Use SR-IOV in a Pod
The VF resources of an SR-IOV device cannot be accessed directly inside a Pod; managing VFs requires a Kubernetes resource-extension mechanism.
If you need to uninstall, be sure to also delete the /etc/cni/net.d/*multus* files on the node, otherwise Pods will fail to be created.
4.2 Creating multus
After installing kube-multus, a single Pod can use multiple NICs.
1
| kubectl apply -f https://raw.githubusercontent.com/shaowenchen/ops-hub/refs/heads/master/network/kube-multus.yml
|
4.3 Installing SR-IOV CNI
After installing kube-sriov-cni, Pod networking can call the SR-IOV CNI to attach VF resources.
1
| kubectl apply -f https://raw.githubusercontent.com/shaowenchen/ops-hub/master/network/kube-sriov-cni.yaml
|
4.4 Installing the SR-IOV Device Plugin
After installing sriov-network-device-plugin, when a Pod is created the Kubelet interacts with sriov-network-device-plugin over GRPC to allocate an SR-IOV VF to the Pod.
1
| kubectl apply -f https://raw.githubusercontent.com/shaowenchen/ops-hub/refs/heads/master/network/kube-sriov-device-plugin.yaml
|
4.5 Configuring Available SR-IOV VFs
 1
 2
 3
 4
 5
 6
 7
 8
 9
10
11
12
| ethtool -i eth0
driver: i40e # 驱动
version: 2.25.7
firmware-version: 4.10 0x80001a63 1.2585.0
expansion-rom-version:
bus-info: 0000:3d:00.0 # PCI 地址
supports-statistics: yes
supports-test: yes
supports-eeprom-access: yes
supports-register-dump: yes
supports-priv-flags: yes
|
1
2
3
| lspci -s 0000:3d:00.0 -v | grep SR-IOV
Capabilities: [160] Single Root I/O Virtualization (SR-IOV)
|
- Check the vendor and device IDs
1
2
3
| lspci -s 0000:3d:00.0 -n
3d:00.0 0200: 8086:37d1 (rev 09)
|
Here 8086 is the vendor ID and 37d1 is the device ID.
1
| kubectl -n kube-system edit cm sriovdp-config
|
1
2
3
4
5
6
7
8
| {
"resourceName": "eth0",
"selectors": {
"drivers": ["i40e"],
"vendor": ["8086"],
"device": ["37d1"]
}
},
|
- Check the discovered SR-IOV devices
 1
 2
 3
 4
 5
 6
 7
 8
 9
10
11
12
13
| kubectl get node bj6-a-kas-t41-01 -o json | jq '.status.allocatable'
{
"cpu": "38",
"ephemeral-storage": "527342541975",
"hugepages-1Gi": "0",
"hugepages-2Mi": "0",
"intel.com/eth0": "2",
"memory": "127356472Ki",
"pods": "110",
"tencent.com/vcuda-core": "100",
"tencent.com/vcuda-memory": "60"
}
|
Here intel.com/eth0 is the SR-IOV device recognized by sirov-device-plugin.
4.6 Configuring NetworkAttachmentDefinition
 1
 2
 3
 4
 5
 6
 7
 8
 9
10
11
12
13
14
15
16
17
18
19
| kubectl apply -f - <<EOF
apiVersion: k8s.cni.cncf.io/v1
kind: NetworkAttachmentDefinition
metadata:
annotations:
k8s.v1.cni.cncf.io/resourceName: intel.com/eth0
name: sriov-eth0
namespace: default
spec:
config: |
{
"type": "sriov",
"cniVersion": "0.3.1",
"name": "sriov-network",
"ipam": {
"type": "host-local"
}
}
EOF
|
If a Pod stays in the ContainerCreating state, it is very likely that the NetworkAttachmentDefinition is misconfigured.
4.7 Creating an Ordinary Pod
 1
 2
 3
 4
 5
 6
 7
 8
 9
10
11
| kubectl apply -f - <<EOF
apiVersion: v1
kind: Pod
metadata:
name: demo-ubuntu
spec:
containers:
- name: demo-ubuntu
image: shaowenchen/demo:ubuntu
imagePullPolicy: Always
EOF
|
Check the NIC
1
2
3
4
5
6
| kubectl exec -it demo-ubuntu ip link show
1: lo: <LOOPBACK,UP,LOWER_UP> mtu 65536 qdisc noqueue state UNKNOWN mode DEFAULT group default qlen 1000
link/loopback 00:00:00:00:00:00 brd 00:00:00:00:00:00
3: eth0@if1659: <BROADCAST,MULTICAST,UP,LOWER_UP> mtu 1450 qdisc noqueue state UP mode DEFAULT group default
link/ether 52:22:5d:0c:0d:d3 brd ff:ff:ff:ff:ff:ff link-netnsid 0
|
4.8 Creating an SR-IOV Pod
Through annotations, you can request an SR-IOV VF for a Pod.
 1
 2
 3
 4
 5
 6
 7
 8
 9
10
11
12
13
14
15
16
17
18
| kubectl apply -f - <<EOF
apiVersion: v1
kind: Pod
metadata:
name: demo-ubuntu-sriov
annotations:
k8s.v1.cni.cncf.io/networks: sriov-eth0
spec:
containers:
- name: demo-ubuntu
image: shaowenchen/demo:ubuntu
imagePullPolicy: Always
resources:
requests:
intel.com/eth0: '1'
limits:
intel.com/eth0: '1'
EOF
|
Check the NIC
 1
 2
 3
 4
 5
 6
 7
 8
 9
10
| kubectl exec -it demo-ubuntu-sriov ip link show
1: lo: <LOOPBACK,UP,LOWER_UP> mtu 65536 qdisc noqueue state UNKNOWN mode DEFAULT group default qlen 1000
link/loopback 00:00:00:00:00:00 brd 00:00:00:00:00:00
3: eth0@if1663: <BROADCAST,MULTICAST,UP,LOWER_UP> mtu 1450 qdisc noqueue state UP mode DEFAULT group default
link/ether f2:32:06:2f:85:13 brd ff:ff:ff:ff:ff:ff link-netnsid 0
7: net1: <NO-CARRIER,BROADCAST,MULTICAST,UP> mtu 1500 qdisc mq state DOWN mode DEFAULT group default qlen 1000
link/ether 90:f7:b2:4b:dc:40 brd ff:ff:ff:ff:ff:ff
alias eth0
altname enp61s0f0
|
The host’s eth0 is also in the DOWN state, and the appearance of the net1 NIC here indicates that an SR-IOV VF has been configured.
4.9 Setting sriov as the Default NIC
You need to create a NetworkAttachmentDefinition under kube-system.
 1
 2
 3
 4
 5
 6
 7
 8
 9
10
11
12
13
14
15
16
17
18
| kubectl apply -f - <<EOF
apiVersion: v1
kind: Pod
metadata:
name: demo-ubuntu-sriov-default
annotations:
v1.multus-cni.io/default-network: sriov-eth0
spec:
containers:
- name: demo-ubuntu
image: shaowenchen/demo:ubuntu
imagePullPolicy: Always
resources:
requests:
intel.com/eth0: '1'
limits:
intel.com/eth0: '1'
EOF
|
5. Summary
This article introduced SR-IOV technology and its use in Kubernetes.
A common deployment approach is also https://github.com/k8snetworkplumbingwg/sriov-network-operator; with the Operator you can integrate SR-IOV with Kubernetes more quickly.
SR-IOV makes physical NICs virtualized and multi-tenant. Besides registering VF resources with sriov-network-device-plugin, another approach is k8s-rdma-shared-dev-plugin, which is what we use in our production environment to work with IB NICs.
