1. Background
In the course of Web development, migrating data between multiple environments (local, testing, and production) comes up often. This article mainly discusses the possible data migration paths involved in Django development, and seeks feasible methods for them.
2. Scenarios
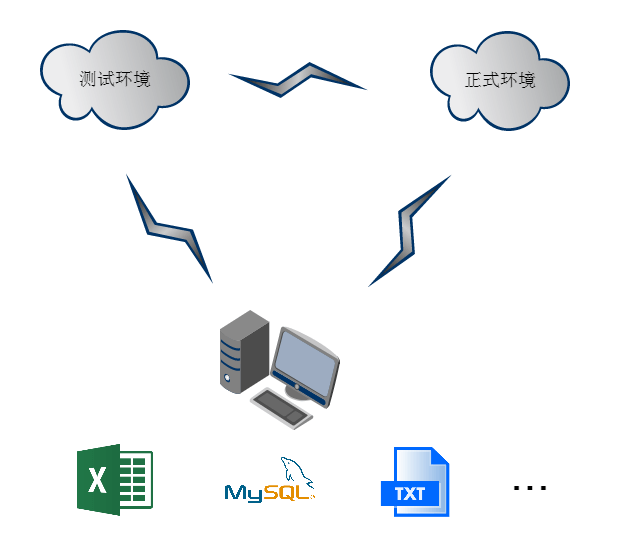
There are four data migration targets in total: the testing environment database, the production environment database, the local development machine database, and data sources that exist in other forms. Data sources in other forms here include: 1. Excel, txt, sql, json, etc., which exist as some form of text; 2. data sources that provide an access interface.
3. Other Data Sources to Local
For data in excel, txt, and json format:
- Step one: Python reads the data from the text;
- Step two: there are two methods. One method is to directly initialize the read data as objects in a Django model and save them to the database. The other method is to go through an interface: the client sends a POST request, and on the Django side you need to configure the url and write dedicated view functions to handle these POST requests and write to the database. The latter method is more universal and is compatible with both local and online data import, so it is recommended.
For data in SQL format, you can create a temporary database, then use the tool provided by Django to reverse-engineer the model. Through the field mapping relationship between the two models, you can very conveniently read and write data between them.
Without further ado, let’s look at the code!
3.1 Reading Excel
Python reads the excel data and sends it to Django for handling through an interface.
 1
 2
 3
 4
 5
 6
 7
 8
 9
10
11
12
13
14
15
16
17
18
19
20
21
22
23
24
25
26
27
28
| # -*- coding: utf-8 -*-
import time
import requests
import xlrd
url = "http://127.0.0.1:8000/import_data/"
filename = "data.xlsx"
datalength = 4
def main():
workbook = xlrd.open_workbook(filename)
sheets1 = workbook.sheets()[0]
for i in range(datalength):
data1 = sheets1.row_values(i)[0]
data2 = sheets1.row_values(i)[1]
data3 = sheets1.row_values(i)[2]
data = {
"data1": data1,
"data2": data2,
"data3": data3
}
res = requests.post(url, data=data)
print i, res
time.sleep(1)
if __name__ == "__main__":
main()
|
3.2 Reading TXT
Python reads the txt data; pay attention to the data’s delimiter. Read the data line by line and assign it to variables.
1
2
3
| with open('data.txt', 'rt') as f:
for line in f:
data1,data2 = line.split(' ')
|
3.3 Reading JSON
Python reads the json data.
1
2
| with open('data.json', 'r') as f:
data = json.load(f)
|
3.4 Reading SQL
- Step one, create a new database locally, temp_db, run data.sql, and import the data into the database.
- Step two, use the inspectdb command provided by Django to obtain the data’s model
- Step three, write a handler function to convert the data between the two models
 1
 2
 3
 4
 5
 6
 7
 8
 9
10
11
12
| # 修改settings中默认DB的配置,将数据库名改为temp_db
# DATABASES = {
# 'default': {
# 'ENGINE': 'django.db.backends.mysql',
# 'NAME': 'temp_db',
# 'USER': 'root',
# 'PASSWORD': '',
# 'HOST': '127.0.0.1',
# 'PORT': '3306',
# },
#}
python manage.py inspectdb > data_models.py
|
4. From Local to Online
The focus here is migration between the local database and the online database.
4.1 The dumpdata and loaddata Commands
1
2
| # 本地,导出django app - app_label的数据,也可以不加app_label导出全部数据
manage.py dumpdata app_label > data.json
|
Commit data.json to the online environment via SVN
Online, when importing the data you do not need to specify the app, because it is already indicated in the json file’s model field
 1
 2
 3
 4
 5
 6
 7
 8
 9
10
11
12
13
14
15
| def jsonimport(request):
import subprocess
from django.http import HttpResponse
cmd = '/cache/python/bin/python manage.py loaddata data.json'
p = subprocess.Popen(cmd, shell=True, stdout=subprocess.PIPE, stderr=subprocess.STDOUT)
out, err = p.communicate()
msg = '【%s】:stdout--%s stderr--%s' % (cmd, out, err)
try:
return HttpResponse(msg)
except IOError:
return HttpResponse(u'磁盘中不存在该文件!')
except Exception, e:
return HttpResponse(u'系统异常!%s' % e)
|
4.2 Executing SQL via subprocess - Importing Data
Export the database locally as an sql file, commit it to the online environment, and then execute the sql statements.
 1
 2
 3
 4
 5
 6
 7
 8
 9
10
11
12
13
14
15
16
17
18
19
20
21
22
23
24
25
26
27
28
29
30
31
| def dbimport(request):
import subprocess
from django.conf import settings
from django.http import HttpResponse
db = settings.DATABASES['default']
dbfile = 'static/%s.sql' % db.get('NAME')
mysql = 'mysql'
importdb = '{dumpcmd} --user={user} ' \
'--password={password} ' \
'--host={host} ' \
'--port={port} ' \
'-f --default-character-set=utf8 ' \
'{dbname} < {dbfile}'.format(dumpcmd=mysql,
user=db.get('USER'),
password=db.get('PASSWORD'),
host=db.get('HOST'),
port=db.get('PORT'),
dbname=db.get('NAME'),
dbfile=dbfile)
p = subprocess.Popen(importdb, shell=True, stdout=subprocess.PIPE, stderr=subprocess.STDOUT)
out, err = p.communicate()
msg = '【%s】:stdout--%s stderr--%s' % (importdb, out, err)
try:
return HttpResponse(msg)
except IOError:
return HttpResponse(u'磁盘中不存在该文件!')
except Exception, e:
return HttpResponse(u'系统异常!%s' % e)
|
5. From Online to Online
For online data migration, you can go through an interface, save to text and then migrate, or copy the database directly.
- Migrate data through an interface: the client sends a GET request for the data, and the data source side provides an API.
- Migrate by saving to text: json files are recommended. The load and dump functions provided by the json library make reading and writing data very convenient.
- Copy the database directly: use the subprocess library to execute mysqldump and mysql.
5.1 Relaying Through json
Read the data and write it to json
1
2
3
4
5
6
7
8
9
| def dumptojson(request):
import json
from django.http import HttpResponse
data = [{'id': 1}, {'id': 2}, {'id': 3}]
fd = json.dumps(data)
response = HttpResponse(fd)
response['Content-Type'] = 'application/json'
response['Content-Disposition'] = 'attachment;filename=data.json'
return response
|
Read json and write the data
1
2
| with open('data.json', 'r') as f:
data = json.load(f)
|
5.2 Through the dumpdata and loaddata Commands
Online machines cannot be logged into whenever you please. The previous section mentioned executing loaddata through a view function to import data.json into the database. Below is the view function code that executes dumpdata to export the data from the online environment.
 1
 2
 3
 4
 5
 6
 7
 8
 9
10
11
12
13
14
15
16
| def jsondump(request):
import subprocess
from datetime import datetime
from django.http import HttpResponse
file = 'data.json'
cmd = '/cache/python/bin/python manage.py dumpdata > %s' % file
p = subprocess.Popen(cmd, shell=True, stdout=subprocess.PIPE, stderr=subprocess.STDOUT)
out, err = p.communicate()
print '【%s】:stdout--%s stderr--%s' % (cmd, out, err)
with open(file, 'rb') as fd:
file_content = fd.read()
response = HttpResponse(file_content)
response['Content-Type'] = 'application/octet-stream'
response['Content-Disposition'] = 'attachment;filename="%s_%s"' % (datetime.now(), file)
return response
|
5.3 Executing SQL via subprocess - Exporting Data
Above there is code for importing data through an SQL file; below is the code for exporting data from the online environment and saving it as an SQL file.
 1
 2
 3
 4
 5
 6
 7
 8
 9
10
11
12
13
14
15
16
17
18
19
20
21
22
23
24
25
26
27
28
29
30
31
32
33
| def dump(request):
import os, subprocess
from datetime import datetime
from django.conf import settings
from django.http import HttpResponse
db = settings.DATABASES['default']
dbfile = 'static/%s.sql' % db.get('NAME')
dumpcmd = 'mysqldump'
dumpdb = '{dumpcmd} --user={user} ' \
'--password={password} ' \
'--host={host} ' \
'--port={port} ' \
'--single-transaction ' \
'{dbname} > {dbfile}'.format(dumpcmd=dumpcmd,
user=db.get('USER'),
password=db.get('PASSWORD'),
host=db.get('HOST'),
port=db.get('PORT'),
dbname=db.get('NAME'),
dbfile=dbfile)
p = subprocess.Popen(dumpdb, shell=True, stdout=subprocess.PIPE, stderr=subprocess.STDOUT)
out, err = p.communicate()
print u'【%s】:stdout--%s stderr--%s' % (dumpdb, out, err)
ret = os.popen('/bin/ls static')
print u'os.popen:%s' % ret.readlines()
with open(dbfile, 'rb') as fd:
file_content = fd.read()
response = HttpResponse(file_content)
response['Content-Type'] = 'application/octet-stream'
response['Content-Disposition'] = 'attachment;filename="%s_%s.sql"' % (db.get('NAME'),
datetime.now())
return response
|
6. Best Practices
During the local development and testing stage, it is recommended to migrate data by having Python read the text and send a POST request. When the data is migrated again to the testing and production environments, you only need to change the interface url. Note, however, the security of the interface: control the request rate of the interface.
For migrating test data from the testing environment to the production environment, you can consider using the subprocess library. If you are unsure about the online environment, you can combine it with tools such as webshell to probe first and reduce debugging time.
