1. A Strange Requirement
My boss had a strange requirement: use a single kubeconfig file to fetch all kinds of host status information, such as the process list and process states.
My first reaction was that he must not understand containers — how could anyone use them that way, and if you were going to use them that way, why use containers at all? Inside, ten thousand horses were galloping.
Then recently I ran into a command-line tool, and I realized that the clown was me. Let me show you what I found.
2. How Containers Work
A sandbox is a virtual environment; operations performed inside the sandbox have no effect on the outside. Sandboxes are isolated from one another and invisible to one another — they cannot see each other’s existence.
What we usually call a container is a sandbox environment built on Linux’s Cgroups and Namespace technologies.
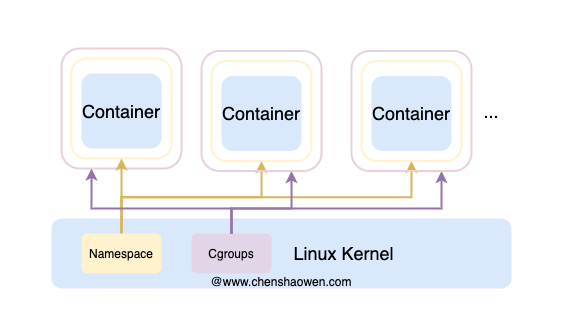
From the diagram you can see that the boundary between one container and another is controlled by exactly these two technologies, Cgroups and Namespace. Here is a brief description of each:
- Namespace
Resources under different Namespaces are independent of one another and invisible to one another. Linux gained Mount Namespace support in 2.4.19, UTS and IPS Namespace support in 2.6.19, PID Namespace support in 2.6.24, Network Namespace support in 2.6.29, and User Namespace support in 3.8. Of these, all except User Namespace must be created with root privileges. Meanwhile, 4.6 already added the Cgroup namespace, and RunC (the runtime provided by Docker) has already merged the relevant PR: https://github.com/opencontainers/runc/pull/1916 . Below are the seven kinds of Namespace.
Mount namespace, which isolates filesystem mount points. Within a namespace, a program’s changes to files affect only its own filesystem and have no effect on other namespaces.
UTS namespace, which isolates hostname and domain name information. In each namespace, the host and domain information is independent.
IPC namespace, which isolates the behavior of inter-process communication. Only processes within a single namespace can communicate with one another.
PID namespace, which isolates the PID space of processes. Process PIDs in different namespaces may repeat without affecting each other. The process with PID 1 is the parent of all other processes, which makes this namespace very meaningful.
Network namespace, which isolates network resources. Each namespace has its own independent network stack information, so a container runtime appears to be in an independent network.
User namespace, which isolates users and user groups. The same user can have different roles in different namespaces, which is used to guarantee security.
Cgroup namespace, which isolates the visibility of Cgroups. In each namespace, there is an independent cgroupns root and cgroup filesystem view.
- Cgroups
Above we placed a group of processes into a Namespace, isolated externally and sharing resources internally; next we use Cgroups to control their resources. Cgroups provides four capabilities:
- Resource limiting. Set resource consumption limits for a process or process group. For example, exceeding a memory limit causes memory allocation to fail.
- Resource accounting. Track things like CPU time used and memory consumption.
- Task control. Control the state of processes; you can suspend and resume them.
- Priority allocation. Set the priority of processes.
Using the sandbox environment provided by Namespace and Cgroups, plus filesystem technologies, is what supports container technology.
3. A Debugging Tool: nsenter
nsenter is a tool used to enter the Namespace of a specified program and execute commands there. In container scenarios, many containers trim away basic commands such as ip and tcpdump in order to stay lightweight. This makes debugging containers somewhat difficult, and debugging by sharing the Namespace through nsenter solves the problem nicely.
In fact, when RunC creates a container it also calls nsenter, as you can see in the libcontainer code.
- Installing nsenter
Most Linux operating systems already ship the nsenter command. If yours does not, taking CentOS as an example, run the following command to install the util-linux package:
| |
- nsenter’s version and parameters
Because different Linux kernels support Namespaces to different degrees, nsenter versions vary. Here we take CentOS 7 as an example:
- Check the system kernel version
| |
- Check the nsenter version
| |
- Check nsenter’s parameters
| |
The parameter to note here is -t, which specifies a process from which to obtain the Namespace parameters. The other parameters mainly enable and set things.
Since it is not easy to demonstrate nsenter’s capabilities outside a sandbox environment, let’s experiment further in a container environment.
4. Applying nsenter in a Docker Container Environment
4.1 On the Host, Entering a Container’s Namespace Environment
- Pick a container
| |
- Get the container’s PID
Every container has a process with PID=1 inside it, just like the init process on a host machine, and it is the parent of all the other processes. But on the host, the container process has a different PID that you can use to manage the container.
| |
- Enter the container’s Namespace environment
Here we take entering the network namespace as an example:
| |
If the host’s default shell exists inside the container, you can omit /bin/bash; otherwise you must explicitly specify a shell that exists in the container.
- Execute the host’s command-line tools to debug the container environment
| |
From the output you can see that it displays the network interface address information of the container, yet the ip command comes from the host.
4.2 Inside the Container, Entering the Host’s Namespace Environment
- Create a container in privileged mode that uses the host’s Namespaces
| |
- Enter the Namespace environment of the PID=1 process
| |
- Run commands to operate on the host environment
| |
From the output you can see that the command displays the container information on the host, yet the command is being executed inside the container.
5. Applying nsenter in a Kubernetes Container Environment
This part is similar to the previous section, except that when entering a container you need to go through the Pod to obtain the PID, and when executing commands on the host you need to go through the Pod to create the container.
5.1 From the Host, Entering a Kubernetes Pod to Debug the Container Environment
- Pick a Pod
| |
- Get the container ID
| |
- Switch to the node the container is on
| |
- Get the container’s PID
| |
- Enter the container’s Namespace
| |
- Execute host commands to debug the container
| |
Note here that a container is bound to a node — in a multi-node environment, after obtaining the container ID you need to switch to the host it is on to operate.
5.2 Inside a Kubernetes Pod, Operating the Host Directly
- Create a file named pod-test.yaml with the following content
| |
- Create the Pod
| |
- Enter the Pod
| |
- Enter the Namespace of the PID=1 process
| |
- Run host commands to test
| |
Start the container in privileged mode, share Namespaces through the PID=1 process, and execute commands on the host directly.
6. Summary
This post mainly covered how, in a container environment, to escape to the host and execute commands, and how, on the host, to enter a container’s debugging environment. It also gave practical examples for both the Docker and Kubernetes scenarios.
Two things in particular were instructive for me. One is the nsenter command, which deepened my understanding of container technology. The other is that a container started in privileged mode has very broad permissions and must be handled with care; business workloads should run containers in a rootless way wherever possible.
In a Docker Daemon started in privileged mode, you can create a Kubernetes cluster and, through the nsenter command, use nodeSelector to reach any node and then run commands like kubectl/docker/systemctl to carry out destructive activities.
