1. Disk Handling
1.1 Inspect Disks
Disk /dev/nvme1n1: 3.91 TiB, 4294967296000 bytes, 8388608000 sectors
1.2 Build a RAID0
If you have several small disks, a better approach is to build a RAID0 — this gives you not only a larger storage directory but also higher speed.
1
| mdadm --create --verbose /dev/md0 --level=0 --raid-devices=3 /dev/nvme1n1 /dev/nvme2n1 /dev/nvme3n1
|
1
| mdadm --detail /dev/md0
|
1.3 Mount the Disk
1
| mkfs.xfs -f /dev/nvme1n1
|
or
mkfs.ext4 /dev/nvme1n1
xfs is suited to large-file workloads, ext4 to small and medium files.
For a RAID0 you can run mkfs.xfs -f /dev/md0 .
- Create the mount directory
1
2
| UUID=$(blkid -s UUID -o value /dev/nvme1n1)
echo $UUID
|
1
| grep -q "$UUID" /etc/fstab || echo "UUID=$UUID /data xfs defaults,nofail 0 2" >> /etc/fstab
|
or
1
| grep -q "$UUID" /etc/fstab || echo "UUID=$UUID /data ext4 defaults,nofail 0 2" >> /etc/fstab
|
1
2
3
| df -h |grep data
/dev/nvme1n1 4.0T 28G 3.9T 1% /data
|
2. Installing Drivers
2.1 Check Whether the System Recognizes the GPU
1
2
3
4
| lspci | grep -i vga
03:00.0 VGA compatible controller: NVIDIA Corporation GP102 [TITAN X] (rev a1)
0a:00.0 VGA compatible controller: Matrox Electronics Systems Ltd. G200eR2 (rev 01)
|
The GPU is identified as an NVIDIA TITAN X.
2.2 Disable nouveau
If there is output, nouveau is loaded and must be disabled. If there is no output, you can skip this step.
- Turn off automatic updates
1
| sed -i.bak 's/1/0/' /etc/apt/apt.conf.d/10periodic
|
Edit the configuration file:
1
| vim /etc/apt/apt.conf.d/50unattended-upgrades
|
Uncomment the following:
1
2
3
4
| Unattended-Upgrade::Package-Blacklist {
"linux-image-*";
"linux-headers-*";
};
|
- Edit the system blacklist
1
| vim /etc/modprobe.d/blacklist-nouveau.conf
|
Add the following configuration to disable nouveau
1
2
| blacklist nouveau
options nouveau modeset=0
|
- Update initramfs
- Reboot the system
- Edit the system blacklist
1
| vim /etc/modprobe.d/blacklist-nouveau.conf
|
Add the configuration to disable nouveau
1
2
| blacklist nouveau
options nouveau modeset=0
|
- Update initramfs
1
2
| mv /boot/initramfs-$(uname -r).img /boot/initramfs-$(uname -r).img.bak
dracut /boot/initramfs-$(uname -r).img $(uname -r)
|
- Reboot the system
- Verify that it is disabled
There should be no output at this point.
2.3 Install the Driver
- Install the base environment
1
| apt install lftp python3 ceph-fuse nfs-common infiniband-diags make -y
|
1
2
3
| apt install build-essential gcc-9 g++-9
update-alternatives --install /usr/bin/gcc gcc /usr/bin/gcc-9 90 --slave /usr/bin/g++ g++ /usr/bin/g++-9 --slave /usr/bin/gcov gcov /usr/bin/gcov-9
apt-get install -y build-essential linux-headers-$(uname -r) pkg-config libglvnd-dev
|
Go to https://www.nvidia.com/en-us/drivers/ and download the matching driver version. Here we take the Linux 64-bit TITAN X driver as an example:
1
| wget https://us.download.nvidia.com/XFree86/Linux-x86_64/535.183.01/NVIDIA-Linux-x86_64-535.183.01.run
|
Downloading from the us site is a bit slower, but wget will not 404.
1
2
| chmod +x NVIDIA-Linux-*.run
bash ./NVIDIA-Linux-*.run --accept-license --silent --no-x-check --no-nouveau-check --disable-nouveau --no-opengl-files --no-drm --dkms
|
Another option is to install with apt
1
| wget https://us.download.nvidia.com/tesla/550.144.03/nvidia-driver-local-repo-ubuntu2204-550.144.03_1.0-1_amd64.deb
|
1
2
3
4
5
| cat > /etc/apt/preferences.d/nvidia <<EOF
Package: *
Pin: release o=NVIDIA
Pin-Priority: 550
EOF
|
1
| dpkg -i nvidia-driver-local-repo-ubuntu2204-535.230.02_1.0-1_amd64.deb
|
1
| apt-get install -y nvidia-driver-550
|
- Verify that the installation succeeded
580.126.09 works with the 50 and 40 series GPUs, cuda-12.8
https://cn.download.nvidia.com/XFree86/Linux-x86_64/580.126.09/NVIDIA-Linux-x86_64-580.126.09.run
570.211.01 works with the L4\L40s\L20\V100\A100\A800\H100\H800\RTX6000 series GPUs, cuda-12.8
https://cn.download.nvidia.com/tesla/570.211.01/NVIDIA-Linux-x86_64-570.211.01.run
2.4 Disable ECC Verification
For inference machines, ECC verification can be disabled to get more usable VRAM.
1
| for GPU in $(nvidia-smi --query-gpu=index --format=csv,noheader); do nvidia-smi -i $GPU -e 0; done
|
3. Installing nvidia-container-runtime
3.1 Install Containerd
1
2
| apt-get update
apt-get install -y ca-certificates curl gnupg lsb-release
|
In China:
1
2
| mkdir -p /etc/apt/keyrings
curl -fsSL https://mirrors.ustc.edu.cn/docker-ce/linux/ubuntu/gpg -o /etc/apt/keyrings/docker.asc
|
1
2
3
4
| echo \
"deb [arch=$(dpkg --print-architecture) signed-by=/etc/apt/keyrings/docker.asc] https://mirrors.ustc.edu.cn/docker-ce/linux/ubuntu/ \
$(. /etc/os-release && echo "$VERSION_CODENAME") stable" | \
sudo tee /etc/apt/sources.list.d/docker.list > /dev/null
|
Overseas:
1
2
| mkdir -p /etc/apt/keyrings
curl -fsSL https://download.docker.com/linux/ubuntu/gpg | gpg --dearmor -o /etc/apt/keyrings/docker.gpg
|
1
2
3
| echo \
"deb [arch=$(dpkg --print-architecture) signed-by=/etc/apt/keyrings/docker.gpg] https://download.docker.com/linux/ubuntu \
$(lsb_release -cs) stable" | tee /etc/apt/sources.list.d/docker.list > /dev/null
|
1
2
| apt update
apt install containerd.io=1.7.20-1
|
- Generate the containerd config file (toml)
1
2
| mkdir -p /etc/containerd
containerd config default > /etc/containerd/config.toml
|
- Modify the containerd config file
1
2
3
4
| sed -i 's#root = "/var/lib/containerd"#root = "/data/containerd"#g' /etc/containerd/config.toml
sed -i 's#state = "/run/containerd"#state = "/data/run/containerd"#g' /etc/containerd/config.toml
sed -i 's#sandbox_image = "registry.k8s.io/pause:[^"]*"#sandbox_image = "registry.aliyuncs.com/google_containers/pause:3.9"#g' /etc/containerd/config.toml
sed -i 's#SystemdCgroup = false#SystemdCgroup = true#g' /etc/containerd/config.toml
|
1
| vim /lib/systemd/system/containerd.service
|
Add the following alongside the other Limit settings:
1
2
| systemctl daemon-reload
systemctl restart containerd
|
3.2 Install nvidia-container-runtime
In China, if it is unreachable, you can install nvidia-container-toolkit
1
2
3
4
5
6
| apt-key adv --keyserver keyserver.ubuntu.com --recv-keys DDCAE044F796ECB0
curl -fsSL https://nvidia.github.io/libnvidia-container/gpgkey | gpg --dearmor -o /usr/share/keyrings/nvidia-container-toolkit-keyring.gpg \
&& curl -s -L https://mirrors.ustc.edu.cn/libnvidia-container/stable/deb/nvidia-container-toolkit.list | \
sed 's#deb https://nvidia.github.io#deb [signed-by=/usr/share/keyrings/nvidia-container-toolkit-keyring.gpg] https://mirrors.ustc.edu.cn#g' | \
tee /etc/apt/sources.list.d/nvidia-container-toolkit.list
apt update && apt install nvidia-container-toolkit
|
Overseas, you can use nvidia-container-runtime directly
1
2
3
4
5
| curl -fsSL https://nvidia.github.io/libnvidia-container/gpgkey | sudo gpg --dearmor -o /usr/share/keyrings/nvidia-container-toolkit-keyring.gpg \
&& curl -s -L https://nvidia.github.io/libnvidia-container/stable/deb/nvidia-container-toolkit.list | \
sed 's#deb https://#deb [signed-by=/usr/share/keyrings/nvidia-container-toolkit-keyring.gpg] https://#g' | \
sudo tee /etc/apt/sources.list.d/nvidia-container-toolkit.list
apt-get update && apt-get install -y nvidia-container-toolkit
|
1
2
| distribution=$(. /etc/os-release;echo $ID$VERSION_ID)
curl -s -L https://nvidia.github.io/nvidia-container-runtime/$distribution/nvidia-container-runtime.repo | tee /etc/yum.repos.d/nvidia-container-runtime.repo
|
1
| yum install -y nvidia-container-runtime
|
3.3 Docker Configuration
- Update the Docker configuration
Configure Docker to enable GPU support
1
| vim /etc/docker/daemon.json
|
Add the following:
 1
 2
 3
 4
 5
 6
 7
 8
 9
10
| {
"default-runtime": "nvidia",
"data-root": "/data/docker",
"runtimes": {
"nvidia": {
"path": "/usr/bin/nvidia-container-runtime",
"runtimeArgs": []
}
}
}
|
1
2
| systemctl daemon-reload
systemctl restart docker
|
1
| docker run --rm --gpus 1 $IMAGE nvidia-smi
|
You should now see the GPU information in the output.
3.4 Containerd Configuration
- Update the Containerd configuration
1
| vim /etc/containerd/config.toml
|
Add the following under plugins."io.containerd.grpc.v1.cri".containerd.runtimes:
 1
 2
 3
 4
 5
 6
 7
 8
 9
10
11
12
13
14
15
16
17
| [plugins."io.containerd.grpc.v1.cri".containerd.runtimes.nvidia]
privileged_without_host_devices = false
runtime_engine = ""
runtime_root = ""
runtime_type = "io.containerd.runc.v2"
[plugins."io.containerd.grpc.v1.cri".containerd.runtimes.nvidia.options]
BinaryName = "/usr/bin/nvidia-container-runtime"
CriuImagePath = ""
CriuPath = ""
CriuWorkPath = ""
IoGid = 0
IoUid = 0
NoNewKeyring = false
NoPivotRoot = false
Root = ""
ShimCgroup = ""
SystemdCgroup = true
|
Set the default runtime to nvidia
1
2
| [plugins."io.containerd.grpc.v1.cri".containerd]
default_runtime_name = "nvidia"
|
You can also replace it directly with sed
1
| sed -i 's/default_runtime_name = "runc"/default_runtime_name = "nvidia"/g' /etc/containerd/config.toml
|
1
2
| systemctl daemon-reload
systemctl restart containerd
|
1
| nerdctl run --rm --gpus 1 $IMAGE nvidia-smi
|
CUDA is NVIDIA’s general-purpose parallel computing architecture, used for general-purpose computation on GPUs. The CUDA Toolkit is CUDA’s development kit, containing the compiler (NVCC), libraries, debuggers, and other tools.
4.1 Check Whether the System Is Supported
See https://docs.nvidia.com/cuda/cuda-installation-guide-linux/index.html#system-requirements for the latest CUDA dependency requirements on CPU architecture, operating system, GCC version, and GLIBC version.
1
| uname -m && cat /etc/os-release
|
4.2 Compatibility Notes
The nvidia-smi command shows a CUDA version number, but that is the version of the CUDA driver libcuda.so, not the version of the CUDA Toolkit.
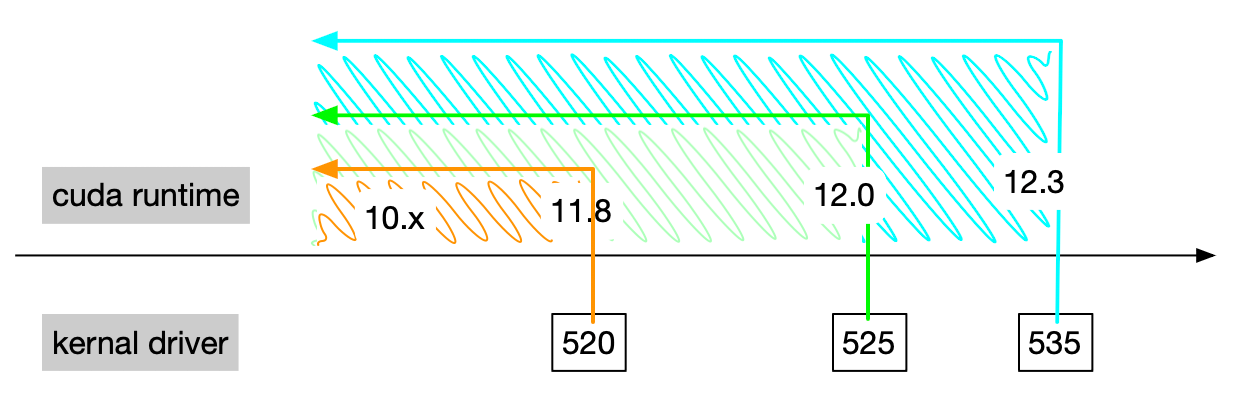
As shown in the figure above, the CUDA driver is backward compatible, i.e. it supports earlier CUDA Toolkit versions.
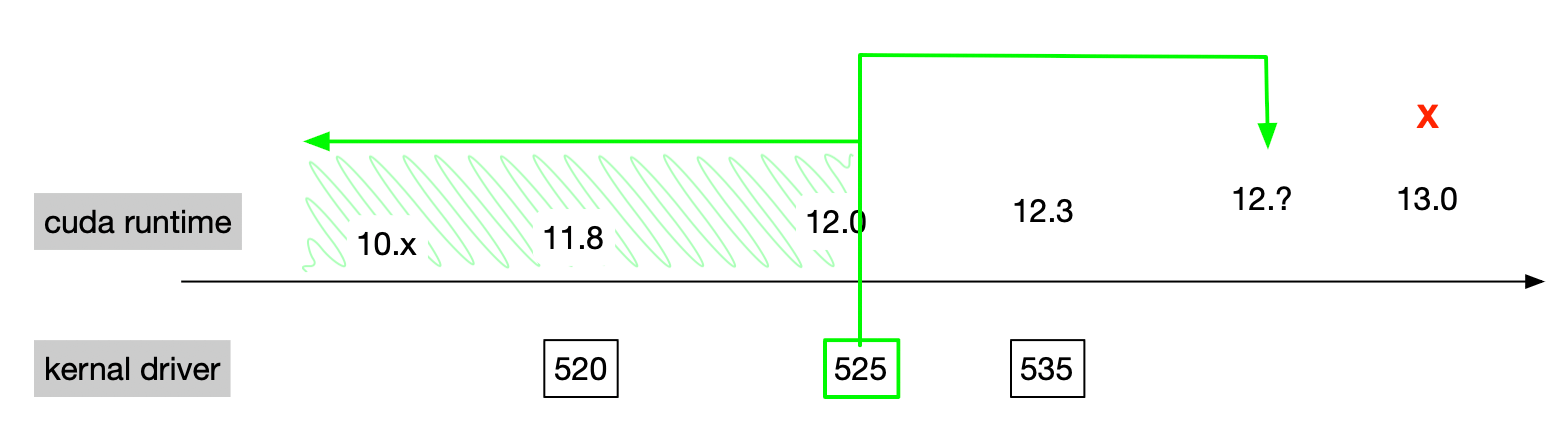
As shown in the figure above, the CUDA driver supports forward minor-version compatibility — that is, it is supported as long as the major version number is the same. See [2].
4.3 Install CUDA
Go to https://developer.nvidia.com/cuda-downloads and download the matching version. Here we take the Ubuntu 20.04 runfile(local) as an example:
1
| wget https://developer.download.nvidia.com/compute/cuda/12.3.1/local_installers/cuda_12.3.1_545.23.08_linux.run
|
1
| sh cuda_12.3.1_545.23.08_linux.run
|
- Add environment variables
Add the following:
1
2
3
| export PATH=$PATH:$PATH:/usr/local/cuda/bin
export LD_LIBRARY_PATH=$LD_LIBRARY_PATH:/usr/local/cuda/lib64
export CUDA_HOME=$CUDA_HOME:/usr/local/cuda
|
Make the environment variables take effect immediately:
5. Installing cuDNN
cuDNN is NVIDIA’s deep neural network acceleration library built on CUDA.
- Check the cuDNN dependencies
Go to https://docs.nvidia.com/deeplearning/cudnn/backend/latest/reference/support-matrix.html to check whether the cuDNN compatibility with CUDA, Driver, and operating system meets your requirements.
Go to https://developer.nvidia.com/rdp/cudnn-archive and download the matching version; choose Local Installer for Linux x86_64 (Tar), which gives you a tar.xz archive.
1
| tar -xvf cudnn-linux-*-archive.tar.xz
|
1
2
3
| cp cudnn-*-archive/include/cudnn*.h /usr/local/cuda/include
cp -P cudnn-*-archive/lib/libcudnn* /usr/local/cuda/lib64
chmod a+r /usr/local/cuda/include/cudnn*.h /usr/local/cuda/lib64/libcudnn*
|
6. Enabling Persistence Mode
nvidia-smi -pm 1 can enable persistence mode, but it does not survive a reboot, and the nvidia-smi approach has been deprecated; the nvidia-persistenced daemon is recommended.
With persistence mode enabled, the driver stays loaded permanently, which consumes more power but effectively mitigates various GPU failures.
- Create the configuration file
 1
 2
 3
 4
 5
 6
 7
 8
 9
10
11
12
13
14
15
16
17
| cat <<EOF > /lib/systemd/system/nvidia-persistenced.service
[Unit]
Description=NVIDIA Persistence Daemon
After=syslog.target
[Service]
Type=forking
PIDFile=/var/run/nvidia-persistenced/nvidia-persistenced.pid
Restart=always
ExecStart=/usr/bin/nvidia-persistenced --verbose
ExecStopPost=/bin/rm -rf /var/run/nvidia-persistenced/*
TimeoutSec=300
[Install]
WantedBy=multi-user.target
EOF
|
1
| systemctl start nvidia-persistenced
|
1
| systemctl status nvidia-persistenced
|
- Enable persistence mode at boot
1
| systemctl enable nvidia-persistenced
|
7. Installing the NVLink and NVSwitch Drivers
If NVLink or NVSwitch is fitted, you also need to install nvidia-fabricmanager, otherwise it will not work properly.
- Download nvidia-fabricmanager
Find a suitable version at https://developer.download.nvidia.com/compute/cuda/repos/ubuntu2004/x86_64/.
1
| wget https://developer.download.nvidia.com/compute/cuda/repos/ubuntu2004/x86_64/nvidia-fabricmanager-535_535.129.03-1_amd64.deb
|
- Install nvidia-fabricmanager
1
| apt install ./nvidia-fabricmanager-535_535.129.03-1_amd64.deb
|
- Start the nvidia-fabricmanager service
1
| systemctl start nvidia-fabricmanager
|
- Check the nvidia-fabricmanager service
1
| systemctl status nvidia-fabricmanager
|
1
| systemctl enable nvidia-fabricmanager
|
8. Installing the InfiniBand Driver
Find a suitable OS version at https://network.nvidia.com/products/infiniband-drivers/linux/mlnx_ofed/.
1
| wget https://content.mellanox.com/ofed/MLNX_OFED-5.8-7.0.6.1/MLNX_OFED_LINUX-5.8-7.0.6.1-ubuntu20.04-x86_64.tgz
|
1
2
3
| tar zxf MLNX_OFED_LINUX-5.8-7.0.6.1-ubuntu20.04-x86_64.tgz
cd MLNX_OFED_LINUX-5.8-7.0.6.1-ubuntu20.04-x86_64
./mlnxofedinstall --with-nfsrdma
|
Then reboot the machine and check the driver status
 1
 2
 3
 4
 5
 6
 7
 8
 9
10
11
| systemctl status openibd
● openibd.service - openibd - configure Mellanox devices
Loaded: loaded (/lib/systemd/system/openibd.service; enabled; vendor preset: enabled)
Active: active (exited) since Mon 2024-03-11 15:30:58 CST; 1 weeks 0 days ago
Docs: file:/etc/infiniband/openib.conf
Process: 2261 ExecStart=/etc/init.d/openibd start bootid=65648015406c4b88b831c8b907ad4ec6 (code=exited, status=0/SUCCESS)
Main PID: 2261 (code=exited, status=0/SUCCESS)
Tasks: 0 (limit: 618654)
Memory: 24.6M
CGroup: /system.slice/openibd.service
|
Use ibstat to inspect device information
 1
 2
 3
 4
 5
 6
 7
 8
 9
10
11
12
13
14
15
16
17
18
19
20
21
22
23
24
25
26
27
28
29
30
31
32
33
34
35
36
37
| ibstat
ibstat
CA 'mlx5_0'
CA type: MT4123
Number of ports: 1
Firmware version: 20.35.1012
Hardware version: 0
Node GUID: 0x946dae03008bcc68
System image GUID: 0x946dae03008bcc68
Port 1:
State: Active
Physical state: LinkUp
Rate: 200
Base lid: 124
LMC: 0
SM lid: 1
Capability mask: 0xa651e848
Port GUID: 0x946dae03008bcc68
Link layer: InfiniBand
CA 'mlx5_1'
CA type: MT4123
Number of ports: 1
Firmware version: 20.35.1012
Hardware version: 0
Node GUID: 0x946dae03008bcc3c
System image GUID: 0x946dae03008bcc3c
Port 1:
State: Active
Physical state: LinkUp
Rate: 200
Base lid: 126
LMC: 0
SM lid: 1
Capability mask: 0xa651e848
Port GUID: 0x946dae03008bcc3c
Link layer: InfiniBand
|
9. Joining the K8s Cluster
9.1 Change the Hostname
1
| export HOSTNAME=k8s-worker-gpu-01
|
1
| hostnamectl set-hostname ${HOSTNAME}
|
9.2 Initialize Kernel Parameters
1
| opscli task -f ~/.ops/tasks/set-os.yaml
|
9.3 Install the Base K8s Components
https://developer.aliyun.com/mirror/kubernetes/ — add this for versions below 1.28
1
| curl -fsSL https://mirrors.aliyun.com/kubernetes/apt/doc/apt-key.gpg | sudo gpg --dearmour -o /etc/apt/trusted.gpg.d/kubernetes-aliyun.gpg
|
1
2
3
| cat <<EOF >/etc/apt/sources.list.d/kubernetes.list
deb https://mirrors.aliyun.com/kubernetes/apt/ kubernetes-xenial main
EOF
|
- Symlink the kubelet directory
1
2
| mkdir -p /data/kubelet
ln -s /data/kubelet /var/lib/kubelet
|
- Install the base K8s components
1
| export K8S_VERSION=1.27.6
|
1
| apt-get install kubeadm=${K8S_VERSION}-00 kubelet=${K8S_VERSION}-00 kubectl=${K8S_VERSION}-00 -y
|
1
| vim /var/lib/kubelet/kubeadm-flags.env
|
Add the following:
1
| --pod-infra-container-image=registry.aliyuncs.com/google_containers/pause:3.9 --resolv-conf=/etc/resolv.conf --authentication-token-webhook=true --authorization-mode=Webhook --system-reserved=cpu=1,memory=2Gi --kube-reserved=cpu=1,memory=2Gi --cpu-manager-policy=static
|
1
| --topology-manager-policy=best-effort --topology-manager-scope=container --feature-gates=TopologyManager=true,CPUManager=true,MemoryManager=true
|
topology-manager-policy can be best-effort (satisfy if possible), restricted (one resource does not cross nodes), or single-numa-node (no resource crosses nodes).
topology-manager-scope can be container (satisfied at the container level) or all containers within the pod.
feature-gates can be TopologyManager=true,CPUManager=true,MemoryManager=true to enable topology management, CPU management, and memory management.
In the kubelet configuration above, add the --node-ip= parameter to specify the node IP address and the --hostname-override= parameter to specify the node Hostname.
1
| --node-ip=x.x.x.x --hostname-override=my-hostname
|
With Flannel, you need to add the --iface= parameter to the DeamonSet to specify the NIC.
1
2
3
4
5
6
7
| containers:
- args:
- --ip-masq
- --kube-subnet-mgr
- --iface-regex=^10\.0\.
command:
- /opt/bin/flanneld
|
1
2
3
4
| systemctl enable kubelet
systemctl daemon-reload
systemctl restart kubelet
systemctl status kubelet
|
9.4 Join the Cluster
Generate the token on the master node
1
| kubeadm token create --print-join-command
|
1
2
| kubeadm join x.x.x.x:6443 --token xxx \
--discovery-token-ca-cert-hash sha256:xxx
|
In a Docker environment, you need to go through the Containerd configuration and then pass the --cri-socket parameter.
1
| --cri-socket unix:///run/containerd/containerd.sock -v5
|
If you get the error [ERROR FileContent--proc-sys-net-bridge-bridge-nf-call-iptables]: /proc/sys/net/bridge/bridge-nf-call-iptables does not exist, run this.
1
2
3
| modprobe br_netfilter
echo 1 > /proc/sys/net/bridge/bridge-nf-call-iptables
echo 1 > /proc/sys/net/ipv4/ip_forward
|
9.5 Create a Test Pod
1
| export IMAGE=nvidia/cuda:12.3.2-base-ubuntu22.04
|
 1
 2
 3
 4
 5
 6
 7
 8
 9
10
11
12
13
14
15
16
17
18
19
| kubectl create -f - <<EOF
apiVersion: v1
kind: Pod
metadata:
generateName: gpu-demo-
labels:
app: gpu-demo
spec:
nodeName: ${HOSTNAME}
containers:
- name: gpu-demo
image: ${IMAGE}
command: ["nvidia-smi"]
resources:
requests:
tencent.com/vcuda-core: 100
limits:
tencent.com/vcuda-core: 100
EOF
|
1
| kubectl logs -l app=gpu-demo
|
1
| kubectl delete pod -l app=gpu-demo
|
10. Deploying k8s-rdma-shared-dev-plugin
To let Kubernetes discover RDMA devices such as InfiniBand and share them among multiple Pods, you need to install k8s-rdma-shared-dev-plugin.
- Install k8s-rdma-shared-dev-plugin
1
| kubectl apply -f https://raw.githubusercontent.com/shaowenchen/ops-hub/master/network/k8s-rdma-shared-dev-plugin.yaml
|
- Modify the configuration file
1
| kubectl -n kube-system edit cm rdma-devices
|
Configure rdma/ib in the spec and you can use it.
 1
 2
 3
 4
 5
 6
 7
 8
 9
10
11
12
13
14
15
16
17
| spec:
containers:
- command:
- /bin/sh
- -c
- mkdir -p /var/run/sshd; /usr/sbin/sshd;bash llama_distributed_v3.0_check.sh
resources:
limits:
cpu: "64"
memory: 950Gi
rdma/ib: "8"
tencent.com/vcuda-core: "800"
requests:
cpu: "64"
memory: 950Gi
rdma/ib: "8"
tencent.com/vcuda-core: "800"
|
- Lock the CPU to the high-performance frequency mode; the downside is higher power consumption
Temporarily set the CPU to the locked high-performance mode
1
2
3
| for cpu in /sys/devices/system/cpu/cpu[0-9]*; do
echo performance | sudo tee $cpu/cpufreq/scaling_governor
done
|
Permanently set the CPU to the locked high-performance mode
1
| apt-get install tuned -y
|
1
| tuned-adm profile throughput-performance
|
Check the CPU operating mode
1
| cat /sys/devices/system/cpu/cpu*/cpufreq/scaling_governor
|
- System THP tuning; the downside is reduced memory utilization
Disable or tune THP (Transparent Huge Pages) automatic compaction to prevent kernel background defrag from causing latency stalls and periodic latency jitter.
Temporarily disable THP
1
2
| echo defer > /sys/kernel/mm/transparent_hugepage/defrag
echo 'defer+madvise' > /sys/kernel/mm/transparent_hugepage/defrag
|
Permanently disable THP
1
| echo never > /sys/kernel/mm/transparent_hugepage/defrag
|
Check the THP status
1
| cat /sys/kernel/mm/transparent_hugepage/defrag
|
- NIC ring buffer (packet loss issue); the downside is a larger buffer and increased network latency
The default value is usually 256 or 512, which is too small for high-speed 10G/100G NICs.
Temporarily set the NIC ring buffer
1
2
| ethtool -G eth0 rx 8192 tx 8192
ethtool -G eth1 rx 8192 tx 8192
|
Permanently set the NIC ring buffer
1
2
3
4
5
6
| cat >/etc/ethtool-ring.sh <<'EOF'
#!/bin/bash
ethtool -G eth0 rx 8192 tx 8192 || true
ethtool -G eth1 rx 8192 tx 8192 || true
EOF
chmod +x /etc/ethtool-ring.sh
|
Or configure bond0
1
2
3
4
5
6
7
8
9
| cat >/etc/ethtool-ring.sh <<'EOF'
#!/bin/bash
SLAVES=$(cat /sys/class/net/bond0/bonding/slaves 2>/dev/null)
for eth in $SLAVES; do
ethtool -G $eth rx 8192 tx 8192 || true
done
EOF
chmod +x /etc/ethtool-ring.sh
|
 1
 2
 3
 4
 5
 6
 7
 8
 9
10
11
12
13
14
15
16
17
18
| cat >/etc/systemd/system/ethtool-ring.service <<'EOF'
[Unit]
Description=Set NIC ring buffer size
After=network-online.target
Wants=network-online.target
[Service]
Type=oneshot
ExecStart=/etc/ethtool-ring.sh
RemainAfterExit=yes
[Install]
WantedBy=multi-user.target
EOF
systemctl daemon-reload
systemctl enable ethtool-ring.service
systemctl start ethtool-ring.service
|
Check the NIC ring buffer
1
2
| ethtool -g eth0
ethtool -g eth1
|
Check the bond0 NIC ring buffer
1
2
3
4
5
| SLAVES=$(cat /sys/class/net/bond0/bonding/slaves 2>/dev/null)
for eth in $SLAVES; do
ethtool -g $eth || true
done
|
- Change the machine clocksource from hpet to tsc; the downside is possible desynchronization on old CPUs or multi-CPU systems
TSC (Time Stamp Counter) is a CPU built-in timer with extremely fast access and low latency (nanosecond level)
Temporarily set the clocksource
1
| echo tsc | tee /sys/devices/system/clocksource/clocksource0/current_clocksource
|
Permanently set the clocksource
 1
 2
 3
 4
 5
 6
 7
 8
 9
10
11
12
13
14
15
16
| cat >/etc/systemd/system/clocksource-tsc.service <<'EOF'
[Unit]
Description=Set clocksource to tsc
After=multi-user.target
[Service]
Type=oneshot
ExecStart=/bin/sh -c 'echo tsc > /sys/devices/system/clocksource/clocksource0/current_clocksource'
[Install]
WantedBy=multi-user.target
EOF
systemctl daemon-reload
systemctl enable clocksource-tsc.service
systemctl start clocksource-tsc.service
|
Check the current clocksource
1
| cat /sys/devices/system/clocksource/clocksource0/current_clocksource
|
This is usually adjusted in the BMC (out-of-band management) or the BIOS.
12. References
- https://nvidia.github.io/nvidia-container-runtime/
- https://tianzhipeng-git.github.io/2023/11/21/cuda-version.html
