In frontend-backend separated development, when the backend API is not finished, the frontend cannot continue debugging. So that frontend and backend can develop in parallel, the frontend needs a set of API interface environments — this is the Mock API. The diagram below lays out the development flow nicely. Without a Mock data step, frontend-backend integration takes up a great deal of time.
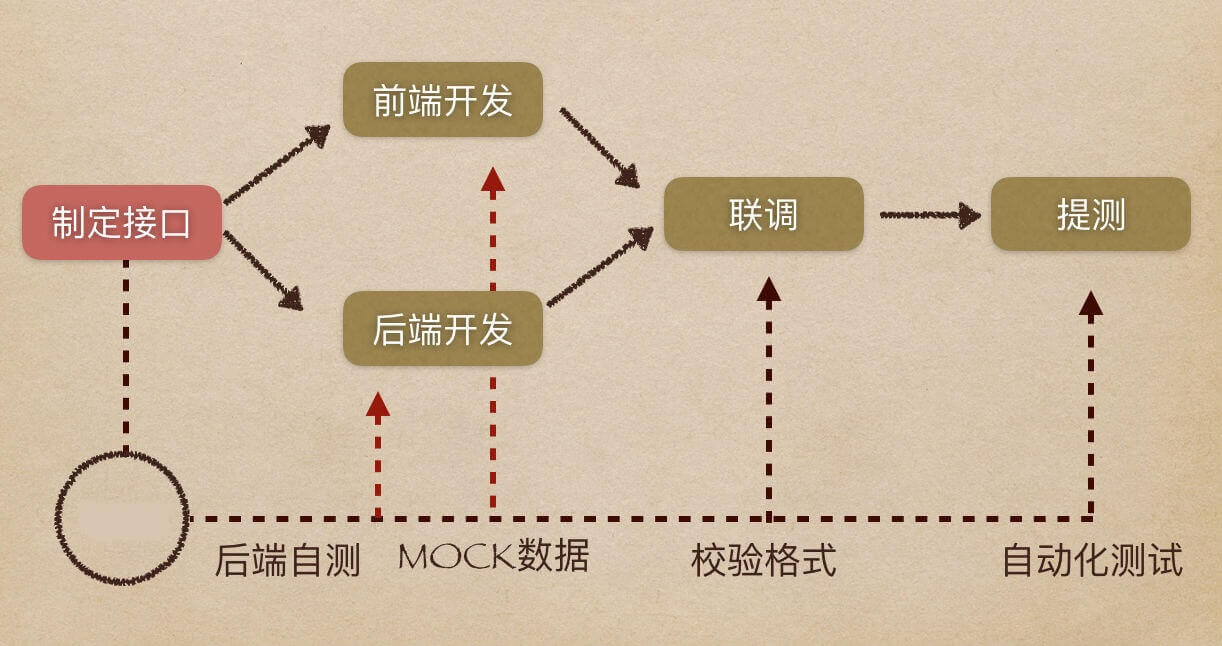
1. What Mock Is — Simulation
Usually, the API documentation the backend provides cannot satisfy the frontend’s debugging needs. During collaborative development it is best to provide a simulated API data request interface. There are several ways to simulate interface calls:
1 . Manual Mock data.
Fill in mock data by hand, save it as json, run an HttpServer locally, and simulate the API call to return data. The drawbacks: it cannot generate data in bulk, it has no randomness, and routes are inconvenient to manage. If you do not run an HttpServer service locally and the frontend uses the static json directly, the URL still has to be changed before going live.
2 . Frontend Mock.
Hijack Ajax — intercept Ajax requests and return fake data in a given format. The drawback: you need to include a mock-api.js file, each page needs a corresponding mock-api.js file, and managing all these mock-api.js files is somewhat challenging.
3 . Backend Mock.
- Use a tool like swagger.
Configure the interface information according to the template rules the tool defines, and generate Mock data. The drawback is that the operation is fairly complex and requires cooperation from backend staff. - Mock-server.
Run a static service locally and convert interface requests into json static files or rule-generated requests.
2. Frontend Mock.js
2.1 Main Features of Mock.js
- Generate mock data from data templates
- Generate mock data from HTML templates
- Intercept and simulate ajax requests
2.2 Using Mock.js
Mock.js has different frontend libraries available. The usage is similar,
| |
3. Backend json-server
3.1 Main Features of json-server
- REST-style API interfaces.
- Supports CORS and JSONP cross-origin requests.
- Custom routes.
- Supports middleware.
- Modular.
3.2 Using json-server
Install json-server
| |
data.json
| |
Start the service
| |
How to access
http://localhost:1000/ The page displays the list of resources and the supported methods (GET, POST, PUT, PATCH, DELETE, OPTIONS)
The GET method fetches resource information, http://localhost:1000/event?id=1.
| |
- Pagination query parameters: _start, _end, _limit.
- Sorting parameters: _sort, _order.
- Operators: _gte greater than, _lte less than, _ne not equal, _like fuzzy query
Data updated with methods such as POST is synced to the data.json file using lowdb.
3.3 Generating Dynamic Data
json-server supports dynamically generating data with js
data.js, generates 1000 entries of {“id”: 0, “tips”: “tips0”} with incrementing id.
| |
Start command
| |
Custom routes
routes.json
| |
Access URL:http://localhost:3000/api/event/1/
Start command
| |
Other configuration options
json-server [options] <source>

Options:
  --config, -c       Path to config file           [default: "json-server.json"]
  --port, -p         Set port                                    [default: 3000]
  --host, -H         Set host                               [default: "0.0.0.0"]
  --watch, -w        Watch file(s)                                     [boolean]
  --routes, -r       Path to routes file
  --middlewares, -m  Paths to middleware files                           [array]
  --static, -s       Set static files directory
  --read-only, --ro  Allow only GET requests                           [boolean]
  --no-cors, --nc    Disable Cross-Origin Resource Sharing             [boolean]
  --no-gzip, --ng    Disable GZIP Content-Encoding                     [boolean]
  --snapshots, -S    Set snapshots directory                      [default: "."]
  --delay, -d        Add delay to responses (ms)
  --id, -i           Set database id property (e.g. _id)         [default: "id"]
  --quiet, -q        Suppress log messages from output                 [boolean]
  --help, -h         Show help                                         [boolean]
  --version, -v      Show version number
