1. Basic Concepts
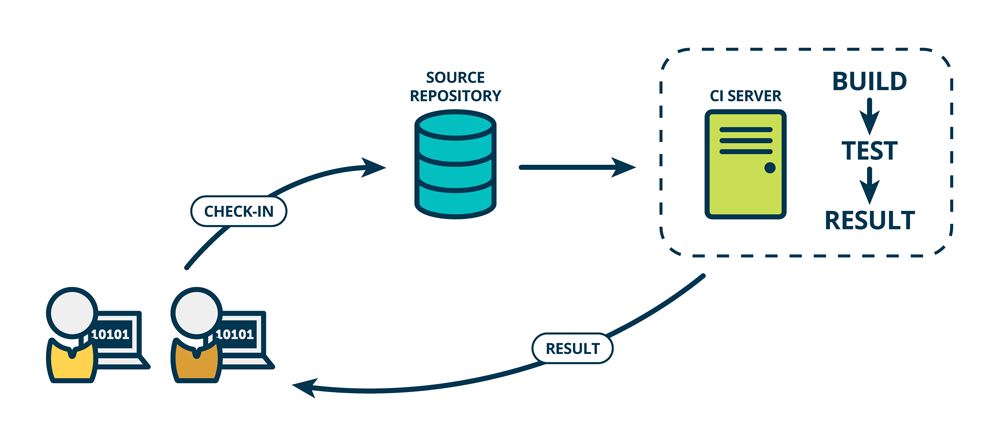
- Continuous Integration
Continuous integration emphasizes that once developers commit new code, a build and (unit) test run immediately. From the test results we can determine whether the new code and the existing code integrate correctly.
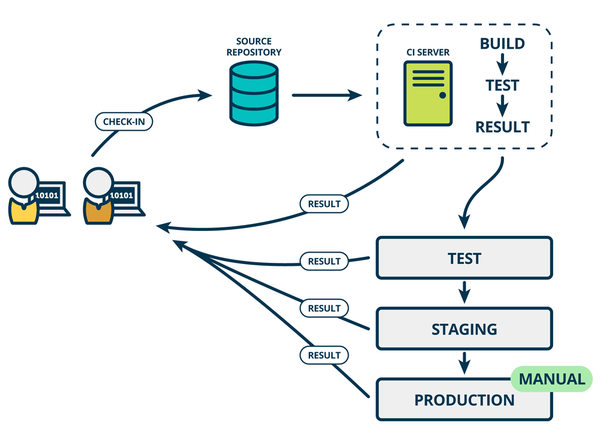
- Continuous Delivery
Building on continuous integration, continuous delivery deploys the integrated code to a staging-like environment that is closer to the real runtime environment. For example, after finishing unit tests we can deploy the code to a Staging environment connected to a database for further testing. If the code is fine, we can then continue to deploy it manually to production.
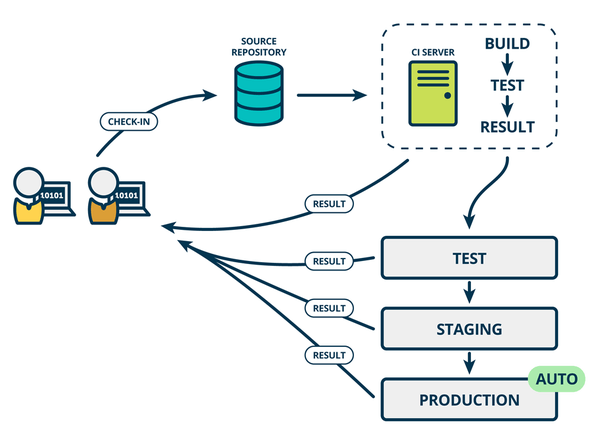
- Continuous Deployment
Continuous deployment, building on continuous delivery, automates the process of deploying to production.
2. Jenkins
2.1 Introduction to Jenkins
Jenkins is an open-source continuous integration tool written in Java. After a dispute with Oracle, on January 11, 2011 the community voted to rename the project from “Hudson” to “Jenkins”.
Jenkins provides continuous integration services for software development. It runs in a Servlet container (just like Apache Tomcat). It supports software configuration management tools (including AccuRev SCM, CVS, Subversion, Git, Perforce, Clearcase, and RTC), can execute projects based on Apache Ant and Apache Maven, and can run arbitrary shell scripts and Windows batch commands.
2.2 Download and Installation
- If you are working locally
Install a Java runtime environment locally, then go to http://mirrors.jenkins-ci.org/war-stable/ and download the latest jenkins.war file. Run the following command:
| |
You can then access the Jenkins service locally at http://127.0.0.1:8080.
- If you are working on a server
Usually requests are proxied through Nginx. Here we take an Ubuntu system as an example to describe how to configure and install it.
| |
Install Jenkins
| |
Start Jenkins
| |
There are also exit, restart, and reload, which you can use.
Finally, do not forget to configure DNS to resolve jenkins.domain.com to the server IP, so that you can access the Jenkins service through the jenkins.domain.com domain.
2.3 Plugin Installation and Configuration
On the first startup, Jenkins automatically generates a random string. Follow the file path shown on the page, find that string, and enter it. Next, you will be prompted to install the recommended plugins. If you choose to install them, a set of commonly used plugins will be installed automatically.
Jenkins has a rich set of third-party plugins that integrate deeply with other tools. It is precisely these plugins that let Jenkins integrate more and more functionality and satisfy all kinds of customized requirements.
There are two ways to install plugins, under Manage Jenkins - > Manage Plugins:
- Under the available tab, you can check the plugins you need and install them.
- Under the advanced tab, you can upload an offline plugin and install it.
In Jenkins, creating a new Item offers the following types:
- Freestyle project, basic functionality, used to run various build tasks (Jobs).
- Pipeline, used to assemble the execution flow of many Jobs.
- External job, used to monitor Jobs executed externally.
- Multi-configuration project, lets a Job run on different machines.
- Folder, creates a file view for organizing.
- GitHub Organization, searches GitHub projects.
- Multibranch Pipeline, creates a set of pipeline projects.
2.4 Chinese Display
By default, the Jenkins web page takes the current language setting from the browser settings. There are two ways to switch it to Chinese:
- Set the browser language to Chinese
In the 【Settings】 - 【Advanced】 - 【Languages】 option, add 【Chinese (Simplified)】.
Install the Locale Plugin
In 【Manage Jenkins】 - 【Manage Plugins】 - 【Available】, find the Locale Plugin, check it and install it, then restart for it to take effect.
In 【Manage Jenkins】 - 【Configure System】, find 【Locale】 - 【Default Language】 and set it to zh_CN, check Ignore browser preference and force this language to all users, and click 【Apply】.
2.5 Jenkins API
Jenkins provides html, json, and Python APIs; in essence they are all called via http get/post. Visit http://jenkins.domain.com/api/ to get the corresponding documentation.
| |
3. Jenkins Integrated with GitHub
This part mainly describes how to use GitHub’s WebHook to trigger Jenkins build tasks. Here we take Maven, the build tool commonly used for Java projects, as an example.
3.1 About Maven
Maven, like make, is a build tool that turns source code into executable code. Maven uses the configuration file pom.xml to configure the environment, for example setting the compiler version and setting the URL of the packages it needs, so that Maven can download the required packages automatically. When the build environment needs to change, you just change the pom.xml file, and Maven will download the configured packages automatically.
What makes Maven more powerful than make is that it can use other tools to produce statistics on compilation results, inspect the source code, and test the code. For example, checkstyle and cobertura both have corresponding Maven plugins.
Maven controls compilation, controls linking, generates various reports, and runs code tests, while Jenkins controls this flow.
3.2 GitHub Settings
- Personal Access Token
Go to the GitHub home page, and on the 【settings】 - 【Personal Access Token page, click 【Generate new token】
Check 【repo】 and 【admin:repo_hook】 to generate the Token. Note that the Token here is shown only once; if you lose it later, you have to regenerate it.
- WebHook
Create a new GitHub project, and on the 【Settings】 - 【Webhooks】 page, click 【Add webhook】, fill in http://jenkins.domain.com/github-webhook/ for the 【Payload URL】 parameter, choose application/json for the 【Content type】 parameter, and save.
- Initializing the project
To quickly verify that the GitHub WebHook can trigger Jenkins build tasks, it is recommended to just pick a fairly simple open-source Maven project. Below is the example code structure:
| |
3.3 Jenkins Plugin and Server Environment Configuration
- Server environment
| |
- Jenkins plugin installation
You need to install the Maven Integration plugin and the GitHub Plugin.
3.4 Jenkins System Configuration
Under 【Manage Jenkins】 - 【System Configuration】
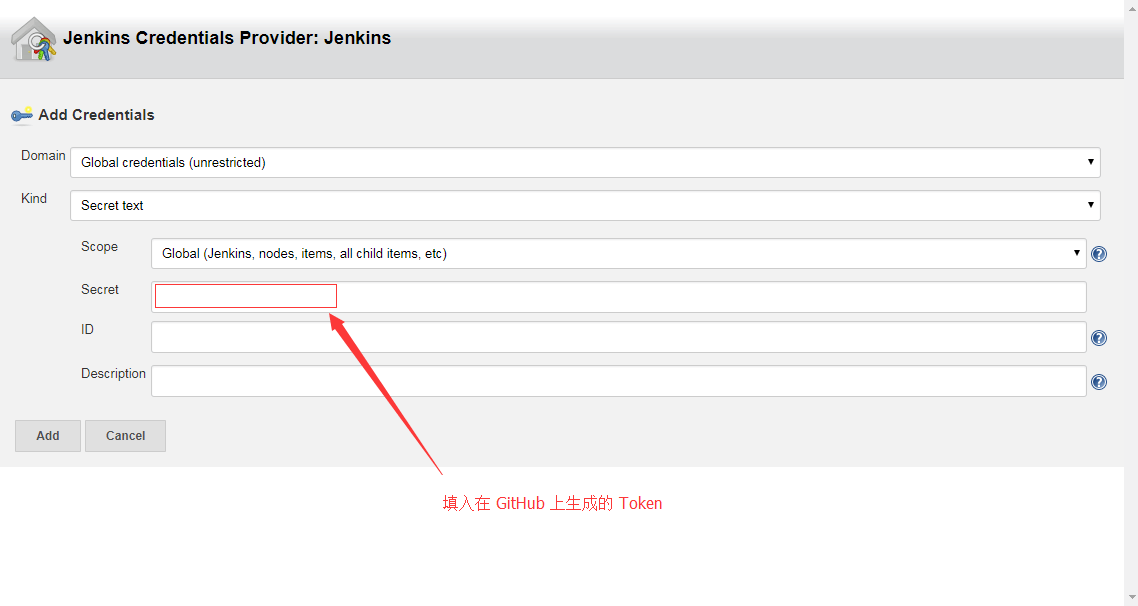
- Setting the TOKEN: find the 【GitHub】 option, click 【Add GitHub Server】, enter the Token in the field shown in the figure (inside the red box), and keep the other settings as selected in the figure.
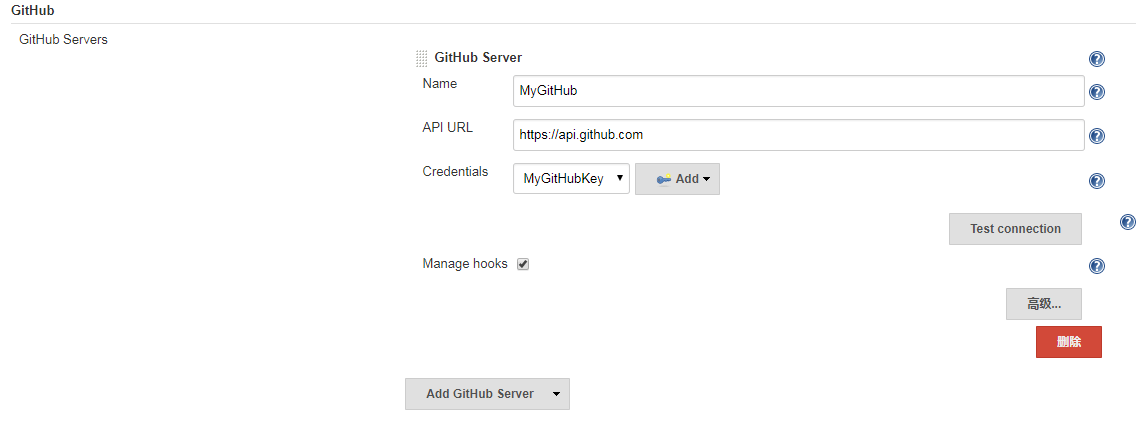
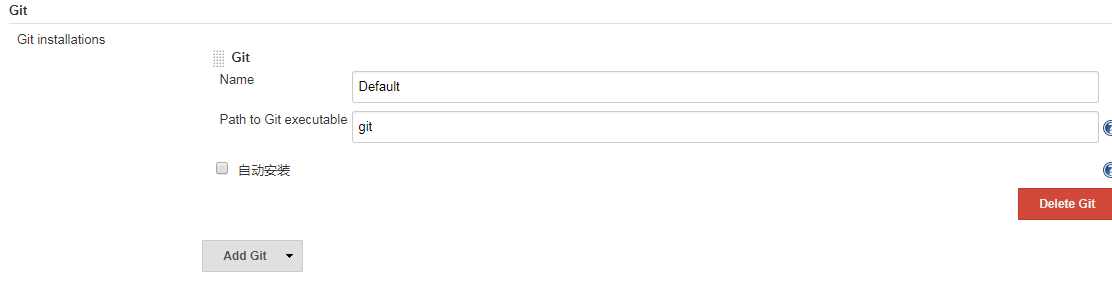
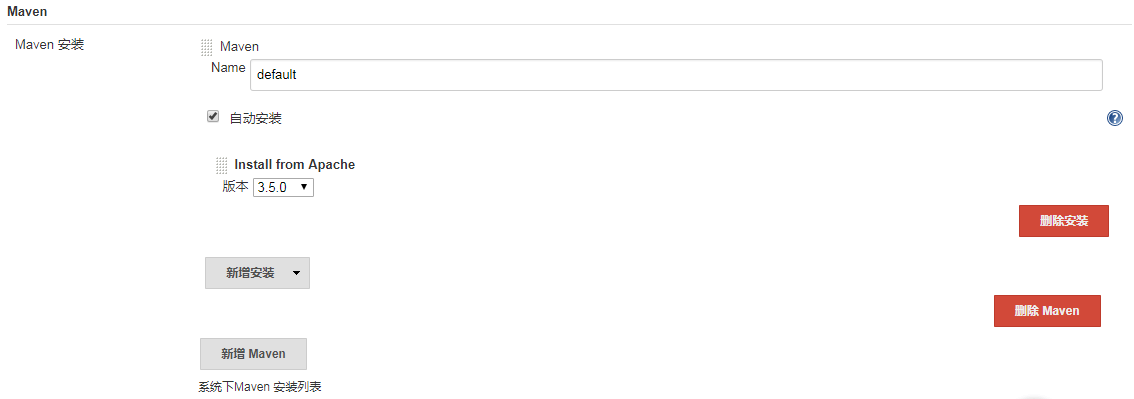
Under 【Manage Jenkins】 - 【Global Tool Configuration】, set the installation paths of Git and Maven. Since the git and mvn commands have already been added to PATH, you only need to set them to default here.
3.5 Creating a Maven Project
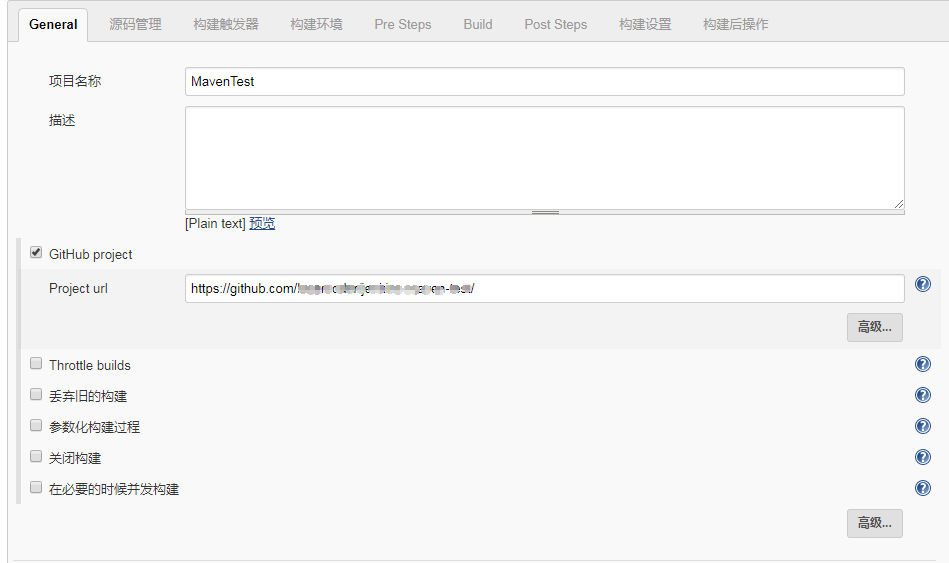
Click 【New Item】, choose 【Build a maven project】, and enter the project name.
Select 【GitHub project】 and set it to the URL of the project you created on GitHub.
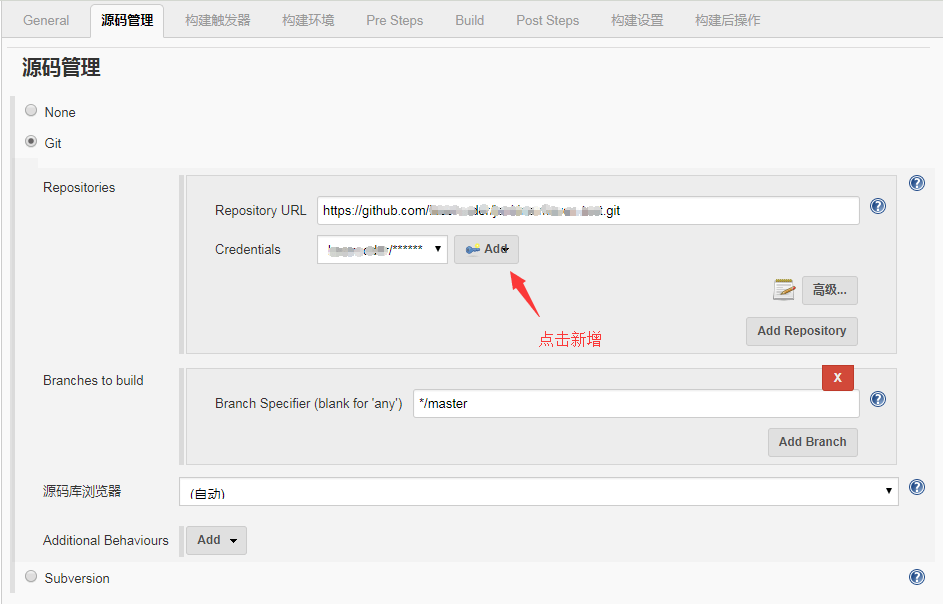
Set 【Source Code Management】 to Git and set the project address; here you need to add a username and password.
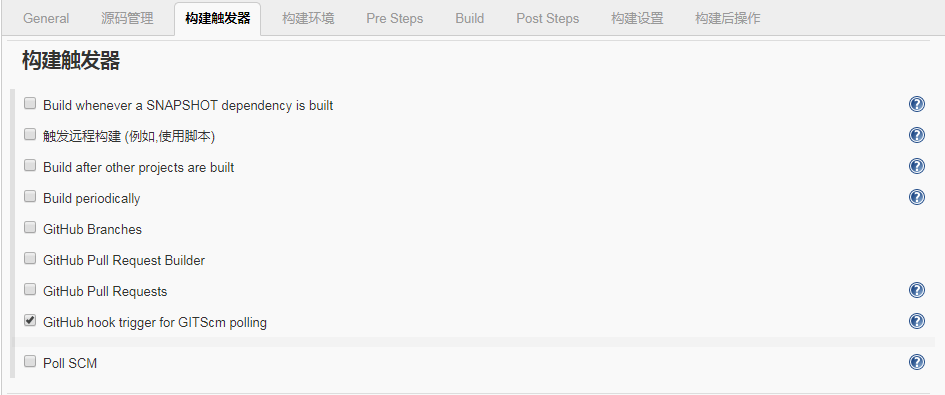
Setting 【Build Triggers】 tells Jenkins under what circumstances to run the build. Here, choose 【GitHub hook tigger for GITScm polling】, that is, triggered by the WebHook event produced when code is committed.
The 【Build】 setting tells Maven where the project’s POM.xml file is; if the file cannot be found, Jenkins will warn you.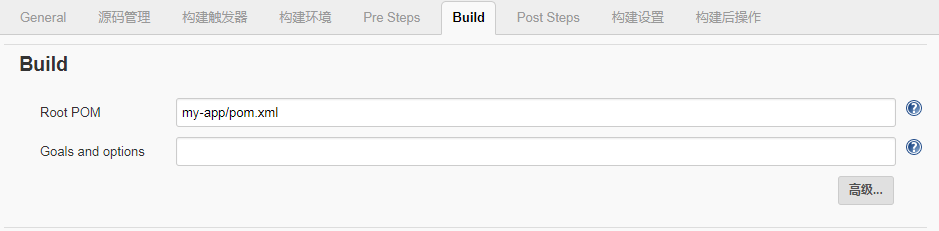
3.5 Triggering a Build
Commit code on GitHub:
| |
This will trigger the build task to run.
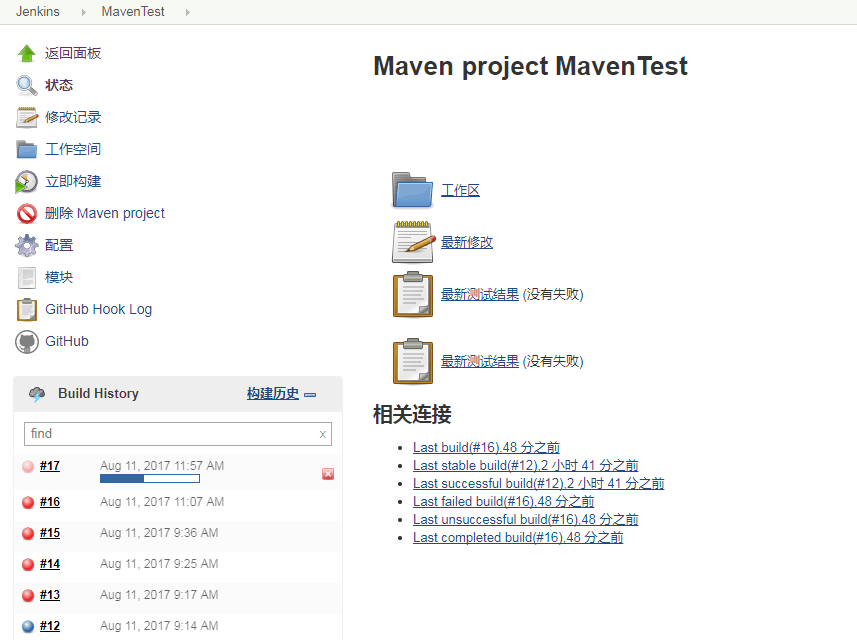
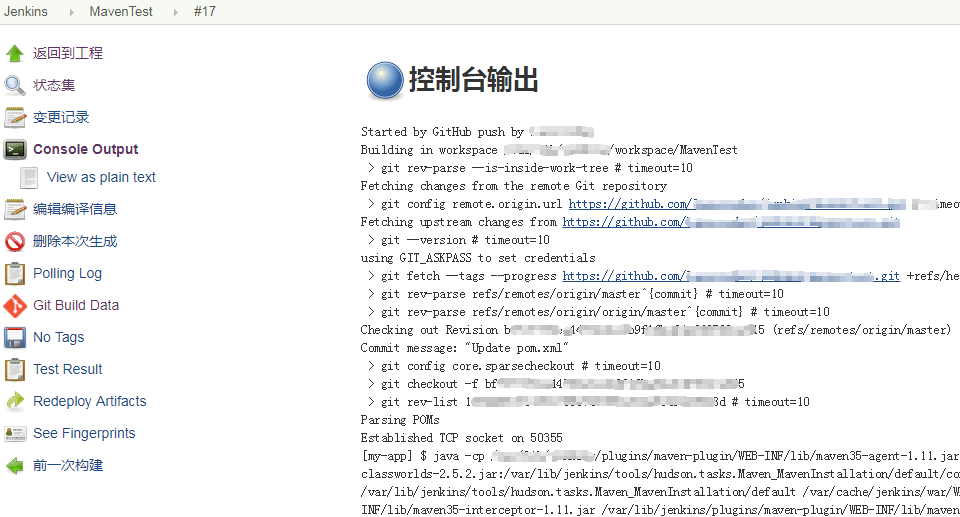
Once it finishes, you can see the details of the run in 【Console Output】.
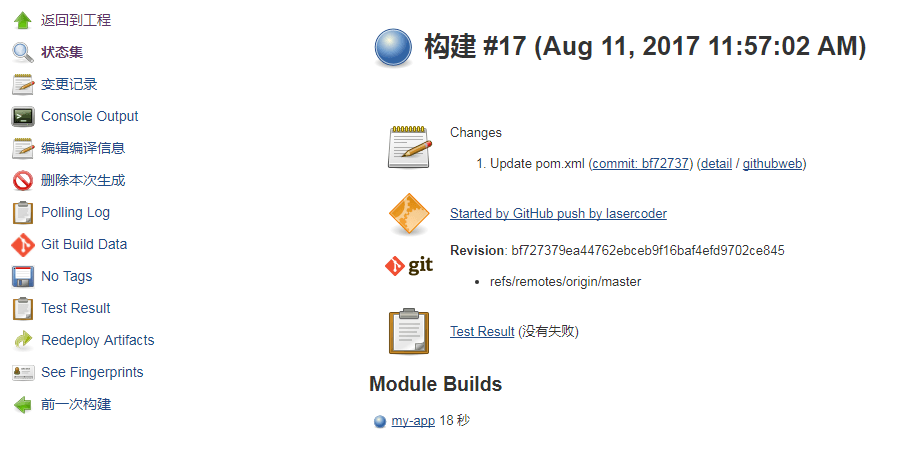
In the 【Status】 set you can see the build status information.
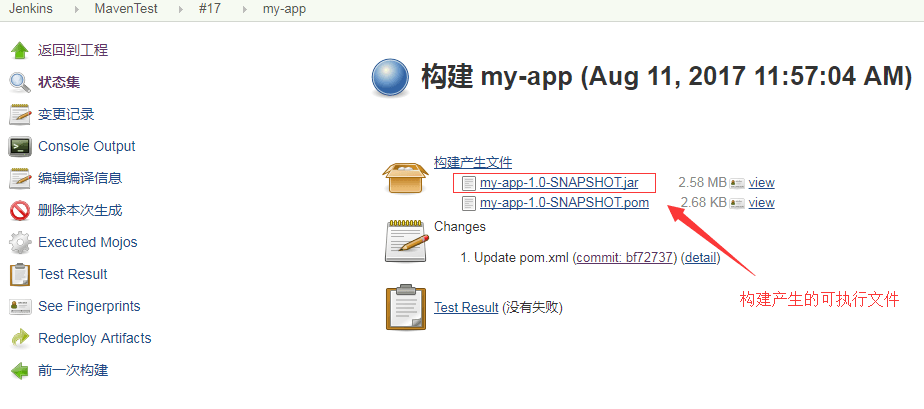
Under 【Module Builds】, click 【my-app】 to see the files produced by the build.
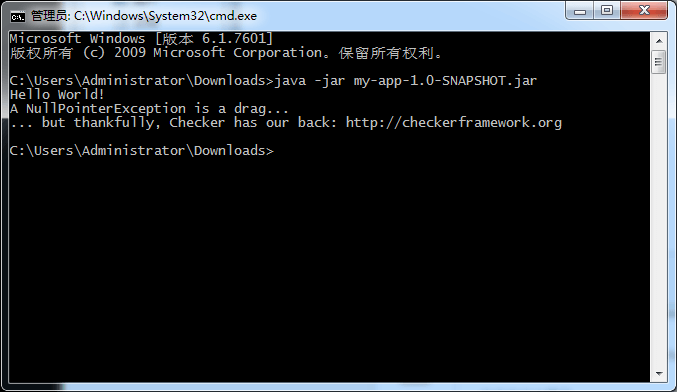
Download the build file locally and run it.
4. References
- https://zh.wikipedia.org/wiki/Jenkins_(%E8%BD%AF%E4%BB%B6)
- https://wiki.jenkins.io/display/JENKINS/Installing+Jenkins+on+Ubuntu
- http://www.jianshu.com/p/22b7860b4e81
- https://wiki.jenkins.io/display/JENKINS/Locale+Plugin
- http://books.xueboren.com/linux/zh-cn/ServersInstallAndConfig/Jenkins/Jenkins-xbooks.html
- http://files.cnblogs.com/files/itech/Jenkins%E5%85%A5%E9%97%A8.pdf
