One of the illusions that programmers at big companies easily fall into is mistaking platform capabilities for their own abilities. In a large team, we should not focus only on our own little patch of ground; we need to understand every part of the platform. On one hand, this helps us make better use of the platform’s features; on the other, it helps our own technical growth. This article describes how to build an automated development and deployment pipeline for Django using Jenkins, Docker, and GitLab. The relevant tools are all open source and ready to use out of the box.
1. Development Workflow
In the production environment, the web application is deployed with multiple K8S instances, and the stateful services MySQL and RabbitMQ are deployed as clusters. Monitoring, log collection, and log search and other surrounding facilities were also set up.
Compared with the production environment, for the development workflow here I want to simulate production as closely as possible, but it does not need to be too polished. After all, personal time and energy are limited, and improving things step by step as needs arise is a good choice.
Here GitLab is used as the development repository, Jenkins as the automation engine, and Docker images for deployment.
Below is a simple deployment flow:
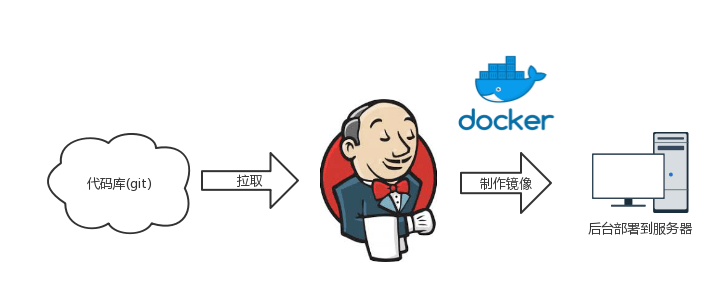
When the trigger condition is met, Jenkins automatically pulls the code from GitLab, builds a Docker image, and finally runs the Django instance on the server. This is basically enough to simulate the entire deployment flow.
2. GitLab Configuration
GitLab was chosen because it allows creating private repositories.
- Create a repository
First, create a GitLab repository, for example: ProjectA
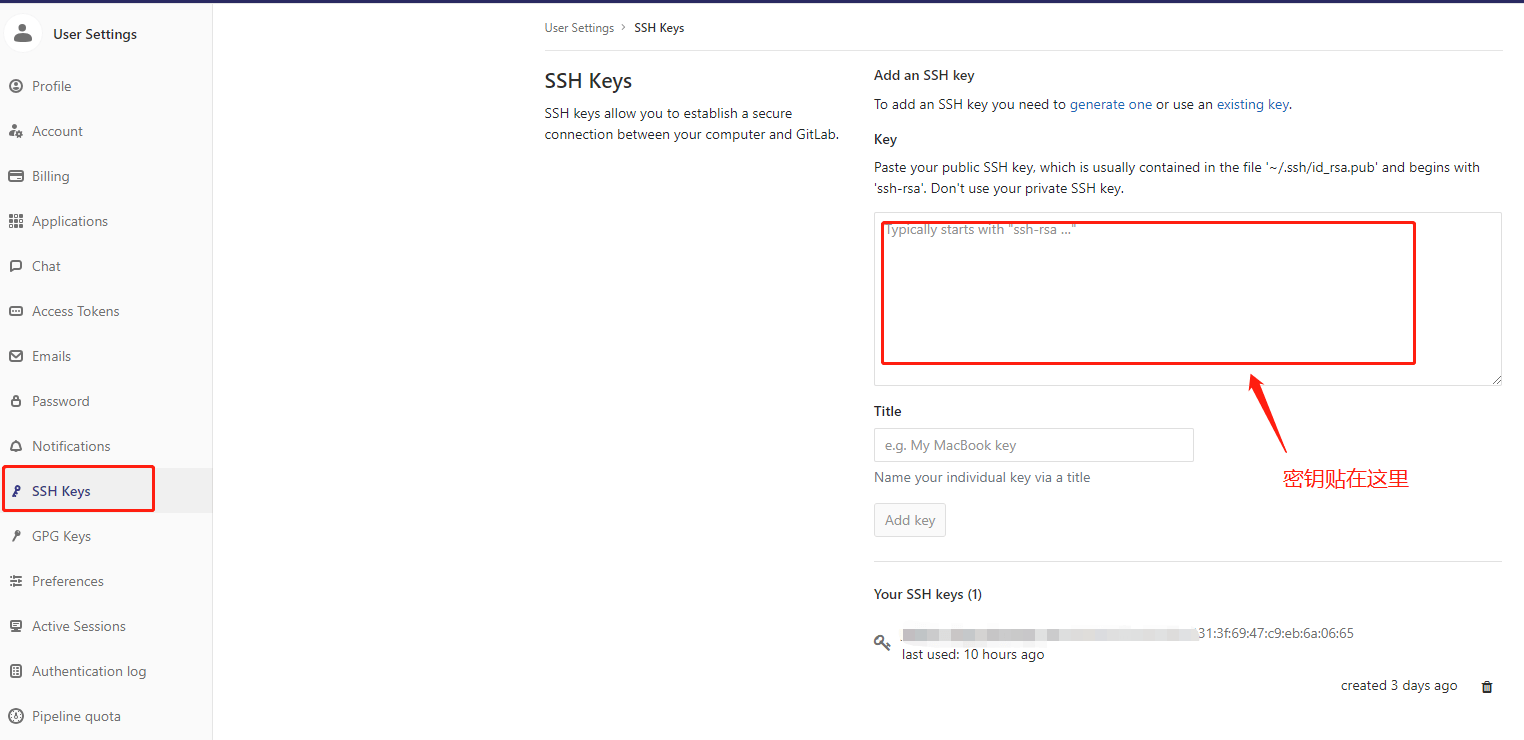
- Add an SSH key for remote access
Run the following command locally to generate the SSH key needed for remote access
| |
On the https://gitlab.com/profile page, find [SSH Keys] and add the key generated above.
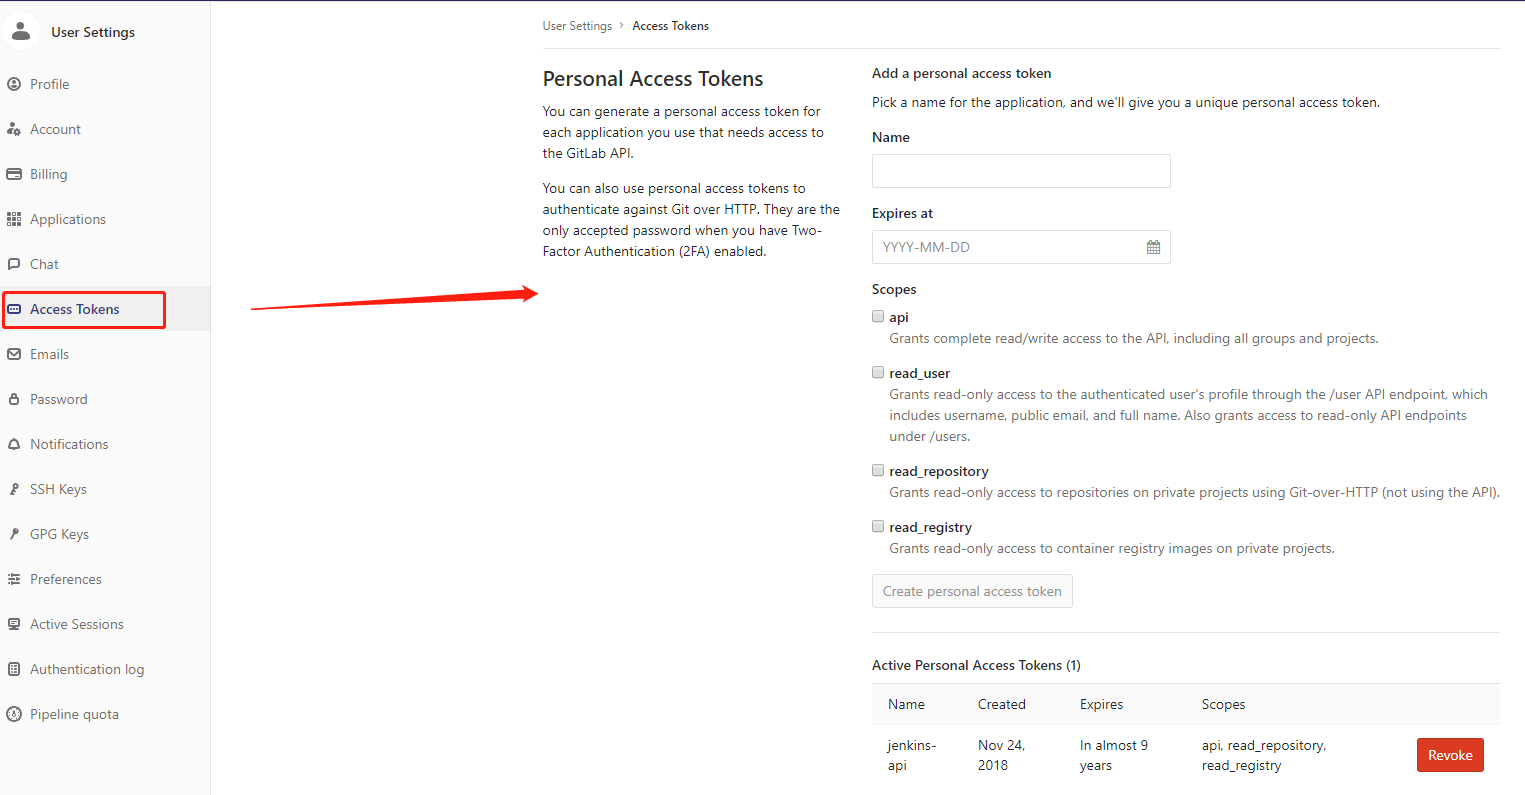
- Generate a token for accessing your personal repository
On the https://gitlab.com/profile page, find [Access Tokens], fill in the information, and click generate to get a PersonToken.
3. Jenkins Configuration
Jenkins can expose an API directly and also supports plugin extension. For teams familiar with Java, Jenkins is very appealing. With Jenkins you can satisfy all kinds of CI and CD needs.
The Jenkins here is mainly used to deploy services. By receiving the commit information sent by GitLab, it pulls the latest code, runs a script, and completes the deployment.
- Install the GitLab-related plugins
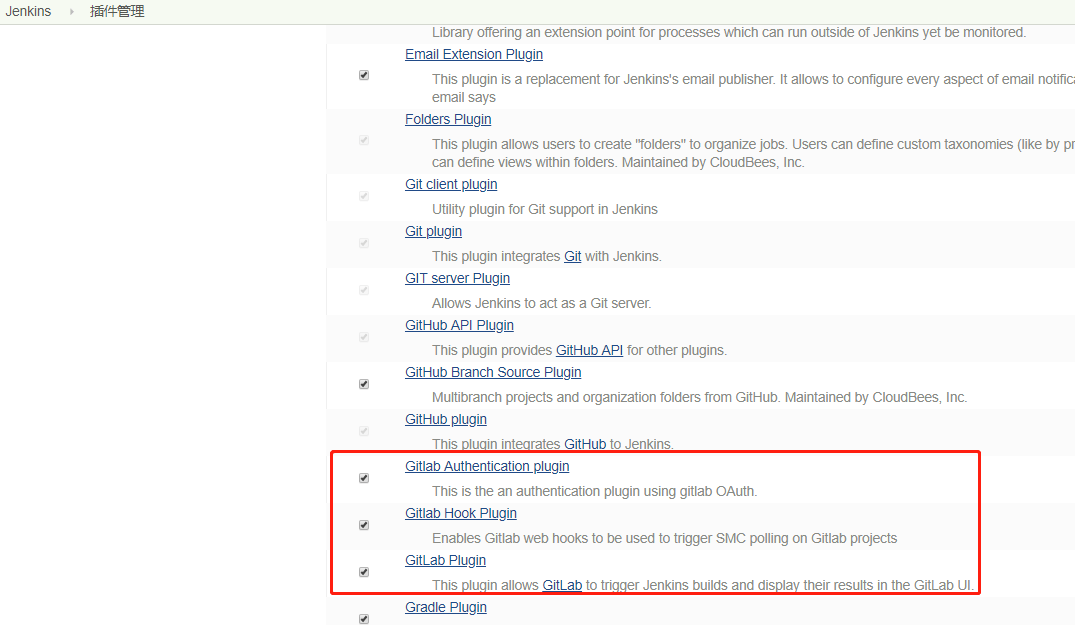
The Jenkins plugins needed here are mainly:
- Gitlab Authentication plugin
- Gitlab Hook Plugin
- Gitlab Plugin
In [Jenkins] -> [Plugin Manager], search for and install the plugins, then restart Jenkins for them to take effect.
- Add GitLab access credentials
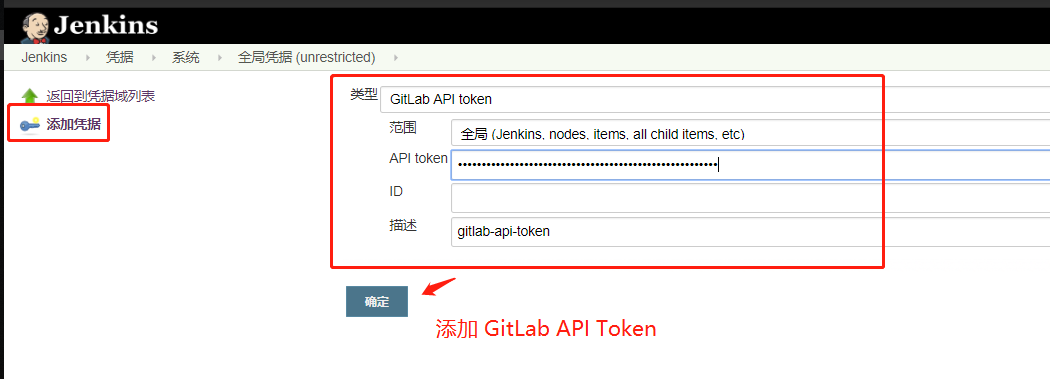
In [Jenkins] -> [Credentials] -> [System] -> [Global credentials (unrestricted)], click [Add Credentials], choose [Gitlab API token] as the type, and use the PersonToken generated in chapter 2 as the API token.
- Create a pipeline and configure the repository
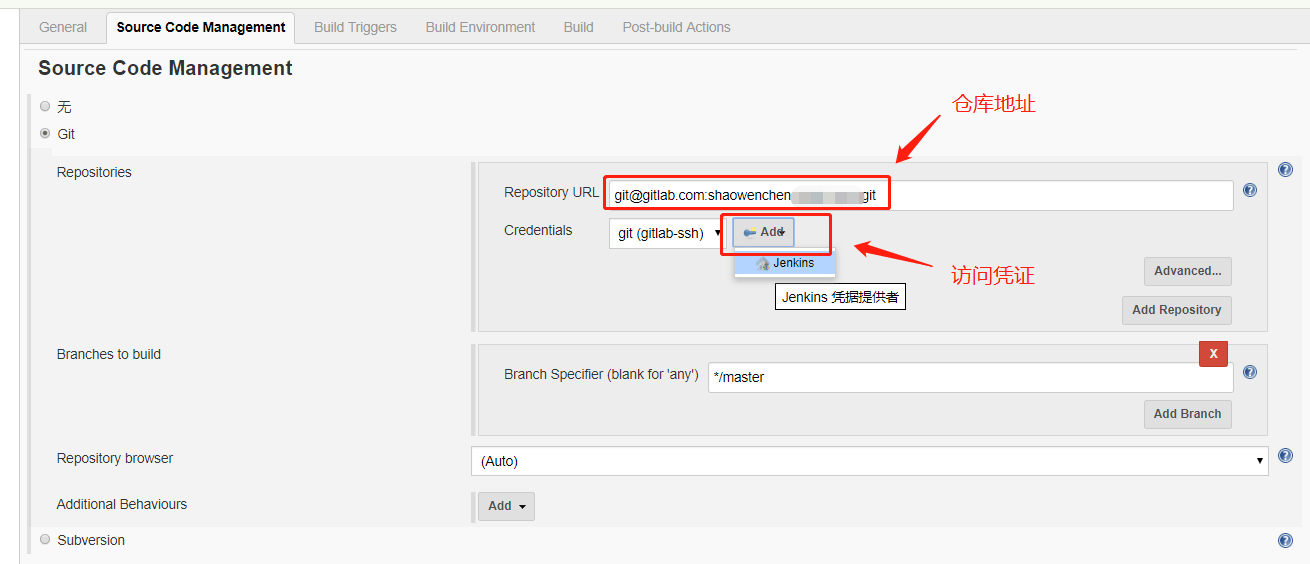
Create a [Build a free-style software project] and fill in the repository address of ProjectA as shown above. Click to add an SSH key access credential.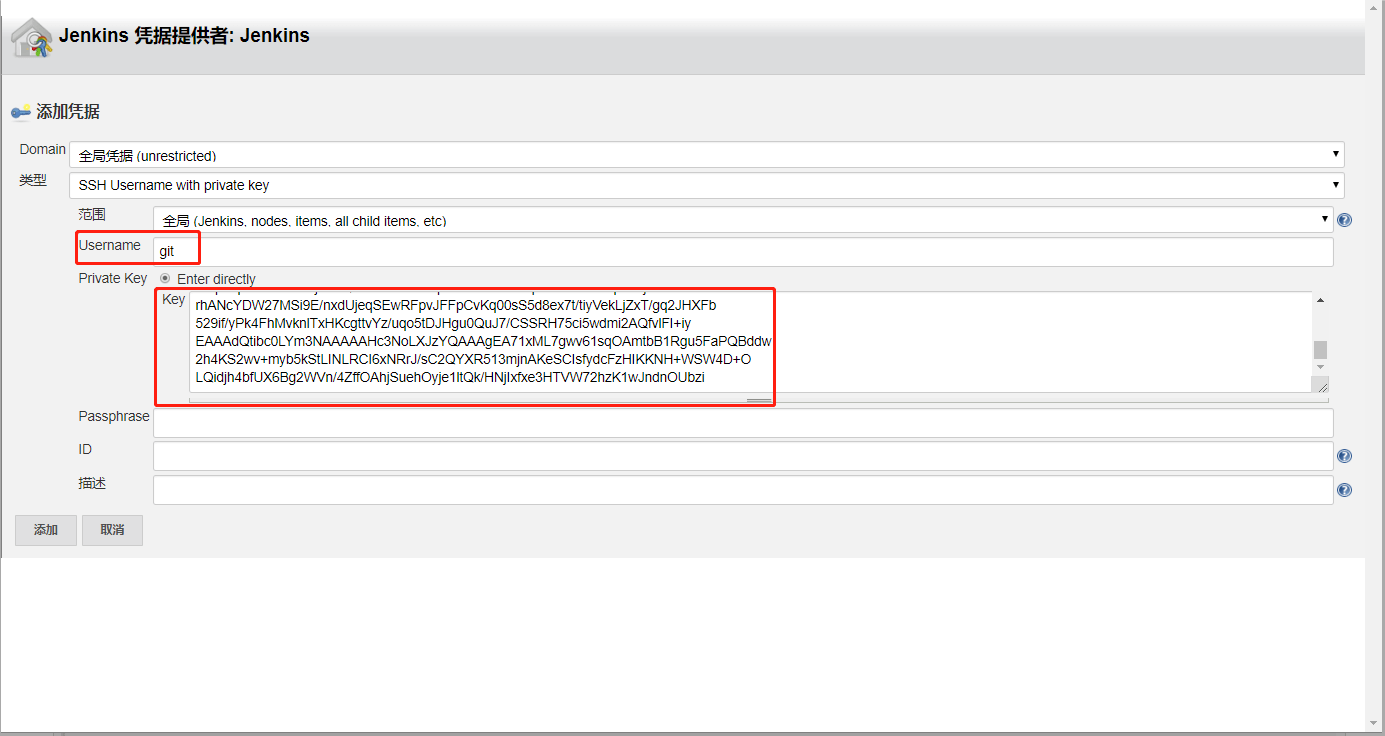
- Configure the Jenkins trigger rule
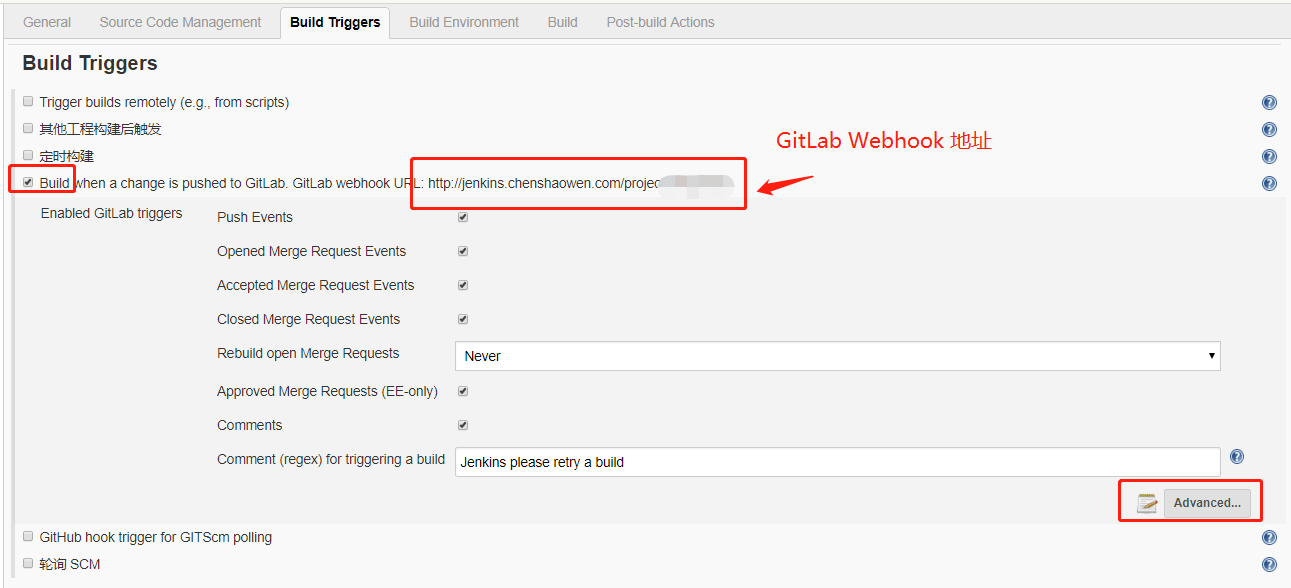
As shown above, under [Build Triggers] check [Build when a change is pushed to GitLab. GitLab webhook URL:] to get the GitLab Webhook address. Click [Advanced] to generate a Token.
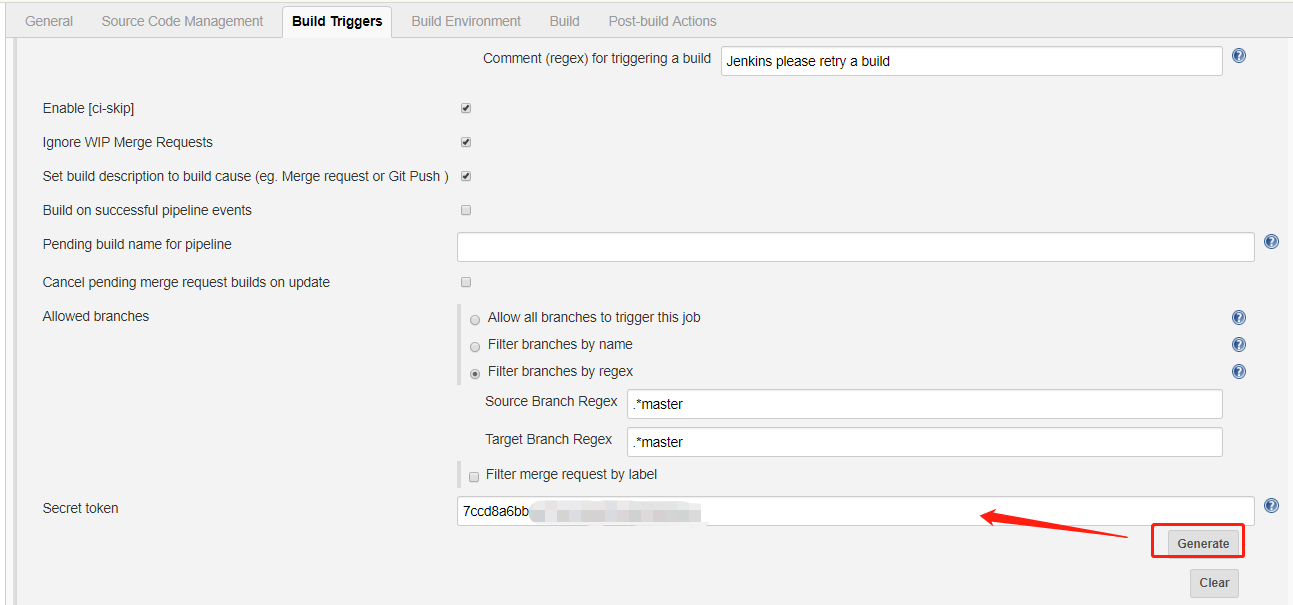
- Configure the Webhook in GitLab
In the previous step two values were obtained: the GitLab Webhook and the Token.
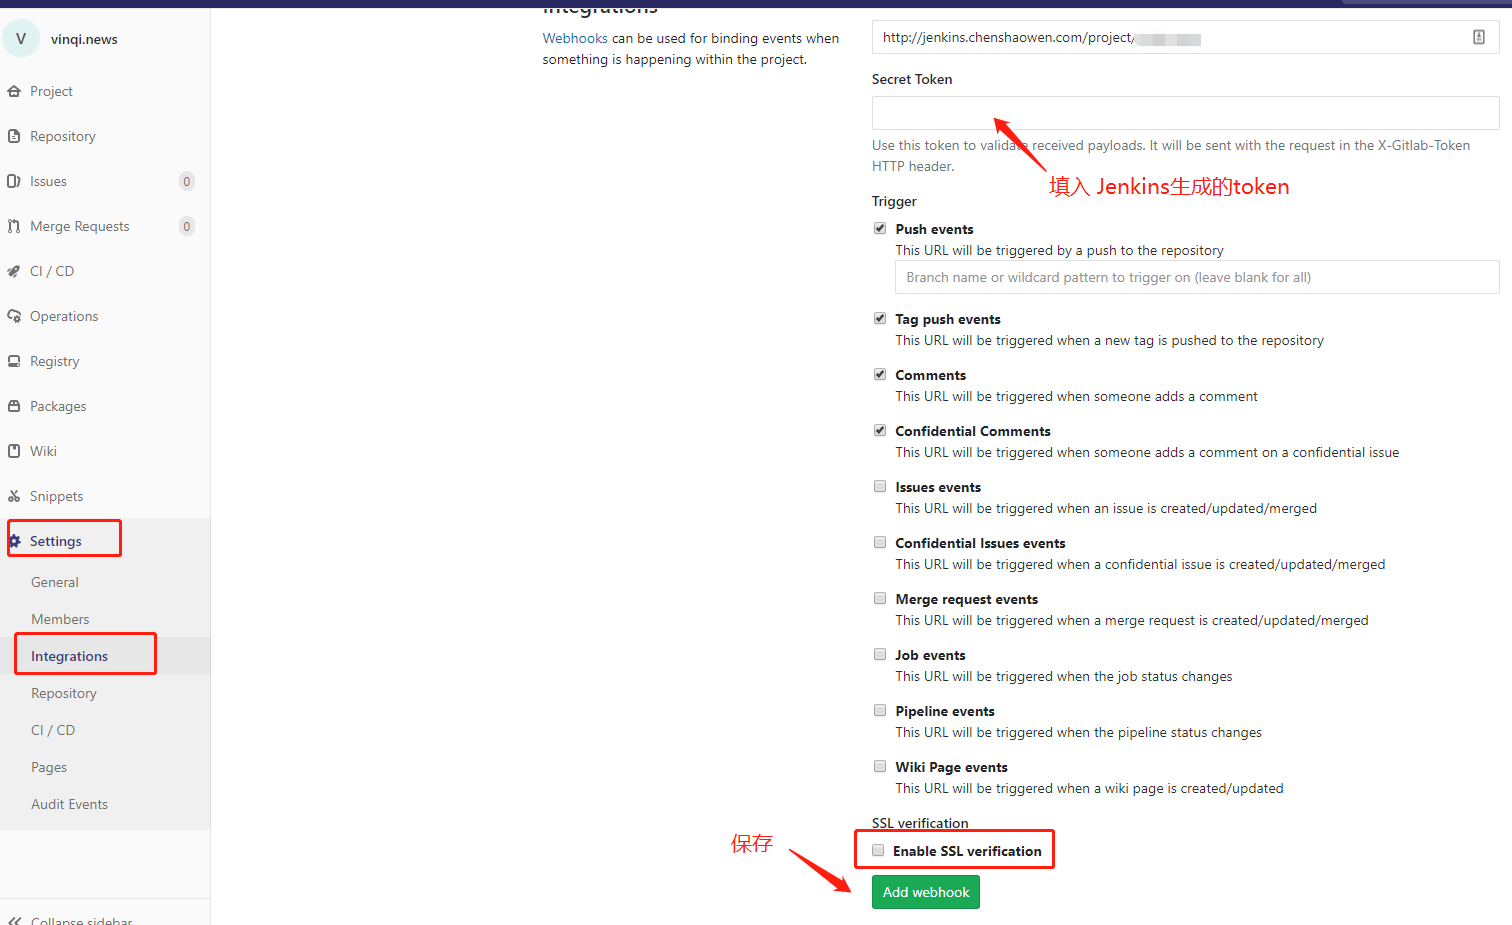
As shown above, fill in the relevant information under [Settings] -> [Integrations] in the GitLab project repository. If your Webhook is not an https link, you also need to uncheck [Enable SSL verification].
- Jenkins build configuration
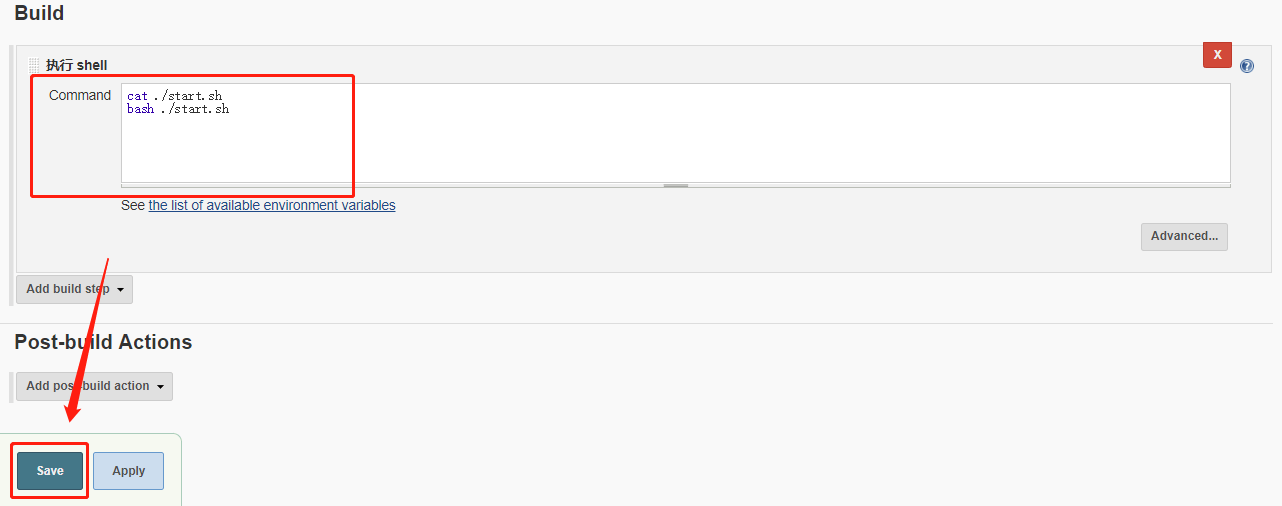
The build configuration is in fact the script command that Jenkins executes after pulling the repository code. Here you can simply run the start.sh script under the project.
4. Building the Docker Image
Deploying with Docker helps package environment dependencies and horizontally scale the service. In a production environment, deployment is usually done with multiple instances plus a cluster to ensure high availability of the service.
Here docker-compose is mainly used to build images and orchestrate the containers the Django runtime needs.
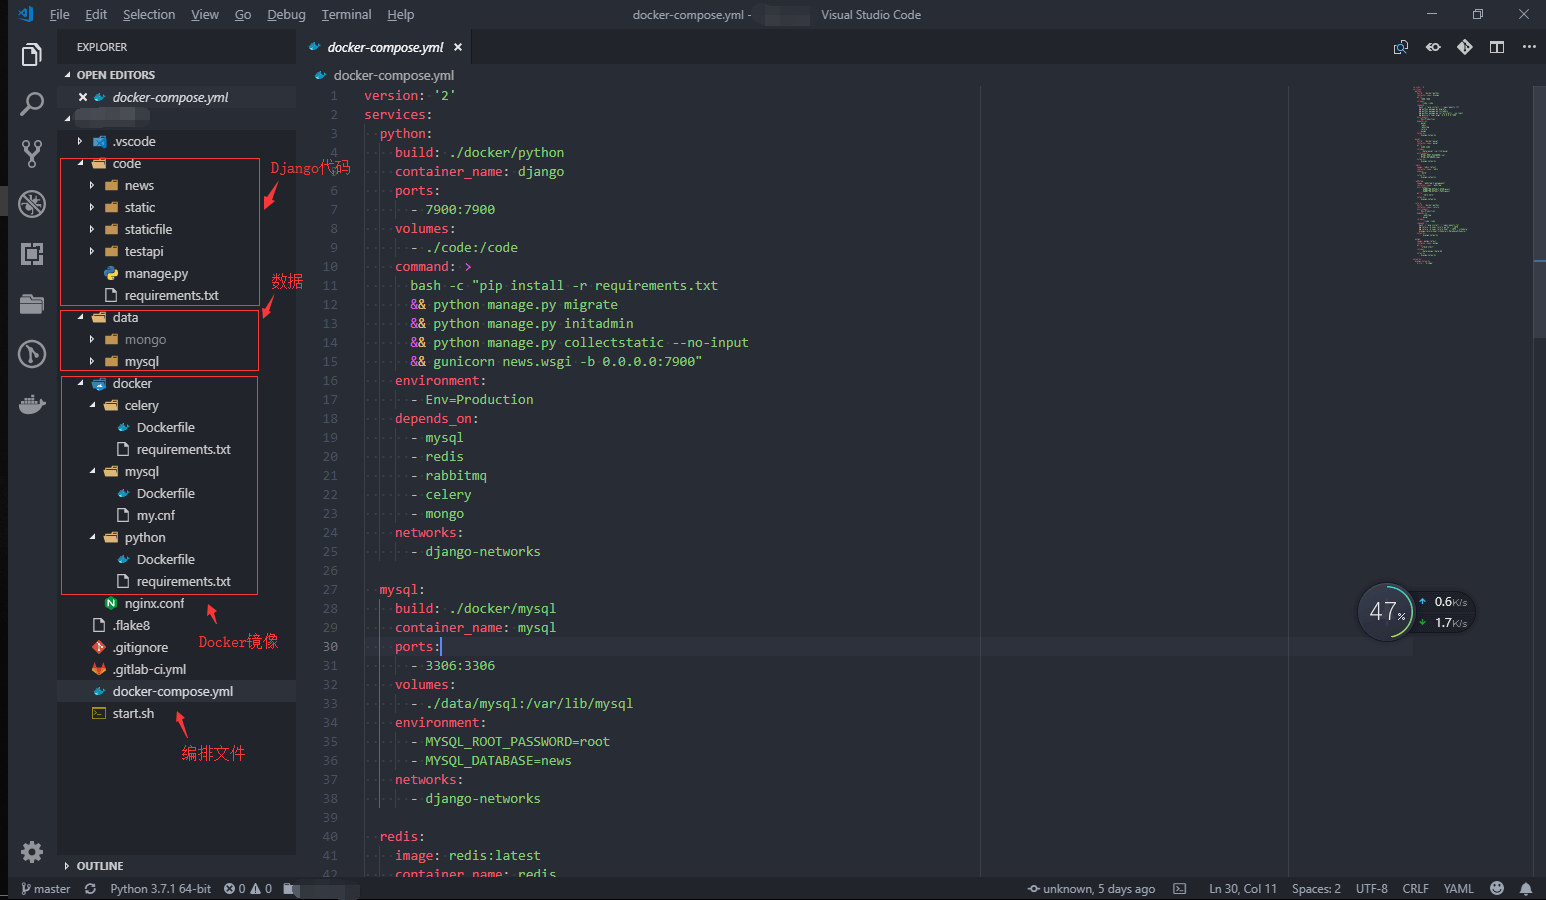
The image above shows the directory structure of the whole repository, divided into four parts.
4.1 Django Project Code
Django uses the default directory structure, and there are two things to note:
- Distinguish environments via an environment variable
At startup, an environment variable needs to be passed in to let Django distinguish environments. In the settings.py file:
| |
- In Django’s DEBUG=False mode, static files cannot be forwarded, so WhiteNoise needs to be configured
| |
4.2 Data Storage
By mounting the data directory into Docker as a volume, you can preserve the running state and avoid losing data when a container restarts.
4.3 Image Configuration
The Python image needs the basic dependency packages installed.
Dockerfile:
| |
requirements.txt file
| |
MySQL image, used to provide the DB access service.
Dockerfile:
| |
my.cnf file:
| |
- Container orchestration
Here the Python image is reused to provide the django and celery container environments. Django is started via gunicorn.
| |
The start.sh script, used to build the image and restart the containers.
| |
5. Running Tests
After committing code to the GitLab repository, the Jenkins pipeline is triggered automatically.
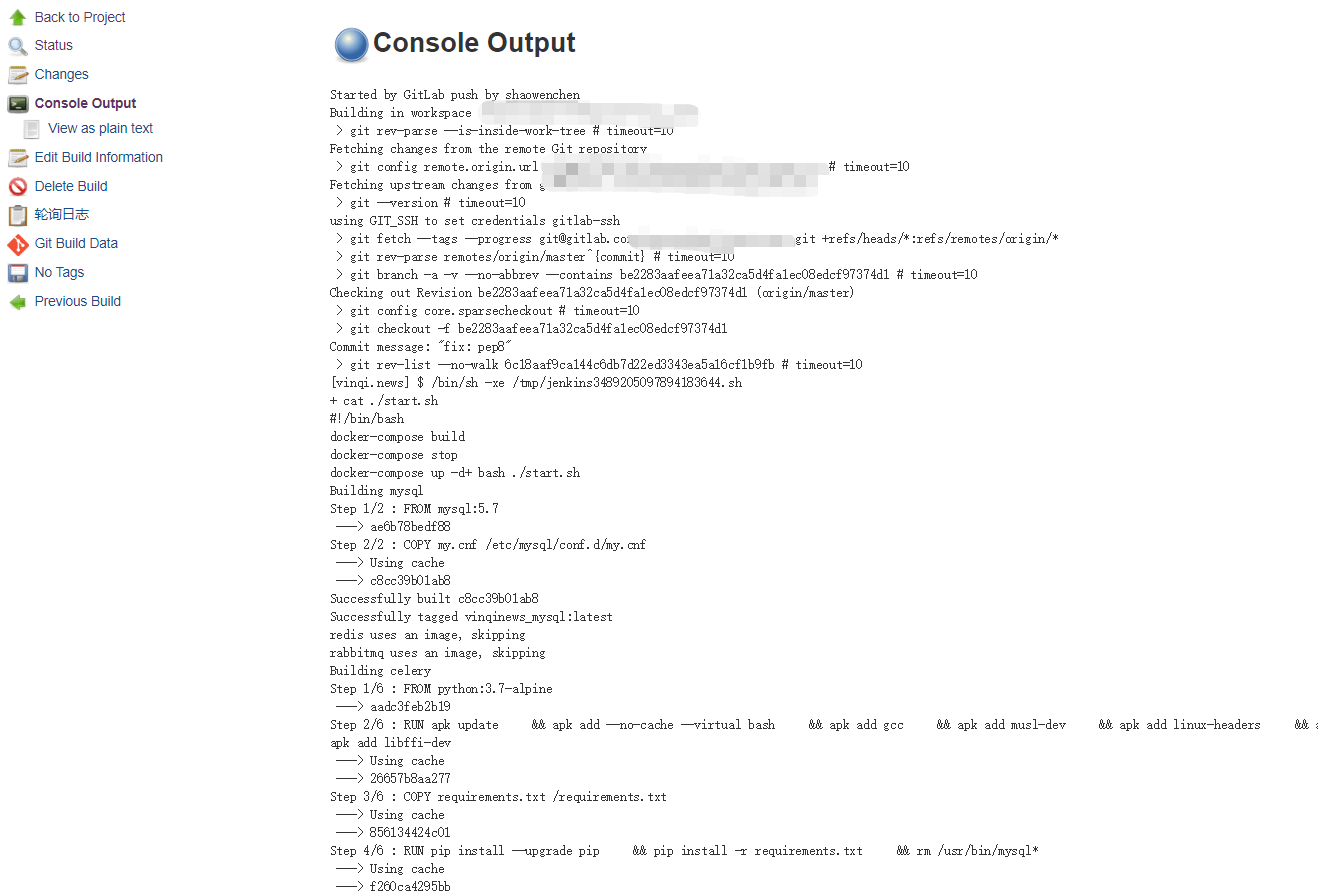
At this point the service is accessible on port 7900. If you need to bind a domain, add an Nginx Server configuration:
| |
By triggering a Celery background task, you can confirm that Celery, RabbitMQ, and MySQL all provide their services normally.
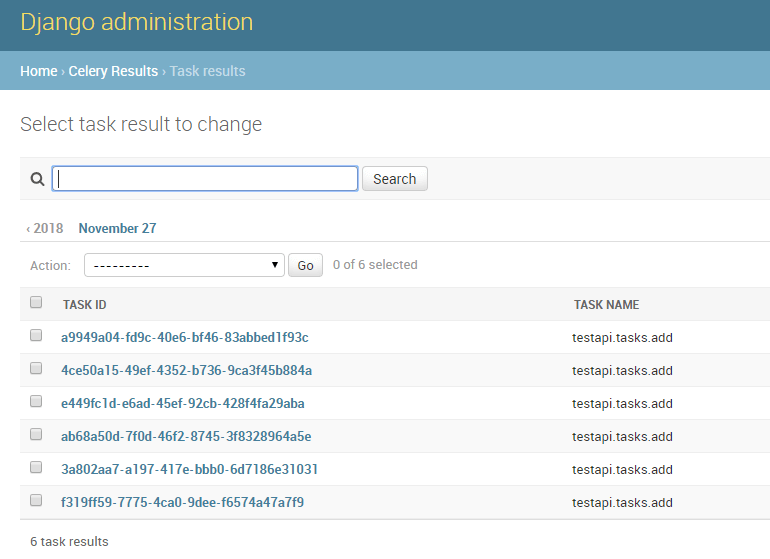
6. Comparison with the Production Environment
- High availability
The key to high concurrency is being stateless, using clusters to provide high-performance, highly available services for state. Here MySQL, RabbitMQ, and Redis are all single instances; a production environment needs cluster deployment.
On the other hand, single-machine single-instance deployment is very unreliable; it is best to use multi-machine multi-instance deployment.
- Runtime logs
For online services, logs are important information for auditing and troubleshooting errors. Using ELK + Filebeat to collect logs at different stages of the chain and at different levels, and to string them together in chronological order, is very necessary.
- Runtime isolation
A single host in a production environment may run many instances, and the resources each instance uses — CPU, memory, IO, and so on — need to be isolated to avoid them affecting one another.
- Service registration
Here we add a service by adding an Nginx Server configuration. You can automate this process with Etcd + Confd; see a previous article. If you use K8S, Ingress can achieve a similar effect.
- Monitoring
A production environment, of course, also cannot do without monitoring and alerting on the status of various services. You can use open-source monitoring tools such as Prometheus + Grafana to quickly build a monitoring system.
