1. Specify a Node via nodeSelector When Creating a Workload
- Add a label to the node
| |
- Create the workload with the specified nodeSelector
| |
- Check the workload
| |
As expected, the Pod runs on the specified node node2.
- Clean up the environment
| |
In fact, there is another node selection parameter, nodeName, which directly specifies the node name. But this setting is too rigid, and it bypasses Kubernetes’ own scheduling mechanism, so it is rarely used in production.
2. Bind a Namespace to a Node via Admission Control
Specifying a nodeSelector when creating a workload lets you set the node a Pod runs on. But if you want to bind all Pods under a namespace to run on a specified node, that approach falls short. Using the kube-apiserver’s admission control can achieve this goal — a feature that entered the alpha stage back in Kubernetes 1.5.
2.1 Modify kube-apiserver Parameters
Edit the kube-apiserver file:
| |
Add PodNodeSelector to admission-plugins:
| |
Here NodeRestriction is enabled by default. For a highly available cluster, you need to modify every kube-apiserver. After the modification, wait a moment for kube-apiserver to finish restarting.
2.2 Add an Annotation to the Namespace
Edit the namespace and add an annotation:
| |
| |
scheduler.alpha.kubernetes.io/node-selector can be a node name or a label key-value pair.
2.3 Add the Specified Label to the Node
Label the node3 node with project=A:
| |
This binds the workloads in the default namespace to the node node3.
2.4 Create a Workload
- Create a workload for testing
| |
- Check the workload distribution
| |
As you can see, although the cluster has 4 available nodes, all workloads in the default namespace run under the node3 node.
2.5 Clean Up the Environment
- Clean up the label
| |
- Clean up the workload
| |
- Clean up the annotation
kubectl edit ns default
Note that if a namespace already has scheduler.alpha.kubernetes.io/node-selector enabled but the nodes do not have the relevant label, then the Pod will remain in the Pending state and cannot be scheduled until a Node matching the label appears.
3. Group Nodes Using Topology Domains
As shown in the figure below, with the kube-apiserver’s admission control plugin we can establish a model in which each project has one namespace, and each namespace contains specified nodes. This can satisfy the requirements of business isolation and cost accounting. But as a cluster grows larger, a project needs to divide several availability zones within the cluster to guarantee business availability.
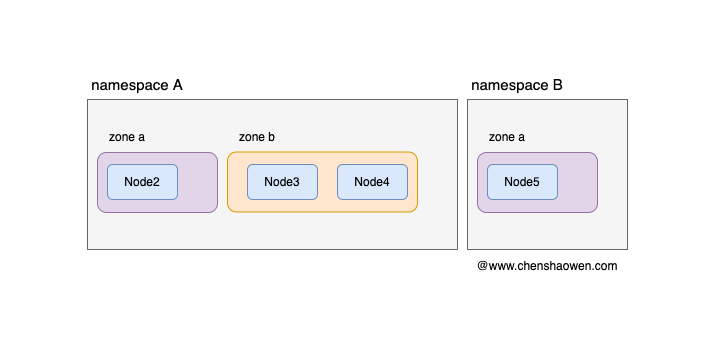
Topology domains mainly solve the problem of Pod distribution across a cluster, and can be used to implement the requirement of Pods targeting specific nodes. The topology domain feature of the Kubernetes cluster scheduler entered the Alpha stage in 1.16 and the Beta stage in 1.18. Let us run some experiments below:
- Divide nodes into different topology domains
Here we assign node2 to zone a, and node3 and node4 to zone b.
| |
| |
- Create a workload
| |
Here topologyKey specifies the Key used to divide topology domains, maxSkew means the difference in the number of Pods between zone=a and zone=b cannot exceed 1, and whenUnsatisfiable: DoNotSchedule means that when the condition is not met, no scheduling is performed.
- Check the Pod distribution
| |
Among them, the node2 node has 10 Pods, the node3 node has 7, and the node4 node has 3. As you can see, the Pods are evenly distributed across zone=a and zone=b.
- Clean up the environment
| |
4. Summary
As a cluster grows larger, problems such as isolation between businesses and exclusive use of nodes by a business begin to surface. Usually, each business has its own separate namespace, so we can bind the namespace to nodes.
This article mainly presents two methods. One is to set nodeSelector directly when creating a workload — a clever trick is to use the namespace value as the value. The other is to rely on the admission control plugin provided by kube-apiserver and, by means of annotations, filter the specified nodes by label when creating workloads in the namespace, thereby completing the binding between the namespace and the nodes.
Thinking further, if the number of nodes is very large and availability zones need to be divided to spread the load, then we can rely on topology domains to achieve this. Through topology domains, we can make workloads distribute evenly across the specified availability zones and racks according to the configured policy.
