For a company that produces technical output, an excellent documentation management and publishing system is indispensable. A documentation system is a kind of content management system; it has high accessibility requirements, a low update frequency per document, and a high publishing frequency. In my opinion, publishing documentation as pure static HTML is a good choice. However, writing HTML documents directly is time-consuming, laborious, and hard to maintain. Can we convert the Markdown documents we commonly use into HTML for publishing? Of course we can. This article mainly introduces how to build a documentation system with Jekyll.
1. Jekyll
1.1 Introduction
Jekyll is a static page generation tool. It can convert Markdown documents into HTML. Jekyll is implemented in Ruby and can be installed with the gem command.
Because Jekyll is easy to use, easy to deploy, and supports Markdown, many blogs adopt the Jekyll approach. At the same time, Jekyll can also integrate with GitHub personal pages: submit Markdown files to GitHub and they are published directly, which is very convenient.
1.1 Project Structure
Using the command jekyll new your_project, you can create a Jekyll project. Below are several commonly used directories:
_includes
Stores some basic elements of a page, such as footer.html, head.html, head.html, script.html, etc. They are all reusable page structures.
_layouts
Stores page layout structures. For example, the homepage style default.html, and the document style post.html. The layout structure for a Markdown document needs to be specified in the document’s header.
_posts
The directory that stores Markdown documents. Naming format: year-month-day-title.md. You can create directories freely, but they must not contain Chinese characters.
_config.yml
The configuration file. You can configure the site’s basic information, global constants (which can be referenced in generated templates), the URL format, the Markdown parsing engine, and so on.
about.md
The about document under the /about/ path.
- index.md.
The homepage document under the / path.
- Gemfile
Specifies which packages and versions need to be used.
- Gemfile.lock
Records the packages and versions already installed in the environment
1.2 Basic Syntax
Because Jekyll uses the Liquid renderer to convert Markdown into HTML. Jekyll’s template syntax is consistent with Liquid.
Liquid basic syntax:
# if 语句
{% if user != null %}
  Hello {{ user.name }}
{% endif %}

# for 循环
{% for item in array %}
  {{ item }}
{% endfor %}

# 过滤器
Hello {{ 'tobi' | upcase }}
Jekyll’s commonly used variables:
| Variable | Description |
|---|---|
| site.time | The current time, the point in time of the command). |
| site.pages | A list of all Pages |
| site.posts | A list of all Posts in reverse chronological order |
| site.related_posts | If the page currently being processed is a Post, this variable will contain up to 10 related Posts. By default, the relevance is low quality, but it can be computed quickly. If you need high relevance, it takes more time to compute. Use this command with the option to compute high-relevance Posts |
| site.categories.CATEGORY | All posts under the CATEGORY category |
| site.tags.TAG | All posts under the TAG tag |
Jekyll’s official documentation has a very detailed explanation of its usage.
1.3 Jekyll’s Windows Runtime Environment
- Step 1: Install ruby and devkit.
Address, http://rubyinstaller.org/downloads/. Download ruby and devkit, install ruby, and add its bin directory to the system PATH.
- Step 1: Extract devkit, and run the commands in its directory.
| |
- Step 3: Set the gem source.
Modify the installation source,
| |
- Step 4: Install Jekyll.
| |
- Step 5: Create a project.
| |
- Step 6: Run the project.
| |
This starts Jekyll at http://127.0.0.1:1000. It may prompt about missing packages; just install them with gem as prompted.
2. Building a Documentation System
Jekyll is just a static HTML generator. A documentation system needs to consider not only document generation, but also version management, release testing, load balancing, ease of editing, fast deployment, and so on.
2.1 Deployment Plan
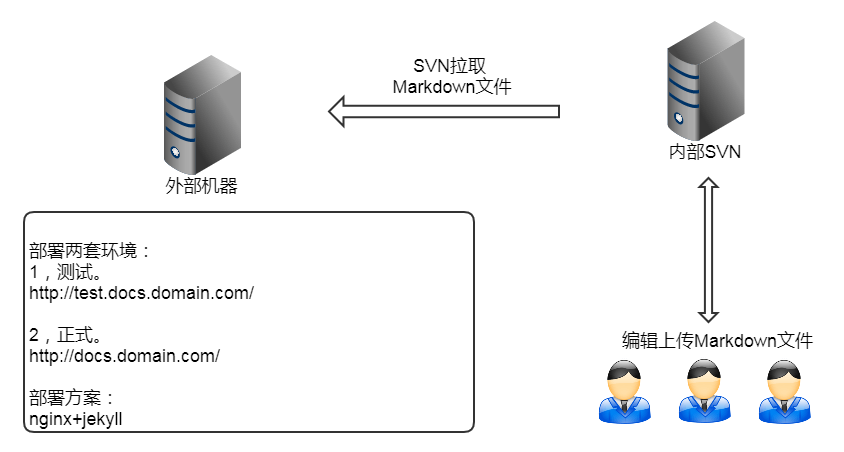
Above is an Nginx + Jekyll deployment plan.
Document editors submit Markdown files to an SVN machine on the internal network, and external machines pull the documents from the SVN server with the svn co command for automatic deployment.
Because a testable publishing environment is needed, when deploying Jekyll you need to deploy two sets, under the test.docs.domain.com and docs.domain.com domains respectively.
The test environment should let document editors see the final converted HTML of a document at any time; it needs high-frequency periodic publishing, or you can use svn hooks to trigger publishing.
Jekyll’s built-in web service is weak, so Nginx is needed as a front end to forward requests, or you can forward requests directly to the static site directory _site generated by Jekyll.
2.2 Service Configuration
A shell script that pulls the Markdown documents from the SVN Server and deploys Jekyll. The test environment and the production environment differ only in port and directory: the test environment uses port 2000, and the production environment uses port 1000.
| |
For the test environment’s deployment script, you can use the crontab command to add a periodic task.
Nginx configuration
# 正式环境配置
server {
        listen       80;
        server_name  docs.domain.com;
	    location /  {
             proxy_pass http://127.0.0.1:1000;
        }
}
# 测试环境配置,测试环境还可以配置一下白名单
server {
        listen       80;
        server_name  test.docs.domain.com;
	    location /  {
             proxy_pass http://127.0.0.1:2000;
        }
}
3. Practical Suggestions
permalink is the setting for the URL generation rule. It can be set in _config.yaml and in the document header. Given the URL generation rule, if two documents generate the same URL, only one of them can be published successfully. Especially when several people collaborate, you must make sure that identical document URLs are not generated.
A CDN solution is better.
This article presents a solution using Nginx as a reverse proxy, which still carries a certain maintenance cost and, at the same time, cannot withstand possible security risks. For sites with static content such as help documentation and official websites, there is a better solution — CDN. Simply upload the static files directly to the CDN, and then bind the CDN to docs.domain.com. For how to batch upload files to Qiniu CDN, please see Qiniu Storage Batch Operations - qshell.
