This page looks best with JavaScript enabled

How to Customize Your Own Jenkins Image

 ·  ☕ 10 min read

1. How to Deploy Jenkins

To make the tests below easier, let me first introduce two ways to deploy Jenkins. Here I use the shaowenchen/jenkins:2.277.4 image. In a production environment, you should replace it with the official jenkins/jenkins image or your own custom image.

1.1 Running with docker-compose

The docker-compose.yaml file

version: '3'

services:
  jenkins:
    image: shaowenchen/jenkins:2.277.4
    container_name: jenkins
    restart: always
    network_mode: "bridge"
    environment:
    - JAVA_OPTS="-Xms1Gi -Xmx4Gi"
    ports:
      - 8080:8080
      - 50000:50000
      - 2222:2222
    environment:
      TZ: Asia/Shanghai
    volumes:
      - /Volumes/Data/jenkins_home:/var/jenkins_home

Create a local directory /Volumes/Data/jenkins_home to store Jenkins data; port 8080 is for web page access, port 50000 is for connecting Agents, and port 2222 is for managing Jenkins over SSH.

1
docker-compose up

After running the command, you can find the initial password for the admin user in the scrolling logs. This is the deployment method I use locally.

1.2 Deploying on Kubernetes

  • Create the configuration file

The values.yaml file

master:
  image: "shaowenchen/jenkins"
  tag: "2.277.4"
  serviceType: NodePort
  nodePort: 38080
  adminPassword: password
  imagePullPolicy: "Always"
  resources:
    requests:
      cpu: "1"
      memory: "2Gi"
    limits:
      cpu: "4"
      memory: "4Gi"
  installPlugins: []

persistence:
  enabled: true
  size: "10Gi"

In the installPlugins configuration item, you can specify the list of plugins to install when Jenkins starts.

  • Add the Helm repository
1
2
helm repo add stable https://charts.helm.sh/stable
helm repo update
  • Install Jenkins
1
helm install jenkins stable/jenkins -f ./values.yaml --namespace default
  • Uninstall Jenkins
1
helm uninstall jenkins --namespace default

2. Managing Jenkins with the CLI

Here I introduce two ways to manage Jenkins from the command line. Jenkins supports CLI management over both SSH and HTTP.

2.1 The First Way: over SSH

  • Generate an ssh-key key pair
1
ssh-keygen -t rsa
  • View the public key
1
cat ~/.ssh/id_rsa.pub
  • Add the SSH public key in Jenkins

Jenkins -> User -> Settings -> SSH Public Keys -> Save
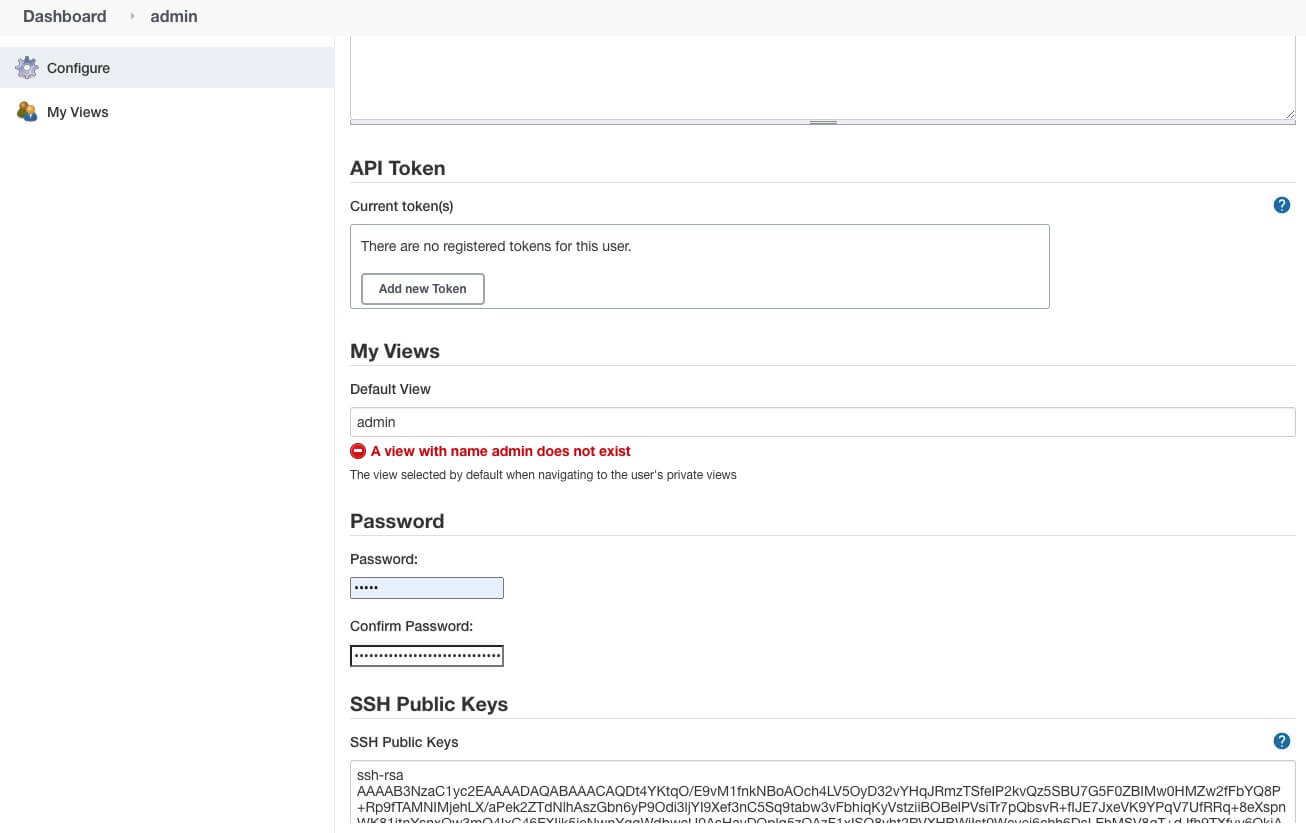
  • Specify the SSHD port

Manage Jenkins -> Global Security Configuration -> SSH Server, specify the port -> Save
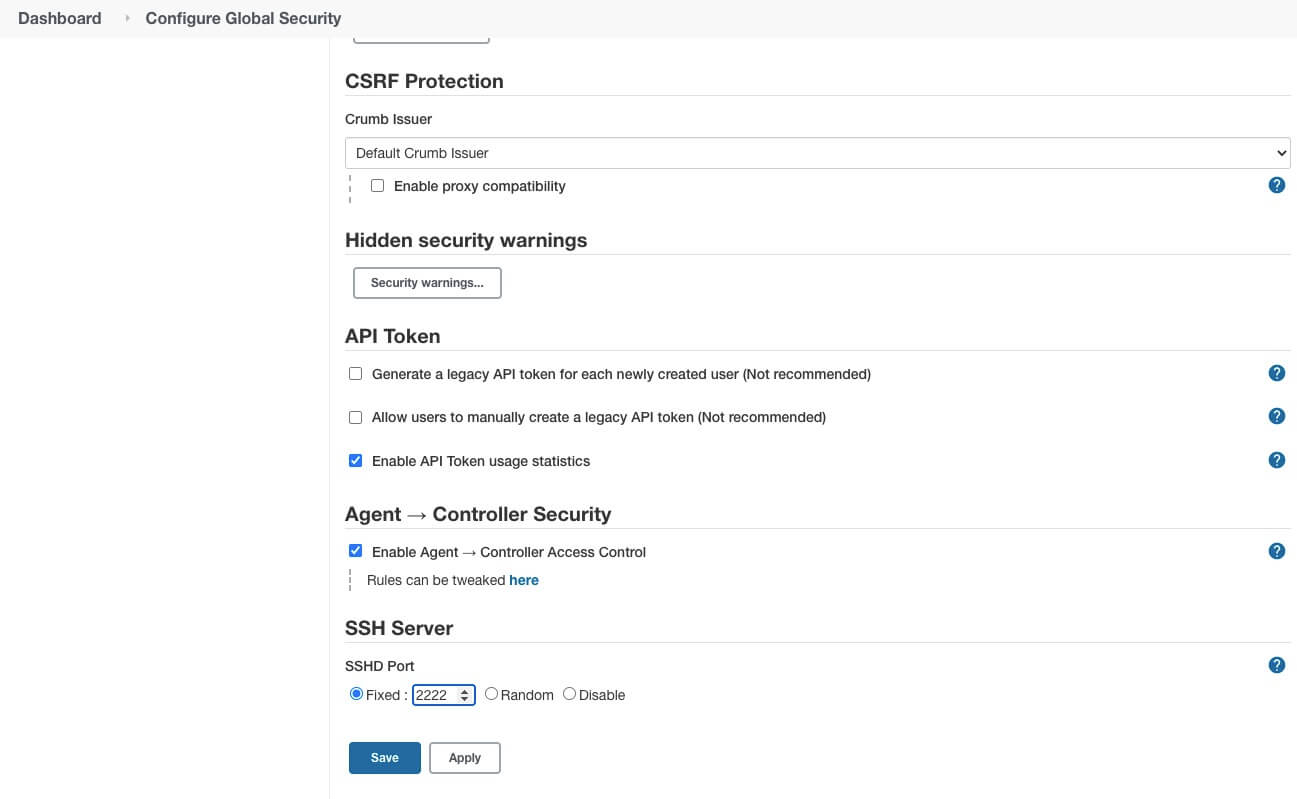
Here port 2222 is used; you can configure it according to your own needs.

  • Manage Jenkins remotely over SSH

Here the default Jenkins administrator account admin is used

1
2
3
ssh -l admin -p 2222 localhost version

2.277.4

2.2 The Second Way: via the Client

http://localhost:8080/ is the Jenkins page, and at the page address http://localhost:8080/jnlpJars/jenkins-cli.jar you can download the Jenkins client tool.

The CLI tool may be incompatible across different Jenkins versions, so it is recommended to download the client tool for the current environment. Here xxx refers to the admin user’s page login password, and it can also be a user-generated API Token.

  1
  2
  3
  4
  5
  6
  7
  8
  9
 10
 11
 12
 13
 14
 15
 16
 17
 18
 19
 20
 21
 22
 23
 24
 25
 26
 27
 28
 29
 30
 31
 32
 33
 34
 35
 36
 37
 38
 39
 40
 41
 42
 43
 44
 45
 46
 47
 48
 49
 50
 51
 52
 53
 54
 55
 56
 57
 58
 59
 60
 61
 62
 63
 64
 65
 66
 67
 68
 69
 70
 71
 72
 73
 74
 75
 76
 77
 78
 79
 80
 81
 82
 83
 84
 85
 86
 87
 88
 89
 90
 91
 92
 93
 94
 95
 96
 97
 98
 99
100
101
102
103
104
105
106
107
108
109
110
111
112
113
114
115
116
117
118
119
120
121
122
123
124
125
126
127
128
129
130
131
132
133
134
135
136
137
138
139
140
141
142
143
144
145
146
147
148
149
150
java -jar jenkins-cli.jar -s http://localhost:8080/ -auth admin:xxx help

  add-job-to-view
    Adds jobs to view.
  apply-configuration
    Apply YAML configuration to instance
  build
    Builds a job, and optionally waits until its completion.
  cancel-quiet-down
    Cancel the effect of the "quiet-down" command.
  check-configuration
    Check YAML configuration to instance
  clear-queue
    Clears the build queue.
  connect-node
    Reconnect to a node(s)
  console
    Retrieves console output of a build.
  copy-job
    Copies a job.
  create-credentials-by-xml
    Create Credential by XML
  create-credentials-domain-by-xml
    Create Credentials Domain by XML
  create-job
    Creates a new job by reading stdin as a configuration XML file.
  create-node
    Creates a new node by reading stdin as a XML configuration.
  create-view
    Creates a new view by reading stdin as a XML configuration.
  declarative-linter
    Validate a Jenkinsfile containing a Declarative Pipeline
  delete-builds
    Deletes build record(s).
  delete-credentials
    Delete a Credential
  delete-credentials-domain
    Delete a Credentials Domain
  delete-job
    Deletes job(s).
  delete-node
    Deletes node(s)
  delete-view
    Deletes view(s).
  disable-job
    Disables a job.
  disable-plugin
    Disable one or more installed plugins.
  disconnect-node
    Disconnects from a node.
  enable-job
    Enables a job.
  enable-plugin
    Enables one or more installed plugins transitively.
  export-configuration
    Export jenkins configuration as YAML
  get-credentials-as-xml
    Get a Credentials as XML (secrets redacted)
  get-credentials-domain-as-xml
    Get a Credentials Domain as XML
  get-job
    Dumps the job definition XML to stdout.
  get-node
    Dumps the node definition XML to stdout.
  get-view
    Dumps the view definition XML to stdout.
  groovy
    Executes the specified Groovy script.
  groovysh
    Runs an interactive groovy shell.
  help
    Lists all the available commands or a detailed description of single command.
  import-credentials-as-xml
    Import credentials as XML. The output of "list-credentials-as-xml" can be used as input here as is, the only needed change is to set the actual Secrets which are redacted in the output.
  install-plugin
    Installs a plugin either from a file, an URL, or from update center.
  keep-build
    Mark the build to keep the build forever.
  list-changes
    Dumps the changelog for the specified build(s).
  list-credentials
    Lists the Credentials in a specific Store
  list-credentials-as-xml
    Export credentials as XML. The output of this command can be used as input for "import-credentials-as-xml" as is, the only needed change is to set the actual Secrets which are redacted in the output.
  list-credentials-context-resolvers
    List Credentials Context Resolvers
  list-credentials-providers
    List Credentials Providers
  list-jobs
    Lists all jobs in a specific view or item group.
  list-plugins
    Outputs a list of installed plugins.
  mail
    Reads stdin and sends that out as an e-mail.
  offline-node
    Stop using a node for performing builds temporarily, until the next "online-node" command.
  online-node
    Resume using a node for performing builds, to cancel out the earlier "offline-node" command.
  quiet-down
    Quiet down Jenkins, in preparation for a restart. Don’t start any builds.
  reload-configuration
    Discard all the loaded data in memory and reload everything from file system. Useful when you modified config files directly on disk.
  reload-jcasc-configuration
    Reload JCasC YAML configuration
  reload-job
    Reload job(s)
  remove-job-from-view
    Removes jobs from view.
  replay-pipeline
    Replay a Pipeline build with edited script taken from standard input
  restart
    Restart Jenkins.
  restart-from-stage
    Restart a completed Declarative Pipeline build from a given stage.
  safe-restart
    Safely restart Jenkins.
  safe-shutdown
    Puts Jenkins into the quiet mode, wait for existing builds to be completed, and then shut down Jenkins.
  session-id
    Outputs the session ID, which changes every time Jenkins restarts.
  set-build-description
    Sets the description of a build.
  set-build-display-name
    Sets the displayName of a build.
  set-external-build-result
    Set external monitor job result.
  shutdown
    Immediately shuts down Jenkins server.
  stop-builds
    Stop all running builds for job(s)
  support
    Generates a diagnostic support bundle.
  update-credentials-by-xml
    Update Credentials by XML
  update-credentials-domain-by-xml
    Update Credentials Domain by XML
  update-job
    Updates the job definition XML from stdin. The opposite of the get-job command.
  update-node
    Updates the node definition XML from stdin. The opposite of the get-node command.
  update-view
    Updates the view definition XML from stdin. The opposite of the get-view command.
  version
    Outputs the current version.
  wait-node-offline
    Wait for a node to become offline.
  wait-node-online
    Wait for a node to become online.
  who-am-i
    Reports your credential and permissions.

The CLI tool basically covers pipeline jobs, nodes, credentials, and Jenkins management functions, which can meet the needs of most operations scenarios.

3. Customizing the Jenkins Version

3.1 Downloading the custom-war-packager-cli Tool

Visit https://repo.jenkins-ci.org/list/releases/io/jenkins/tools/custom-war-packager/custom-war-packager-cli/ and download the latest version of the custom-war-packager tool. Note that you should choose the package with with-dependencies.

The version I downloaded here is 2.0-alpha-5

1
wget https://repo.jenkins-ci.org/list/releases/io/jenkins/tools/custom-war-packager/custom-war-packager-cli/2.0-alpha-5/custom-war-packager-cli-2.0-alpha-5-jar-with-dependencies.jar -O custom-war-packager-cli.jar

3.2 Customizing Jenkins

For the specific configuration, refer to: https://github.com/jenkinsci/custom-war-packager/ . Below is a test configuration of mine:

The config.yaml file

 1
 2
 3
 4
 5
 6
 7
 8
 9
10
11
12
13
14
15
16
17
18
19
20
bundle:
  groupId: com.dev
  artifactId: "jenkins"
  description: "Jenkins Custom With Package"
  vendor: "Jenkins Project"
buildSettings:
  docker:
    base: jenkins/jenkins:2.277.4
    tag: shaowenchen/jenkins:2.277.4
    build: true
war:
  groupId: org.jenkins-ci.main
  artifactId: jenkins-war
  source:
    version: 2.277.4
plugins:
  - groupId: io.jenkins
    artifactId: configuration-as-code
    source:
      version: 1.47

There are two main points to focus on here: buildSettings and plugins. You can also specify a CasC file.

  • buildSettings, which specifies the build artifact. What it means here is to package the shaowenchen/jenkins:2.277.4 image based on the jenkins/jenkins:2.277.4 image.
  • plugins, which specifies the list of plugins to download.

Now let’s compile the image:

1
java -jar ./custom-war-packager-cli.jar --installArtifacts -configPath=./config.yaml

This produces a customized Jenkins image. Run shaowenchen/jenkins:2.277.4 directly, and the configuration-as-code plugin is already built in with no installation needed.

4. How to Add New Plugins to Jenkins

4.1 The First Way: Search on the Page or Upload Offline

Open the Jenkins plugin management page and search online directly.
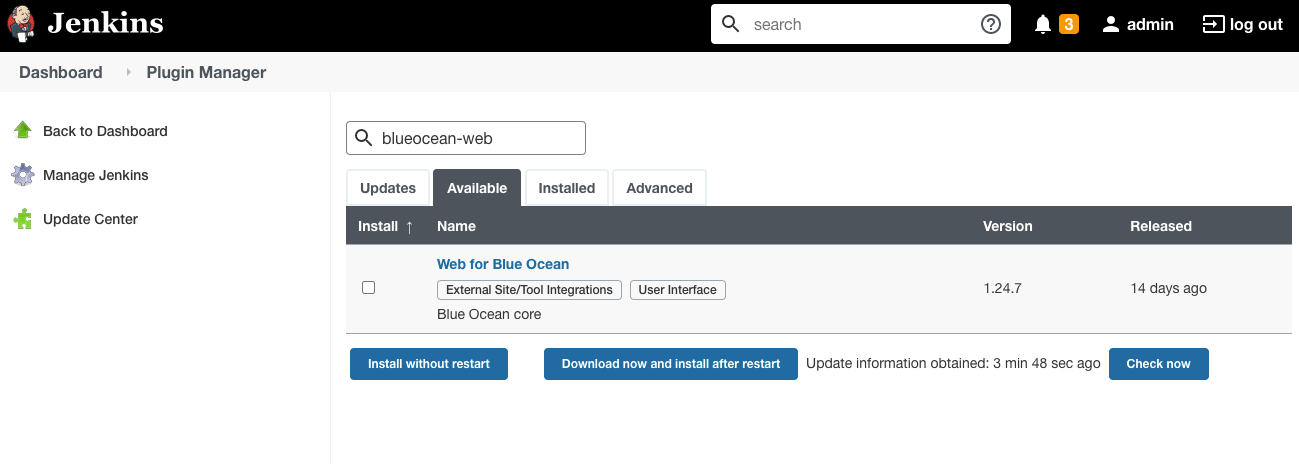
Then, click install.
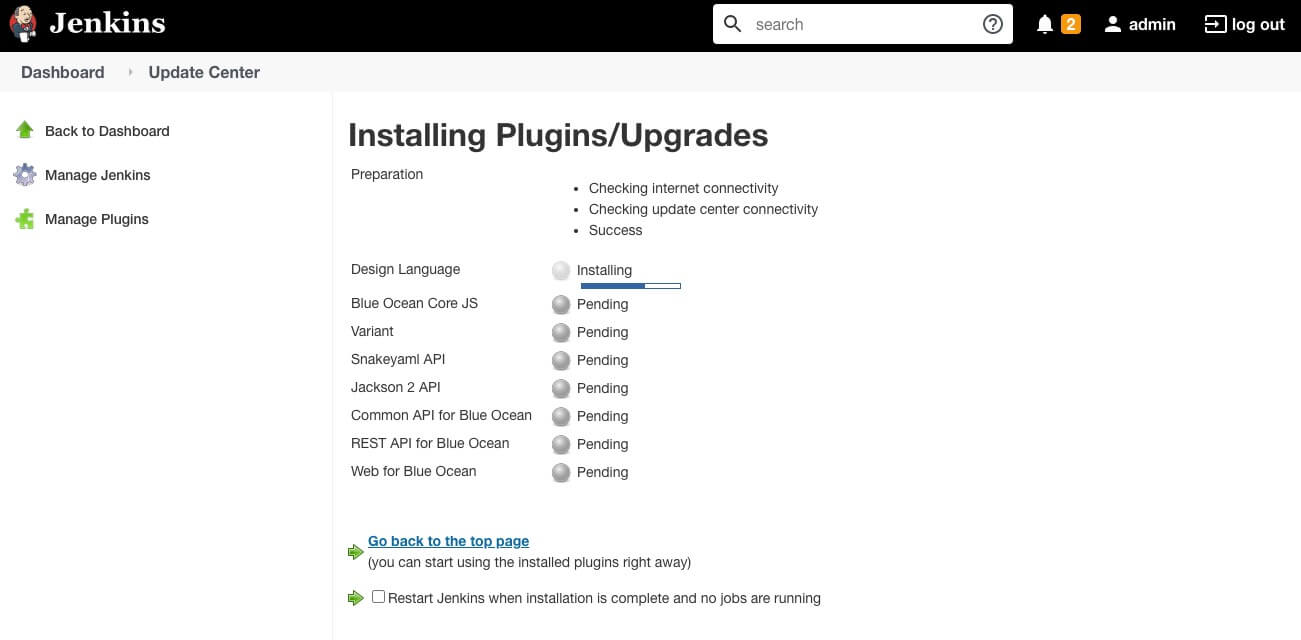
The official default plugin source is https://updates.jenkins.io/update-center.json . If access is not fast enough, you can change it to another source. In Plugin Management -> Advanced -> Update Site, replace the URL with https://mirrors.tuna.tsinghua.edu.cn/jenkins/updates/update-center.json .

Another way is offline upload, but Jenkins plugins have dependencies on each other, so an offline upload has to upload all the dependency packages, which is rather troublesome and not recommended. In an offline environment, you can collect the list of dependent plugins into a text file, then use plugin-installation-manager-tool to download them, and provide the plugin source through Nginx.

4.2 The Second Way: via the CLI Tool

As mentioned earlier, Jenkins can be managed through the CLI tool, which includes plugin management.

  • Use the client’s install-plugin subcommand to install the specified plugin
1
java  -jar jenkins-cli.jar -s http://localhost:8080/ -auth admin:xxx install-plugin blueocean-web:1.24.7
  • Restart Jenkins for it to take effect
1
java  -jar jenkins-cli.jar -s http://localhost:8080/ -auth admin:xxx restart

But this approach does not solve the plugin dependency conflict problem. That is, when new plugin A depends on the latest version of plugin B, plugin B will not be updated automatically, which makes new plugin A unavailable. And if you upgrade B directly, it may in turn make other plugins that depend on B unavailable. Here you need to determine the version dependencies.

4.3 The Third Way: via custom-war-packager

From what we learned earlier, we know that we only need to add new plugins to the config.yaml file.

1
2
3
4
5
6
7
8
9
plugins:
  - groupId: io.jenkins
    artifactId: configuration-as-code
    source:
      version: 1.47
  - groupId: io.jenkins.blueocean
    artifactId: blueocean-web
    source:
      version: 1.24.7

Then recompile and repackage, but you will find that the plugin still does not work properly, again because the plugin dependency conflict problem is not solved.
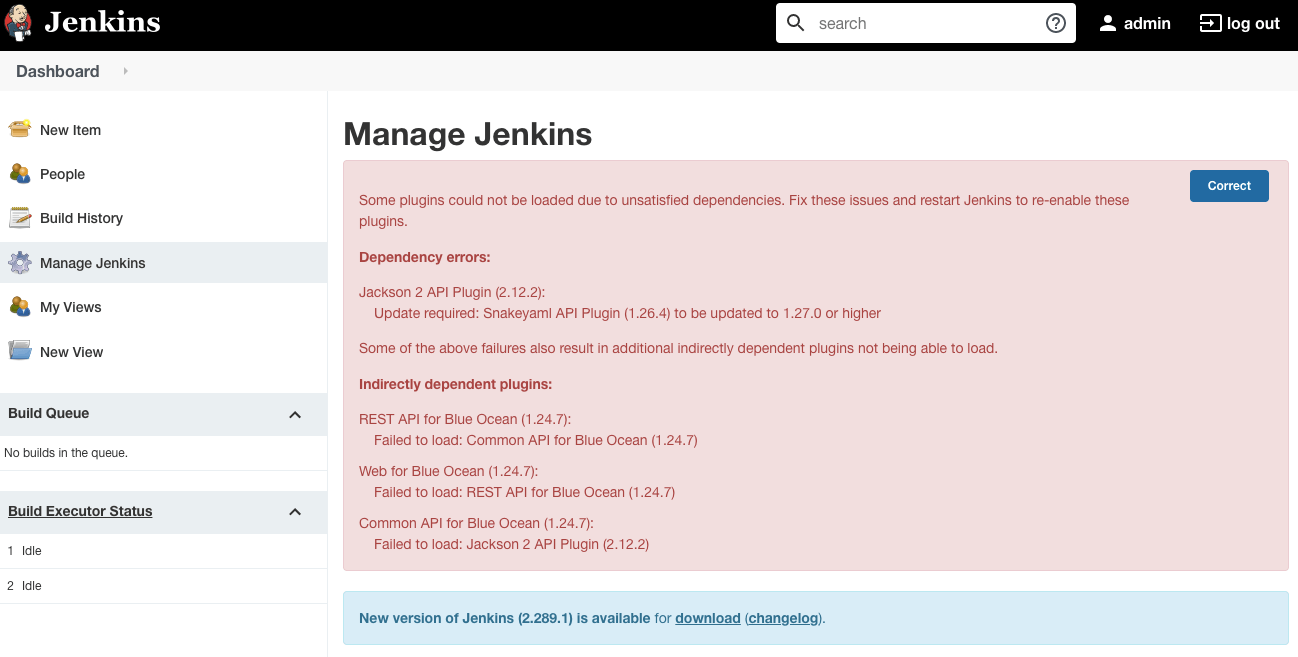
According to the page prompt, we need to upgrade a dependency package, Snakeyaml API Plugin, from 1.26.4 to 1.27.0. In that case, you just need to write it explicitly in the config.yaml file.

 1
 2
 3
 4
 5
 6
 7
 8
 9
10
11
12
13
plugins:
  - groupId: io.jenkins
    artifactId: configuration-as-code
    source:
      version: 1.47
  - groupId: io.jenkins.blueocean
    artifactId: blueocean-web
    source:
      version: 1.24.7
  - groupId: io.jenkins.plugins
    artifactId: snakeyaml-api
    source:
      version: 1.27.0

After compiling and building again, Jenkins runs normally.

5. Summary

As an orchestration engine that has existed for more than ten years, Jenkins has a significant first-mover advantage, and its plugin ecosystem and surrounding tooling are very mature.

This article mainly introduces a few features that are not commonly used but are useful:

  • The Jenkins CLI tool. Managing Jenkins through a command-line tool is an interesting area, and it makes automated integration very convenient.
  • custom-war-packager for custom images. It packages Jenkins dependencies such as plugins and configuration into a single whole for deployment, which lets you manage the runtime environment well.

However, neither of these two approaches adapts well in terms of plugin compatibility, and both require manual intervention.


微信公众号
WRITTEN BY
微信公众号