1. Why Connect 3FS to Fluid
3FS is a distributed storage system open-sourced by DeepSeek. Its exceptionally impressive performance test results have made it a hot topic, and its star count has risen rapidly.
The team I work on has also been tracking 3FS technically, looking for suitable application scenarios to get the most value out of our AI hardware infrastructure.
The storage systems used by our online inference and training services are all managed through Fluid. Using Fluid makes it easy to create PVCs, which are automatically mounted on the nodes that use the storage — very convenient.
Before connecting it to Fluid, we had already deployed a 3FS storage system in an IB + H100 environment and run some tests. To make it easier to run more tests and create storage for use, we needed to connect 3FS into Kubernetes using Fluid.
2. Building the 3FS builder Image
2.1 Why Provide a Separate 3FS builder Image
- Provide a containerized 3FS build environment
To avoid affecting the host’s local configuration when installing dependencies.
At the same time, compiling on a server environment is recommended, since it needs a lot of build resources. A low-memory configuration will directly cause the build to fail, and too few CPU cores will make the build take too long.
- Provide a containerized 3FS runtime environment
It makes deployment easier. 3FS depends on many dynamic library files, and the builder image can provide a complete dependency environment.
You only need to copy the compiled binary into the builder image and it can run directly.
2.2 Writing the Dockerfile
 1
 2
 3
 4
 5
 6
 7
 8
 9
10
11
12
13
14
15
16
17
18
19
20
21
22
23
24
25
26
27
28
29
30
31
32
33
34
35
36
37
38
39
40
41
42
43
44
45
46
47
48
49
| # Base image
FROM ubuntu:22.04
# Arguments
ARG FOUNDATIONDB_TAG=7.1.26
ARG FOUNDATIONDB_VERSION=${FOUNDATIONDB_TAG}-1
ARG LIBFUSE_TAG=fuse-3.16.1
ARG LIBFUSE_VERSION=3.16.1
# Install system dependencies and build tools
RUN apt update && \
apt install -y \
infiniband-diags cmake libuv1-dev liblz4-dev liblzma-dev libdouble-conversion-dev \
libprocps-dev libdwarf-dev libunwind-dev libaio-dev libgflags-dev \
libgoogle-glog-dev libgtest-dev libgmock-dev clang-format-14 clang-14 \
clang-tidy-14 lld-14 libgoogle-perftools-dev google-perftools libssl-dev \
ccache gcc-12 g++-12 libboost-all-dev git meson ninja-build lsb-release wget && \
wget https://apache.jfrog.io/artifactory/arrow/$(lsb_release --id --short | tr 'A-Z' 'a-z')/apache-arrow-apt-source-latest-$(lsb_release --codename --short).deb && \
apt install -y -V ./apache-arrow-apt-source-latest-$(lsb_release --codename --short).deb && \
apt update && \
apt install -y -V libarrow-dev && \
rm -rf /var/lib/apt/lists/* apache-arrow-apt-source-latest-$(lsb_release --codename --short).deb
RUN wget https://raw.githubusercontent.com/Mellanox/container_scripts/refs/heads/master/ibdev2netdev -O /usr/sbin/ibdev2netdev && \
chmod +x /usr/sbin/ibdev2netdev
# Install Rust
RUN curl --proto '=https' --tlsv1.2 -sSf https://sh.rustup.rs | sh -s -- -y
# Install FoundationDB client
RUN wget https://github.com/apple/foundationdb/releases/download/${FOUNDATIONDB_TAG}/foundationdb-clients_${FOUNDATIONDB_VERSION}_amd64.deb && \
dpkg -i ./foundationdb-clients_${FOUNDATIONDB_VERSION}_amd64.deb && \
rm -f foundationdb-clients_${FOUNDATIONDB_VERSION}_amd64.deb
# Build and install libfuse
RUN wget https://github.com/libfuse/libfuse/releases/download/${LIBFUSE_TAG}/fuse-${LIBFUSE_VERSION}.tar.gz && \
tar -zxvf fuse-${LIBFUSE_VERSION}.tar.gz && \
cd fuse-${LIBFUSE_VERSION} && \
mkdir build && \
cd build && \
meson setup .. && \
ninja && \
ninja install && \
cd ../.. && \
rm -rf fuse-${LIBFUSE_VERSION} fuse-${LIBFUSE_VERSION}.tar.gz
# Set up environment variables
ENV PATH="/root/.cargo/bin:${PATH}"
WORKDIR /app
|
2.3 Building and Pushing the Image
1
| docker build -t shaowenchen/3fs-builder:latest . --push
|
If you build with nerdctl, you also need to configure BuildKit; see Building Multi-Architecture Images with Nerdctl.
3. Making the ThinRuntime Image
Fluid offers a way to quickly connect mount-type storage: ThinRuntime. The storage configuration and management capabilities Fluid provides can then be quickly extended to a new storage system.
3.1 Writing the fluid_config_init.py Script
 1
 2
 3
 4
 5
 6
 7
 8
 9
10
11
12
13
14
15
16
17
18
19
20
21
22
23
24
25
26
27
28
29
30
31
32
33
34
35
36
37
38
39
40
41
42
43
44
45
46
47
48
49
50
51
52
53
54
55
56
57
58
59
60
| #!/usr/bin/env python
import json
rawStr = ""
try:
with open("/etc/fluid/config/config.json", "r") as f:
rawStr = f.readlines()
except:
pass
if rawStr == "":
try:
with open("/etc/fluid/config.json", "r") as f:
rawStr = f.readlines()
except:
pass
rawStr = rawStr[0]
script = """
#!/bin/sh
set -ex
# xxxxx@RDMA://0.0.0.0:8000
MNT_FROM=$mountPoint
TOKEN=$(echo $MNT_FROM | awk -F'@' '{print $1}')
RDMA=$(echo $MNT_FROM | awk -F'@' '{print $2}' | awk -F'://' '{print $2}')
RDMA="RDMA://${RDMA}"
echo $TOKEN > /opt/3fs/etc/token.txt
sed -i "s#RDMA://0.0.0.0:8000#${RDMA}#g" /opt/3fs/etc/hf3fs_fuse_main_launcher.toml
CLUSTER_ID=$clusterID
sed -i "s/^cluster_id.*/cluster_id = '${CLUSTER_ID:-default}'/" /opt/3fs/etc/hf3fs_fuse_main_launcher.toml
DEVICE_FILTER=$deviceFilter
if [[ -n "${DEVICE_FILTER}" ]]; then
QUOTED_DEVICE_FILTER=$(echo ${DEVICE_FILTER} | sed "s/\\([^,]*\\)/'\\1'/g")
sed -i "s|device_filter = \\[\\]|device_filter = [${QUOTED_DEVICE_FILTER}]|g" /opt/3fs/etc/hf3fs_fuse_main_launcher.toml
fi
MNT_TO=$targetPath
trap "umount ${MNT_TO}" SIGTERM
mkdir -p ${MNT_TO}
sed -i "s#/3fs/stage#${MNT_TO}#g" /opt/3fs/etc/hf3fs_fuse_main_launcher.toml
cat /opt/3fs/etc/hf3fs_fuse_main_launcher.toml
/opt/3fs/bin/hf3fs_fuse_main --launcher_cfg /opt/3fs/etc/hf3fs_fuse_main_launcher.toml
"""
obj = json.loads(rawStr)
with open("/mount-3fs.sh", "w") as f:
f.write('mountPoint="%s"\n' % obj["mounts"][0]["mountPoint"])
f.write('targetPath="%s"\n' % obj["targetPath"])
f.write('clusterID="%s"\n' % obj["mounts"][0]["options"]["clusterID"])
f.write('deviceFilter="%s"\n' % obj["mounts"][0]["options"]["deviceFilter"])
f.write(script)
|
What this script does is render the parameters Fluid provides dynamically into the 3FS configuration file, then start the 3FS Fuse service.
Starting with Fluid v1.1, Fluid uses /etc/fluid/config/config.json as the configuration file, rather than the /etc/fluid/config.json file used in earlier versions. To stay compatible with the different configuration file paths used by different Fluid versions, I added some compatibility handling in the script.
3.2 Writing the entrypoint.sh Script
1
2
3
4
5
6
7
| #!/usr/bin/env bash
set +x
echo "sleep inf" > /mount-3fs.sh
python3 /fluid_config_init.py
chmod u+x /mount-3fs.sh
bash /mount-3fs.sh
|
3.3 Building hf3fs_fuse_main
- Start the 3FS builder container
1
| docker run -it --rm -v $(pwd):/app shaowenchen/demo:3fsbuilder bash
|
1
2
3
| git clone https://github.com/deepseek-ai/3FS
cd 3FS
git submodule update --init --recursive
|
1
| cmake -S . -B build -DCMAKE_CXX_COMPILER=clang++-14 -DCMAKE_C_COMPILER=clang-14 -DCMAKE_BUILD_TYPE=RelWithDebInfo -DCMAKE_EXPORT_COMPILE_COMMANDS=ON
|
The -j 100 here is to speed up the build; the exact value can be adjusted according to your own CPU machine configuration. The 3FS community uses 32.
1
| cmake --build build -j 100
|
- Exit the container and inspect the artifacts
1
2
3
4
| ls 3FS/build/bin/
admin_cli hf3fs_fuse_main mgmtd_main monitor_collector_main storage_bench
hf3fs-admin meta_main migration_main simple_example_main storage_main
|
When connecting to Fluid, only the hf3fs_fuse_main binary is needed.
3.4 Preparing the hf3fs_fuse_main_launcher.toml Configuration File
 1
 2
 3
 4
 5
 6
 7
 8
 9
10
11
12
13
14
15
16
17
18
19
20
21
22
23
24
25
26
27
28
29
30
31
32
33
34
35
36
37
38
39
40
41
42
43
44
45
46
47
48
49
50
51
52
53
54
55
56
57
58
59
60
61
62
63
64
65
66
67
68
69
70
71
72
73
74
75
76
77
78
79
80
81
82
83
84
85
86
87
88
89
90
91
92
93
94
95
| allow_other = true
cluster_id = 'stage'
mountpoint = '/3fs/stage'
token_file = '/opt/3fs/etc/token.txt'
[client]
default_compression_level = 0
default_compression_threshold = '128KB'
default_log_long_running_threshold = '0ns'
default_report_metrics = false
default_send_retry_times = 1
default_timeout = '1s'
enable_rdma_control = false
force_use_tcp = false
[client.io_worker]
num_event_loop = 1
rdma_connect_timeout = '5s'
read_write_rdma_in_event_thread = false
read_write_tcp_in_event_thread = false
tcp_connect_timeout = '1s'
wait_to_retry_send = '100ms'
[client.io_worker.connect_concurrency_limiter]
max_concurrency = 4
[client.io_worker.ibsocket]
buf_ack_batch = 8
buf_signal_batch = 8
buf_size = 16384
drain_timeout = '5s'
drop_connections = 0
event_ack_batch = 128
max_rd_atomic = 16
max_rdma_wr = 128
max_rdma_wr_per_post = 32
max_sge = 1
min_rnr_timer = 1
record_bytes_per_peer = false
record_latency_per_peer = false
retry_cnt = 7
rnr_retry = 0
send_buf_cnt = 32
sl = 0
start_psn = 0
timeout = 14
[client.io_worker.transport_pool]
max_connections = 1
[client.processor]
enable_coroutines_pool = true
max_coroutines_num = 256
max_processing_requests_num = 4096
response_compression_level = 1
response_compression_threshold = '128KB'
[client.rdma_control]
max_concurrent_transmission = 64
[client.thread_pool]
bg_thread_pool_stratetry = 'SHARED_QUEUE'
collect_stats = false
enable_work_stealing = false
io_thread_pool_stratetry = 'SHARED_QUEUE'
num_bg_threads = 2
num_connect_threads = 2
num_io_threads = 2
num_proc_threads = 2
proc_thread_pool_stratetry = 'SHARED_QUEUE'
[ib_devices]
allow_no_usable_devices = false
allow_unknown_zone = true
default_network_zone = 'UNKNOWN'
default_pkey_index = 0
default_roce_pkey_index = 0
default_traffic_class = 0
device_filter = []
fork_safe = true
prefer_ibdevice = true
skip_inactive_ports = true
skip_unusable_device = true
subnets = []
[mgmtd_client]
accept_incomplete_routing_info_during_mgmtd_bootstrapping = true
auto_extend_client_session_interval = '10s'
auto_heartbeat_interval = '10s'
auto_refresh_interval = '10s'
enable_auto_extend_client_session = true
enable_auto_heartbeat = false
enable_auto_refresh = true
mgmtd_server_addresses = ["RDMA://0.0.0.0:8000"]
work_queue_size = 100
|
There are two things to note in the configuration:
- The RDMA address will ultimately be injected dynamically by Fluid, so the value in the image should be uniquely identifiable, making sed replacement easy
- When device_filter is empty, all RDMA devices are used by default, which may cause IB and RoCE devices to be mixed and the mount to fail in the end
3.5 Writing the Dockerfile
1
2
3
4
5
6
7
8
9
| FROM shaowenchen/demo:3fsbuilder
RUN apt-get install -y python3
COPY bin /opt/3fs/bin
RUN chmod +x /opt/3fs/bin/* && mkdir -p /var/log/3fs
COPY etc /opt/3fs/etc
COPY ./fluid_config_init.py /
COPY ./entrypoint.sh /usr/local/bin/
RUN chmod +x /usr/local/bin/entrypoint.sh
ENTRYPOINT []
|
3.6 Writing and Pushing the ThinRuntime Image
 1
 2
 3
 4
 5
 6
 7
 8
 9
10
11
| tree -L 3 .
.
├── Dockerfile
├── bin
│ └── hf3fs_fuse_main
├── entrypoint.sh
├── etc
│ ├── hf3fs_fuse_main_launcher.toml
│ └── token.txt
└── fluid_config_init.py
|
token.txt is empty inside the image.
- Build and push the ThinRuntime image
1
| docker build -t shaowenchen/demo:fluid-3fs .
|
4. Mounting 3FS Storage with Fluid
4.1 Creating the ThinRuntimeProfile
 1
 2
 3
 4
 5
 6
 7
 8
 9
10
11
12
13
14
| kubectl apply -f - <<EOF
apiVersion: data.fluid.io/v1alpha1
kind: ThinRuntimeProfile
metadata:
name: 3fs
spec:
fileSystemType: 3fs
fuse:
image: shaowenchen/demo:fluid-3fs
imageTag: latest
imagePullPolicy: Always
command:
- "/usr/local/bin/entrypoint.sh"
EOF
|
4.2 Creating the Dataset
 1
 2
 3
 4
 5
 6
 7
 8
 9
10
11
12
13
| kubectl apply -f - <<EOF
apiVersion: data.fluid.io/v1alpha1
kind: Dataset
metadata:
name: demo-3fs
spec:
mounts:
- mountPoint: my3fsTOKEN@RDMA://x.x.x.x:8000
name: demo-3fs
options:
clusterID: ds3fs
deviceFilter: ""
EOF
|
The mountPoint here is made up of a token and an RDMA address; the token is 3FS’s authentication information, and the RDMA address is the 3FS service address.
4.3 Creating the ThinRuntime
1
2
3
4
5
6
7
8
| kubectl apply -f - <<EOF
apiVersion: data.fluid.io/v1alpha1
kind: ThinRuntime
metadata:
name: demo-3fs
spec:
profileName: 3fs
EOF
|
4.4 Creating the Test Pod
 1
 2
 3
 4
 5
 6
 7
 8
 9
10
11
12
13
14
15
16
17
| kubectl apply -f - <<EOF
apiVersion: v1
kind: Pod
metadata:
name: demo-3fs
spec:
containers:
- name: demo-3fs
image: shaowenchen/demo:ubuntu
volumeMounts:
- mountPath: /data
name: demo-3fs
volumes:
- name: demo-3fs
persistentVolumeClaim:
claimName: demo-3fs
EOF
|
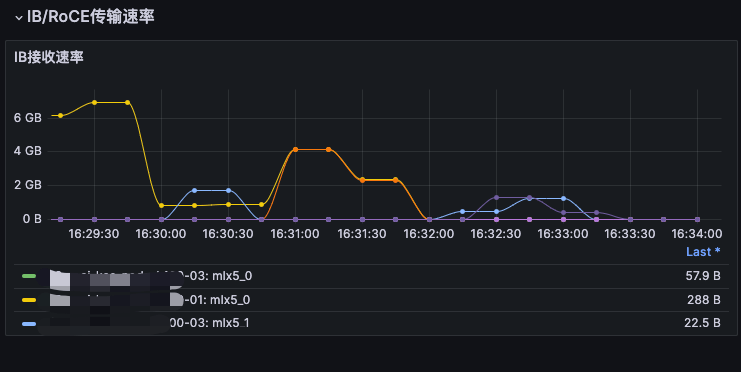
3FS’s test data under DD is not good, so here, to make it convenient to observe the limit performance of RDMA and SSD, we used the FIO tool for testing. At present we are trying 3FS’s applicability in various scenarios, and we will write a dedicated article later to publish the test data.
1
| kubectl exec -it demo-3fs -- bash
|
1
2
| apt-get update
apt-get install -y fio
|
On the host
1
2
3
4
| fio -numjobs=128 -fallocate=none -iodepth=2 -ioengine=libaio -direct=1 -rw=read -bs=4M --group_reporting -size=100M -time_based -runtime=30 -name=2depth_128file_4M_direct_read_bw -directory=/3fs/stage/fio-read
Run status group 0 (all jobs):
READ: bw=12.0GiB/s (12.9GB/s), 12.0GiB/s-12.0GiB/s (12.9GB/s-12.9GB/s), io=361GiB (388GB), run=30029-30029msec
|
In the Pod
fio -numjobs=128 -fallocate=none -iodepth=2 -ioengine=libaio -direct=1 -rw=read -bs=4M --group_reporting -size=100M -time_based -runtime=30 -name=2depth_128file_4M_direct_read_bw -directory=/data/fio-read

Run status group 0 (all jobs):
   READ: bw=12.1GiB/s (12.0GB/s), 12.1GiB/s-12.1GiB/s (12.0GB/s-12.0GB/s), io=363GiB (390GB), run=30030-30030msec
The two test results are basically the same, with read speeds both around 12GB/s — exactly the read limit of all the disks in the test environment, 2 disks, with a single-disk read speed of 6GB/s.
On the host
1
2
3
4
| fio -numjobs=128 -fallocate=none -iodepth=2 -ioengine=libaio -direct=1 -rw=write -bs=4M --group_reporting -size=100M -time_based -runtime=30 -name=2depth_128file_4M_direct_write_bw -directory=/3fs/stage/fio-write
Run status group 0 (all jobs):
WRITE: bw=1623MiB/s (1702MB/s), 1623MiB/s-1623MiB/s (1702MB/s-1702MB/s), io=47.9GiB (51.5GB), run=30238-30238msec
|
In the Pod
1
2
3
4
| fio -numjobs=128 -fallocate=none -iodepth=2 -ioengine=libaio -direct=1 -rw=write -bs=4M --group_reporting -size=100M -time_based -runtime=30 -name=2depth_128file_4M_direct_write_bw -directory=/data/fio-write
Run status group 0 (all jobs):
WRITE: bw=1610MiB/s (1688MB/s), 1610MiB/s-1610MiB/s (1688MB/s-1688MB/s), io=47.6GiB (51.1GB), run=30259-30259msec
|
The two test results are basically the same, with write speeds both around 1.6GB/s, which is somewhat below the test environment’s single-disk write speed of 4GB/s.
6. Summary
This article described how to connect 3FS into Fluid. The main points are as follows:
- To make compiling and running 3FS convenient, it is best to package a builder image, shaowenchen/3fs-builder:latest
- Fluid offers a way to quickly connect mount-type storage: ThinRuntime. This article provides a 3FS ThinRuntime image, shaowenchen/demo:fluid-3fs
- By creating a ThinRuntimeProfile, Dataset, and ThinRuntime, you can mount 3FS into a Pod, avoiding the tedious manual mounting operations
- Performance testing shows that host-mounted and Pod-mounted 3FS have basically the same read speed, so it can be used with confidence
The related scripts in this article have been collected on GitHub.
