1. Introduction to Dragonfly
The Dragonfly documentation at https://d7y.io/zh/docs/ already covers things in detail. Here is just a brief introduction to the main components of V2:
- Manager, which provides the UI, user management, cluster monitoring, task management, and other features
- Scheduler, which schedules traffic between Peers and provides preheating and other features
- Seed Peer, the back-to-source node used to download data from origin sites (Harbor, Docker.io, etc.); it can also act as a Peer node
- Peer, the terminal node that provides downloaded data
Among these, Manager and Scheduler are separate container images, while Seed Peer and Peer share the same container image.
The image preheating feature Dragonfly supports can be integrated with Harbor, but this article will not cover that. This article mainly introduces some of our practices in the production environment while supporting AI business. It is worth noting that Dragonfly V2 actually builds a P2P distribution network that can distribute not only images but also files, which opens up a lot of possibilities.
2. The Dragonfly Cluster in the IDC
Our AI model inference and training are both based on Kubernetes clusters, and the backend storage uses the enterprise edition of JuiceFS, with several TB of SSD disks mounted on every Node to mount the JuiceFS cache directory.
As a result, every Node in the Kubernetes cluster meets the conditions to act as a Dragonfly Peer node. But when forming the Peer network, we do not want any extra burden, including:
- NAT traffic across VPCs
- Data transmission over the public network
Below is the multi-VPC deployment topology of Dragonfly v2 in the IDC:
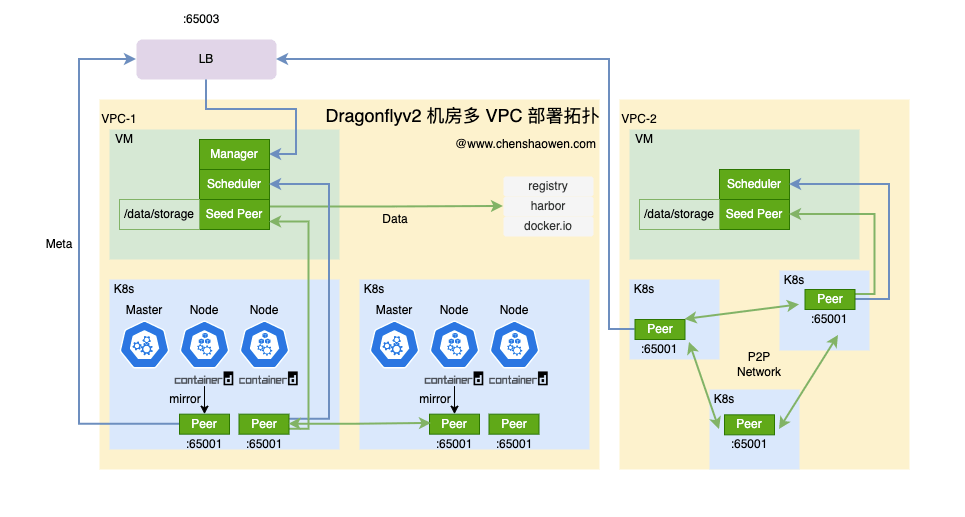
- The LB needs a public IP to serve as the Peer access point
- One VPC corresponds to one Dragonfly Cluster abstraction
- Although the IDC connects the networks between VPCs, only Peers within a single VPC are allowed to form the network
- One Peer is deployed on every Node in the cluster
Within a VPC, the following diagram shows the detailed high-availability scheme.
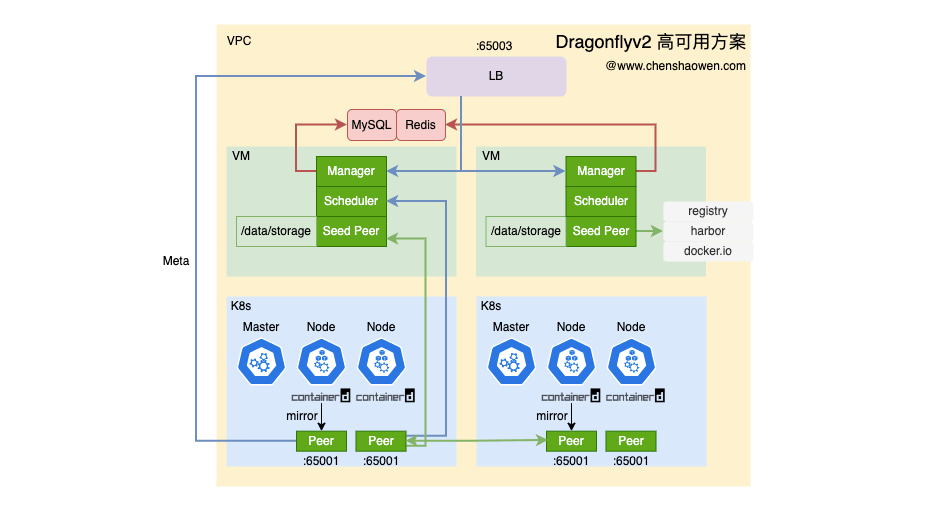
- The LB only needs an internal IP
- Use the cloud provider’s MySQL 8.0 and Redis 6 services
- Two VMs deploy Manager, Scheduler, and Seed Peer
- Each VM runs a complete Dragonfly cluster, including Manager, Scheduler, and Seed Peer, so it can be used without going through the LB
- One Peer is deployed on every Node
The P2P distribution network Dragonfly builds should not be coupled too tightly with the PaaS layer, to avoid circular dependencies. Therefore, we use a dual-VM scheme here, sharing data storage to guarantee availability. On the Master nodes of the Kubernetes cluster, we also do not apply any acceleration optimization, to keep the PaaS layer’s control plane simple and independent.
3. Deploying the Dragonfly Control Plane on VMs
Docker needs to be installed in advance, and deployment is done independently on each of the two VMs.
3.1 Installing docker-compose
- Download docker-compose
| |
- Add the execute permission
| |
- Check the version
| |
3.2 Installing dragonfly
See https://d7y.io/zh/docs/getting-started/quick-start/docker-compose/
- Download the docker-compose deployment files
| |
- Clean up unneeded files
| |
- Generate the default configuration files
| |
Since the default release package has no configuration files, we first generate one and then modify it.
| |
Terminate execution immediately, then continue modifying the configuration files.
- Pin the image version
| |
- Modify the storage account and other configuration
Modify the Redis and MySQL addresses and passwords
| |
Modify the Redis password
| |
These two configuration files contain some other configuration items that can be modified according to the actual situation. For example, point the manager’s addr at the current host’s service, output logs to the console, enable Metrics, and so on.
- Modify seed-peer’s cache directory
| |
| |
If you have disabled seed-peer’s ability to act as a peer node, you can skip this step, and the VM’s disk space does not need to be very large either.
- Start the services
| |
- Check the services
| |
- Open the management page and take a look
Visit http://${VM_IP}:8080 to see the Dragonfly management interface. If the machine has no public IP, you can use socat for port forwarding. Pick a machine with a public IP and run the following command to forward port 30000 to port 8080:
| |
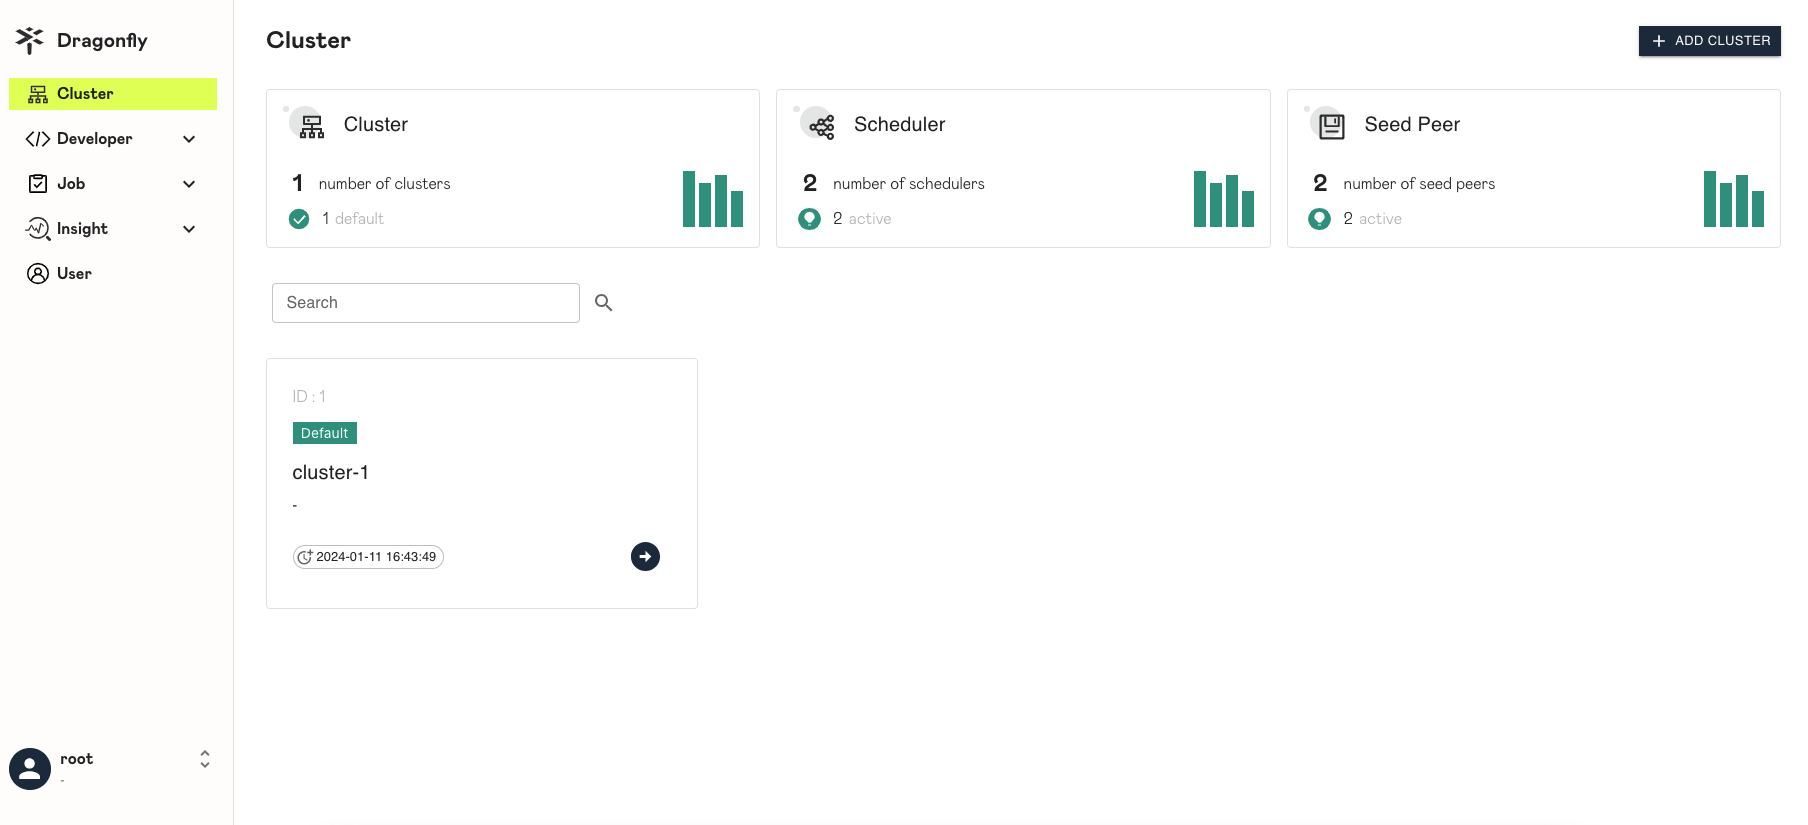
Once both VMs are deployed, you can see a cluster like the one below in the Dashboard, with two Schedulers and two Seed Peers. As shown below:
4. Deploying Peer Nodes in the Cluster
Nodes running Peer need access to ports 8002, 65001, 65003, and 65006-65008 on the two VMs.
- Create the namespace
| |
- Create the configuration file
Here you need to fill the LB’s IP address into the configuration file before the Peer can join the Dragonfly cluster.
| |
There are many parameters that can be modified according to the actual situation. A default configuration file is provided here.
| |
- Create the DaemonSet
We extracted the DaemonSet file from the official Helm Chart. Note that the cache directory the Peer uses is the /data/dfget directory on the host. It is best to clean up the /data/dfget directory on the host in advance to avoid permission issues; there is also no need to create it beforehand, as the DaemonSet will create it automatically.
| |
- Check the workload
| |
5. Deploying Peer Nodes on VMs
- Create the directory
| |
- Set the IP
| |
| |
- Start the Peer
| |
6. Node Configuration
6.1 Docker
Docker’s Mirror approach can only accelerate images from Docker.io, so we use the Proxy approach here, proxying all of Dockerd’s traffic. The difference between Proxy and Mirror is that if Mirror goes down, Dockerd pulls from the origin, whereas if Proxy goes down, Dockerd’s pull simply fails.
- Add the proxy
| |
| |
- Restart Docker
| |
Note that if "live-restore": true is not configured in /etc/docker/daemon.json, all containers will be restarted.
- Check the environment variables
| |
- Image pull test
| |
At this point, Dockerd’s traffic goes through the Dragonfly Peer node.
6.2 Containerd
See https://github.com/containerd/containerd/blob/main/docs/cri/config.md#registry-configuration
The config_path = "/etc/containerd/certs.d" item under [plugins."io.containerd.grpc.v1.cri".registry] in /etc/containerd/config.toml provides a mirror-like way of configuring things.
- Configure Docker.io
| |
| |
- Configure other, private image registries
The configuration for other image registries can be generated by a script, for example:
| |
The reason we did not use the script to generate the docker.io configuration is that in the generated configuration file, X-Dragonfly-Registry is https://docker.io rather than https://registry-1.docker.io.
Using X-Dragonfly-Registry = ["https://docker.io"] produces the following error:
| |
The mirror added above takes effect immediately without restarting Containerd.
- Image pull test
| |
At this point, you can see the image data cached by the Peer node under the local /data/dfget/data directory.
7. Integrating Nydus
If Nydus has already been configured, it can actually be configured easily here.
- Add a mirror for Nydusd
| |
| |
- Restart Nydusd
| |
- Image pull test
| |
8. Summary
This article records part of the process of testing and deploying Dragonfly V2 in the production environment this week. The main content includes:
- The deployment topology of the Dragonfly cluster in the IDC
- The deployment of Peer nodes on clusters and VMs
- The integration of Docker, Containerd, and Nydus
As for the shortcomings: there is no metric monitoring. When doing benchmarks, we found that data transmission between Peers within an AZ and across AZs is both limited. If you want to build a high-performance P2P distribution network, the network between Peer and Peer, and between Peer and Seed Peer, is an important factor to consider.
