Compiled from the “Development Tips” series, collecting common development tools and productivity-related techniques.
1. The Babel Transpiler
ES6 provides many new features, but not every browser supports them perfectly, while ES5 support is far better. Babel is an ES6 transpiler that converts ES6 code into ES5 code. This means you can write programs with ES6 syntax without worrying about whether the existing environment supports it.
| |
Babel’s configuration file is .babelrc , stored in the project’s root directory. Use this file to set the transpilation rules and plugins; the basic format is as follows:
| |
2. Badge Generators


The documentation of open-source projects usually adds various Badges. Some of these Badges are hard-coded, and some are fetched dynamically by third-party tools. http://shields.io/ is recommended — it can generate all kinds of Badges very conveniently.
3. Code Statistics Tool - Cloc
Cloc is an open-source code statistics tool developed in Perl. It supports multiple platforms and multiple languages, and can count, for a given target file or folder, the number of files (files), blank lines (blank), comment lines (comment), and lines of code (code).
On Windows, you can first download and install msys2, use $pacman -S cloc to install Cloc, and then run the statistics:
| |
4. A Tool for Monitoring Celery - Flower
Flower is a web-based Celery monitoring and management tool. The features it offers are:
- View worker status and statistics
- Shut down and restart worker instances
- Control the size of the worker pool
- Display detailed task information
- View currently running tasks
- View task scheduling
- Wake up and terminate tasks
- …
Installation:
| |
Run:
| |
Open: http://localhost:5555, and visit:

5. Remote Control Tool - TeamViewer
Because, currently (2018.11), QQ on Mac OS X does not support remote assistance, here is another remote control program to recommend:
TeamViewer is compatible with Microsoft Windows, Mac OS X, Linux, iOS, and Android operating systems, and can also connect through a web browser to a computer that has TeamViewer installed.
6. Performance Testing - Locust
Locust is an open-source performance testing tool developed in Python. It is event-based, supports distribution, and provides a Web UI for running tests and displaying results. Because it uses gevent’s coroutine concurrency mechanism, Locust is significantly better than other similar tools when it comes to concurrency levels.
Installation:
| |
Write a test case:
test.py
| |
Run the test:
| |
For the Web UI, open the link: http://localhost:8089/
7. Simple pandoc Usage Tips
Pandoc is a markup language conversion tool developed by John MacFarlane. It can convert between the formats of different markup languages, and can be called the “Swiss Army knife” of that domain.
Pandoc is written in Haskell and interacts with the user through the command line, and it supports a variety of operating systems.
Download address: https://github.com/jgm/pandoc/releases/ .
Pandoc’s basic command format is:
| |
A simple format conversion:
| |
Here -o ouput.html means the output file is output.html, and input.md is the input file.
Pandoc determines the format automatically from the file extension, and the user can also explicitly specify the input and output file formats:
| |
Here -f markdown means the input file format is Markdown, and -t html means the output file format is HTML.
For detailed command parameters, see the Pandoc User’s Guide.
8. Session Management Tool tmux
tmux is a terminal multiplexer. With tmux, a user can manage multiple detached sessions, windows, and panes within a single terminal, which is very convenient when using multiple command lines or multiple tasks at the same time.
Install with brew on OS X:
| |
Below are some commonly used commands:
- Create a new session
| |
- Detach the current session
| |
- Enter a session
| |
Shorthand: tmux a -t session_name
- Kill a session
| |
- List all sessions
| |
Shorthand: tmux ls (shortcut: Ctrl+b+s)
- Kill all sessions
| |
- Switch to a session
| |
- Rename a session
| |
If you get sessions should be nested with care, unset $TMUX to force, just run unset TMUX.
9. Using rclone to Mount OneDrive on a Server
Rclone can conveniently manage various cloud drives and object storage such as OneDrive, Google Drive, and Amazon Drive, and supports mounting a drive letter as well as uploading and downloading files from the command line.
- Installation
| |
- Local authorization
You need to install rclone first, then run:
| |
Log in to the OneDrive account on the page; after authorization succeeds, copy the entire Token: {"access_token":"","expiry":""} and keep it for later.
- Server-side configuration
You need to install rclone first, then run:
| |
Enter the relevant information as prompted, and only when the following prompt appears:
| |
Choose n, and enter the Token Json string you copied earlier in result. Continue the configuration and save at the end.
- Mount OneDrive
| |
- DriveName is the name entered when creating the new remote
- Folder is a folder on OneDrive
- LocalFolder is a folder on the server
For example, rclone mount onedrive:Code /data --copy-links --no-gzip-encoding --no-check-certificate --allow-other --allow-non-empty --umask 000& mounts the Code directory on OneDrive to the local /data directory.
If you get a fuse-related error, run yum install -y fuse to fix it.
10. Making the VS Code Terminal Execute the .bash_profile Initialization Script
By adding a startup command argument, you can make the shell execute the initialization script .bash_profile when it opens.
Edit settings.json; taking OS X as an example, just add the following:
| |
11. Icons Fail to Display After Configuring zsh in VS Code
Because VS Code cannot automatically detect the patched font after it is installed, you need to configure it in settings.json.
| |
Reference: https://gist.github.com/kevin-smets/8568070
12. Making a CentOS Bootable USB Drive on OS X
- Check the USB drive’s mount point
| |
- Unmount the USB drive
| |
- Write the ISO image
| |
The if argument specifies the location of the file to be written, and the of argument specifies the output location — here, it means writing the image to the USB drive. Note that rdisk2 refers to the raw disk of disk2, and bs=1m means the write block size is 1MB, in order to write the data faster.
You can check the write progress with Ctrl + T.
- Eject the USB drive
After about a few minutes, the write is complete. Eject the USB drive:
| |
13. How to Run a Project Written in Go
Through the Readme document, Makefile, and scripts, you can usually quickly learn how to run a project written in Go. But sometimes, because the material is incomplete, you have to figure it out yourself.
13.1 Projects Containing Gopkg.lock and Gopkg.toml Files
Gopkg.local and Gopkg.toml are the two files dep uses for package management, and the project needs to be copied into the $GOPATH/src directory.
If there is also a vendor directory in the project directory, you can find the entry file (usually main.go) and run the build command directly.
| |
If there is no vendor directory, you need to install the dependencies first.
- Install dep
| |
- Install dependencies
| |
dep installs the dependencies into the current project’s vendor directory. Once that is done, run the build command.
13.2 Projects Containing go.sum and go.mod Files
go.sum and go.mod are the two files Go Modules uses for package management.
If the project has a vendor folder, then just build directly.
| |
If the project has no vendor folder, you need to install the dependencies first.
go module is a feature built into Go 1.11, so there is nothing to install. Install the dependencies:
| |
14. Enabling OS X’s Native NTFS Support
- Plug in the disk and check the volume name
| |
Here SSD is the Volume Name.
- Update the /etc/fstab file
| |
Enter your password, then enter LABEL=SSD none ntfs rw,auto,nobrowse, where SSD is the Volume Name.
Press Ctrl + X, then press Y to save.
- Create an access link
| |
SSD is the Volume Name and needs to be replaced according to the actual situation.
15. Secure Shell Extension’s NaCI Exits with Status 255
The cause of the error is that the locally stored fingerprint information does not match the host information.
Solution:
In the shell window, press Ctrl+Shift+J to enter the debug window, and execute in the console:
| |
That clears known_hosts.
16. Azure Image Proxy
On servers in mainland China, pulling certain images is slow, or simply impossible. Azure provides a mirror proxy service for container registries.
| Image source that cannot be pulled | Image source after replacement |
|---|---|
| k8s.gcr.io | gcr.azk8s.cn/google_containers |
| docker.io | dockerhub.azk8s.cn |
| gcr.io | gcr.azk8s.cn |
| quay.io | quay.azk8s.cn |
17. The watch Command
The watch command can execute a specified command periodically.
Common parameters:
- n, the interval, with a default value of 2 seconds
- d, highlight the regions that change
Usage examples:
- Highlight changes in the number of network connections every 1 second
| |
- Print the system’s load average once every 3 seconds
| |
- Send a request every 0.5 seconds
| |
18. Abnormal VS Code Terminal Font
Because on OS X, icons fail to display after configuring zsh in VS Code. You need to set the terminal font to Source Code Pro for Powerline. But this font is not a built-in font on every operating system. Below are the steps to install that font:
Download the font:
| |
Install the font:
- Windows
Move the font to C:\WINDOWS\Fonts.
- Linux
| |
- OS X
| |
19. VS Code Remote Development Extensions
VS Code has released an official remote development extension pack. The way it works is by dividing VS Code into a client and a server: the client is mainly responsible for the UI, and the server is mainly responsible for fulfilling the development needs.
Below is the architecture diagram:
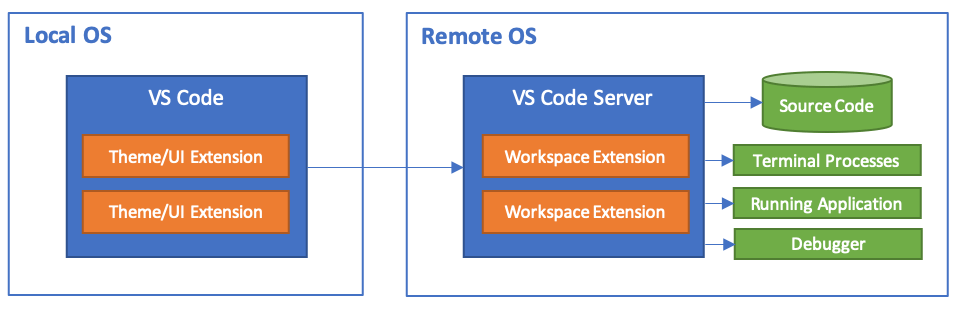
The Remote Development pack is mainly made up of three extensions:
- Remote SSH
Connect to a Linux server over SSH; some system versions may need adjustments (upgrading glibc, libstdc++, and so on).
- Remote Containers
Allows a local folder to be mounted into a specified Docker container. You can use the Dockerfile or docker-compose.yml in the local folder, or mount directly into a container that already exists.
- Remote WSL
Connect to a Windows Subsystem for Linux environment that is already running.
The effect of connecting remotely with all the extensions above is that you can edit a remote file directory in your local VS Code, and when you open the command line it is already connected to the remote terminal.
20. On OS X, Running the git Command Reports an Error, xcrun: error
After upgrading to the latest version of OS X, running the git pull command reports an error:
| |
You need to install the Xcode toolkit:
| |
If the error persists, you can try resetting:
| |
21. DNS SPF Records
When sending email, because the sender can be specified arbitrarily, the recipient cannot verify whether the sender is genuine. SPF exists precisely to solve the problem of forged senders.
For example, the receiving side gets an email from the host IP 10.0.0.10 claiming to be from the sender admin@domain.com. To verify the sender information, the receiving side will look up the SPF record to see whether the host with IP 10.0.0.10 is allowed to send mail. If it is not allowed, the message is bounced or treated as spam.
For the relevant principles and configuration, see the document, SPF Records: An Introduction to the Principles, Syntax, and Configuration Methods
.
22. kubebuilder Installation Script
| |
