1. Deployment Plan
Before starting the containerized deployment, a few requirements:
- To simplify delivery, only one image is needed
- For reliability, deploy as many replicas as possible
- Start different services through different parameters
- Inject configuration through environment variables and render it into configuration files
Below is the deployment plan for DeepSeek 3FS:
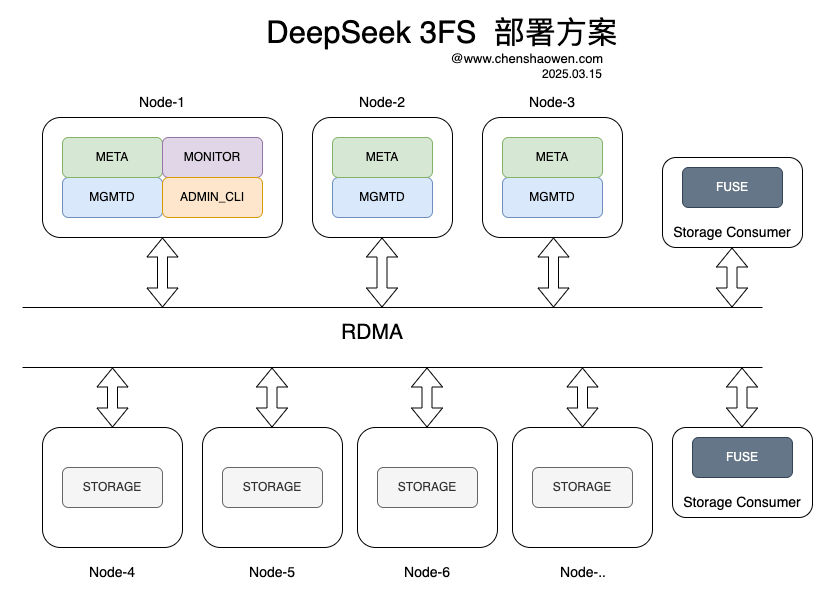
What needs to be deployed:
- One Monitor to collect monitoring data, stored in ClickHouse
- One Admin CLI providing a terminal for cluster management; every component submits its configuration through the Admin CLI
- Three MgmtD to manage the cluster, storing component and heartbeat information in FoundationDB
- Three Meta to provide Chain and file information, with data stored in FoundationDB
- As many Storage nodes as possible to store data; files are stored as Chunks in disk directories
- Several Fuse instances to provide a POSIX filesystem interface to the application layer. If the storage service can be called through the USRBIO user-space interface, performance improves by 3-5x compared with Fuse.
The hosts these services are deployed on must all be connected through an RDMA network (not just RDMA-capable NICs, but switches that support RDMA as well). Applications that consume the 3FS storage service must also run on RDMA-capable hosts.
By default, the MgmtD and Storage services have a port conflict and must be deployed on different hosts. Most teams probably have not planned a dedicated RDMA storage cluster, so when using 3FS they deploy it together with training and inference tasks to make full use of resources. To save as many resources as possible, Monitor is deployed together with Mgmd; for convenience in managing the cluster, the Admin CLI is also deployed together with Mgmd.
2. Building the 3FS Image
- Start the build container
1
| nerdctl run -it --rm -v $(pwd):/app shaowenchen/demo:3fsbuilder bash
|
The base image uses Ubuntu 22.04; I have also built an image based on Ubuntu 20.04, shaowenchen/demo:3fsbuilder-2004.
 1
 2
 3
 4
 5
 6
 7
 8
 9
10
11
12
13
14
15
16
17
| ARG BASE_IMAGE=shaowenchen/demo:3fsbuilder
FROM ${BASE_IMAGE} as builder
RUN git clone https://github.com/deepseek-ai/3FS && \
cd 3FS && \
git submodule update --init --recursive && \
./patches/apply.sh && \
cmake -S . -B build -DCMAKE_CXX_COMPILER=clang++-14 -DCMAKE_C_COMPILER=clang-14 -DCMAKE_BUILD_TYPE=RelWithDebInfo -DCMAKE_EXPORT_COMPILE_COMMANDS=ON -DSHUFFLE_METHOD=g++11 && \
cmake --build build -j 100
FROM ${BASE_IMAGE}
COPY --from=builder /app/3FS/build/bin /opt/3fs/bin
COPY --from=builder /app/3FS/configs /opt/3fs/etc
COPY --from=builder /app/3FS/deploy /opt/3fs/deploy
COPY --from=builder /app/3FS/build/third_party/jemalloc/lib/libjemalloc.so.2 /lib/x86_64-linux-gnu/
RUN mkdir -p /var/log/3fs/ && \
wget -O /opt/3fs/bin/3fs-entrypoint.sh https://raw.githubusercontent.com/shaowenchen/demo/master/3fs-deploy/3fs-entrypoint.sh && \
chmod +x /opt/3fs/bin/3fs-entrypoint.sh
WORKDIR /opt/3fs/bin
|
The default is Ubuntu 22.04
1
| nerdctl build --build-arg BASE_IMAGE=shaowenchen/demo:3fsbuilder -t shaowenchen/demo:3fs .
|
Ubuntu 20.04 also works
1
| nerdctl build --build-arg BASE_IMAGE=shaowenchen/demo:3fsbuilder-2004 -t shaowenchen/demo:3fs-2004 .
|
If building it yourself is inconvenient, you can pull the binaries and the dependent shared libraries directly from the image. If Dockerhub is not reachable over the network, you can use the shaowenchen/demo:3fs image address.
3. Deploying the Dependent Middleware
3.1 ClickHouse
1
| kubectl apply -f https://raw.githubusercontent.com/shaowenchen/ops-hub/refs/heads/master/storage/clickhouse-operator-0.24.5/crd.install-bundle.yaml
|
1
| kubectl apply -f https://raw.githubusercontent.com/shaowenchen/ops-hub/refs/heads/master/storage/clickhouse-operator-0.24.5/deploy.install-bundle.yaml
|
- Create the ClickHouse cluster
1
| kubectl apply -f https://raw.githubusercontent.com/shaowenchen/ops-hub/refs/heads/master/storage/clickhouse-operator-0.24.5/cluster.yaml
|
The access credentials for ClickHouse are set in the yaml.
1
2
3
4
5
6
7
| kubectl get pod -l clickhouse.altinity.com/cluster=test-cluster
NAME READY STATUS RESTARTS AGE
chi-test-cluster-test-cluster-0-0-0 1/1 Running 0 7m53s
chi-test-cluster-test-cluster-0-1-0 1/1 Running 0 3m9s
chi-test-cluster-test-cluster-1-0-0 1/1 Running 0 7m55s
chi-test-cluster-test-cluster-1-1-0 1/1 Running 0 3m14s
|
 1
 2
 3
 4
 5
 6
 7
 8
 9
10
11
12
13
14
15
16
17
18
19
20
21
22
23
24
25
26
27
| kubectl apply -f - <<EOF
apiVersion: v1
kind: Service
metadata:
name: chi-test-cluster-exposed
namespace: default
labels:
clickhouse.altinity.com/cluster: test-cluster
spec:
type: NodePort
selector:
clickhouse.altinity.com/cluster: test-cluster
ports:
- name: tcp
port: 9000
protocol: TCP
targetPort: 9000
nodePort: 30000
- name: http
port: 8123
protocol: TCP
targetPort: 8123
- name: interserver
port: 9009
protocol: TCP
targetPort: 9009
EOF
|
This way ClickHouse can be reached at http://node-ip:30000.
Enter any ClickHouse Pod
1
| kubectl exec -it chi-test-cluster-test-cluster-0-0-0 bash
|
Download the database script
1
| wget https://raw.githubusercontent.com/deepseek-ai/3FS/refs/heads/main/deploy/sql/3fs-monitor.sql
|
Create the database
1
| clickhouse-client -n < 3fs-monitor.sql
|
3.2 FoundationDB
1
| kubectl apply -f https://raw.githubusercontent.com/shaowenchen/ops-hub/refs/heads/master/storage/fdb-kubernetes-operator-2.0.0/apps.foundationdb.org_foundationdbbackups.yaml
|
1
| kubectl apply -f https://raw.githubusercontent.com/shaowenchen/ops-hub/refs/heads/master/storage/fdb-kubernetes-operator-2.0.0/apps.foundationdb.org_foundationdbclusters.yaml
|
1
| kubectl apply -f https://raw.githubusercontent.com/shaowenchen/ops-hub/refs/heads/master/storage/fdb-kubernetes-operator-2.0.0/apps.foundationdb.org_foundationdbrestores.yaml
|
1
| kubectl apply -f https://raw.githubusercontent.com/shaowenchen/ops-hub/refs/heads/master/storage/fdb-kubernetes-operator-2.0.0/deployment.yaml
|
- Create the FoundationDB cluster
1
| kubectl apply -f https://raw.githubusercontent.com/shaowenchen/ops-hub/refs/heads/master/storage/fdb-kubernetes-operator-2.0.0/cluster.yaml
|
The instance name here has been changed to fdb-a800.
 1
 2
 3
 4
 5
 6
 7
 8
 9
10
11
| kubectl get pod -l foundationdb.org/fdb-cluster-name=fdb-a800
NAME READY STATUS RESTARTS AGE
fdb-a800-cluster-controller-49248 2/2 Running 0 4h21m
fdb-a800-log-19564 2/2 Running 0 4h21m
fdb-a800-log-30929 2/2 Running 0 4h21m
fdb-a800-log-98017 2/2 Running 0 4h21m
fdb-a800-log-9876 2/2 Running 0 4h21m
fdb-a800-storage-16687 2/2 Running 0 4h21m
fdb-a800-storage-31181 2/2 Running 0 4h21m
fdb-a800-storage-90277 2/2 Running 0 4h21m
|
- Get the FDB cluster connection information
1
2
3
| kubectl exec -it fdb-a800-cluster-controller-49248 cat /var/dynamic-conf/fdb.cluster
fdb_a800:xxx@fdb-a800-log-19564.fdb-a800.default.svc.cluster.local:4501,fdb-a800-log-30929.fdb-a800.default.svc.cluster.local:4501,fdb-a800-log-98017.fdb-a800.default.svc.cluster.local:4501
|
But containers started by Containerd cannot resolve the domain names above, so the Service IP must be used.
 1
 2
 3
 4
 5
 6
 7
 8
 9
10
11
12
13
14
15
| kubectl apply -f - <<EOF
apiVersion: v1
kind: Service
metadata:
name: fdb-a800-exposed
spec:
ports:
- port: 4501
protocol: TCP
targetPort: 4501
selector:
foundationdb.org/fdb-cluster-name: fdb-a800
foundationdb.org/fdb-process-class: log
type: ClusterIP
EOF
|
The following is the connection information the containers actually need:
1
| fdb_a800:xxx@x.x.x.x:4501
|
One detail here: containers started with nerdctl on a Kubernetes cluster node can reach the cluster’s Service\Pod IPs.
The reason NodePort is not used is that the following error occurs — a port mismatch assertion.
1
| Assertion pkt.canonicalRemotePort == peerAddress.port failed @ /home/foundationdb_ci/src/oOoOoOoOoOoOoOoOoOoOoOoOoOoOoOoOoOoOoOoOo/foundationdb/fdbrpc/FlowTransport.actor.cpp 1545:
|
To access FoundationDB from outside the cluster, it is recommended to deploy FoundationDB from binaries and use the physical machine IP as the connection address.
1
2
3
4
| wget https://github.com/apple/foundationdb/releases/download/7.1.26/foundationdb-clients_7.1.26-1_amd64.deb
wget https://github.com/apple/foundationdb/releases/download/7.1.26/foundationdb-server_7.1.26-1_amd64.deb
dpkg -i foundationdb-clients_7.1.26-1_amd64.deb
dpkg -i foundationdb-server_7.1.26-1_amd64.deb
|
Replace the IP in /etc/foundationdb/fdb.cluster with the host IP; after restarting, the FoundationDB service can be accessed from any reachable source.
1
| systemctl restart foundationdb.service
|
4. Starting the 3FS Services in Containers
4.1 Common Environment Variables
This mainly sets some common variables that need to be set before starting a service each time.
1
2
3
| export CLUSTER_ID=stage
export FDB_CLUSTER="xxx:xxx@x.x.x.x:4500"
export IMAGE=shaowenchen/demo:3fs
|
4.2 One Monitor
- Set the environment variables
CLUSTER_ID is the 3FS cluster ID and must stay consistent across the cluster’s components.
Before setting DEVICE_FILTER, you can run ibdev2netdev to see which devices are available; note that IB and RoCE devices must not be mixed here.
1
2
3
4
5
6
| export CLICKHOUSE_DB=3fs
export CLICKHOUSE_HOST=x.x.x.x
export CLICKHOUSE_PASSWD=xxxx
export CLICKHOUSE_PORT=30000
export CLICKHOUSE_USER=app
export DEVICE_FILTER="mlx5_0,mlx5_1,mlx5_4,mlx5_5"
|
The Monitor occupies port 10000
 1
 2
 3
 4
 5
 6
 7
 8
 9
10
11
12
13
14
15
16
| nerdctl run --name 3fs_monitor \
--privileged \
--security-opt apparmor=unconfined \
--security-opt seccomp=unconfined \
--network host \
-d --restart always \
--env CLUSTER_ID=${CLUSTER_ID} \
--env CLICKHOUSE_DB=${CLICKHOUSE_DB} \
--env CLICKHOUSE_HOST=${CLICKHOUSE_HOST} \
--env CLICKHOUSE_PASSWD=${CLICKHOUSE_PASSWD} \
--env CLICKHOUSE_PORT=${CLICKHOUSE_PORT} \
--env CLICKHOUSE_USER=${CLICKHOUSE_USER} \
--env FDB_CLUSTER=${FDB_CLUSTER} \
--env DEVICE_FILTER=${DEVICE_FILTER} \
${IMAGE} \
./3fs-entrypoint.sh monitor
|
4.3 One Admin CLI
The Admin CLI is a management terminal that occupies no ports, so it can be deployed on the same node as other services.
- Set the environment variables
The MGMTD_SERVER_ADDRESSES here need to be planned in advance; you do not have to start the service first, you can set them directly. REMOTE_IP is the address the Monitor service exposes.
1
2
| export MGMTD_SERVER_ADDRESSES="RDMA://x.x.x.x:8000,RDMA://x.x.x.x:8000,RDMA://x.x.x.x:8000"
export REMOTE_IP=x.x.x.x:10000
|
 1
 2
 3
 4
 5
 6
 7
 8
 9
10
11
12
13
| nerdctl run --name 3fs_admin_cli \
--privileged \
--security-opt apparmor=unconfined \
--security-opt seccomp=unconfined \
--network host \
-d --restart always \
--env FDB_CLUSTER=${FDB_CLUSTER} \
--env MGMTD_SERVER_ADDRESSES=${MGMTD_SERVER_ADDRESSES} \
--env DEVICE_FILTER=${DEVICE_FILTER} \
--env CLUSTER_ID=${CLUSTER_ID} \
--env REMOTE_IP=${REMOTE_IP} \
${IMAGE} \
./3fs-entrypoint.sh admin_cli
|
- Enter the Admin CLI container
1
| nerdctl exec -it 3fs_admin_cli bash
|
1
| /opt/3fs/bin/admin_cli -cfg /opt/3fs/etc/admin_cli.toml "init-cluster --mgmtd /opt/3fs/etc/mgmtd_main.toml 1 1048576 6"
|
1 is the chain table ID; 1048576 is the block size in bytes, that is, 1M; 6 is the file striping size.
4.4 Multiple MgmtD
- Set the environment variables
The MGMTD_NODE_ID set for each Mgmtd should be different.
1
2
3
4
| export MGMTD_NODE_ID="1"
export DEVICE_FILTER="mlx5_0,mlx5_1,mlx5_4,mlx5_5"
export REMOTE_IP=x.x.x.x:10000
export MGMTD_SERVER_ADDRESSES="RDMA://x.x.x.x:8000,RDMA://x.x.x.x:8000,RDMA://x.x.x.x:8000"
|
If using IPoIB, add the --cfg /opt/3fs/etc/mgmtd_main.toml argument at startup and change the default RDMA in it to IPoIB.
The Mgmtd service listens on ports 8000 and 9000
Changing the Mgmtd port may fail; it is best to leave it unchanged and not try to modify port 9000.
 1
 2
 3
 4
 5
 6
 7
 8
 9
10
11
12
13
14
| nerdctl run --name 3fs_mgmtd \
--privileged \
--security-opt apparmor=unconfined \
--security-opt seccomp=unconfined \
--network host \
-d --restart always \
--env CLUSTER_ID=${CLUSTER_ID} \
--env FDB_CLUSTER=${FDB_CLUSTER} \
--env MGMTD_NODE_ID=${MGMTD_NODE_ID} \
--env DEVICE_FILTER=${DEVICE_FILTER} \
--env REMOTE_IP=${REMOTE_IP} \
--env MGMTD_SERVER_ADDRESSES=${MGMTD_SERVER_ADDRESSES} \
${IMAGE} \
./3fs-entrypoint.sh mgmtd
|
Meta and Mgmtd listen on different ports, so they can be deployed on the same machine.
- Set the environment variables
The META_NODE_ID set for each Meta should be different.
1
2
3
4
| export MGMTD_SERVER_ADDRESSES="RDMA://x.x.x.x:8000,RDMA://x.x.x.x:8000,RDMA://x.x.x.x:8000"
export META_NODE_ID="101"
export DEVICE_FILTER="mlx5_0,mlx5_1,mlx5_4,mlx5_5"
export REMOTE_IP=x.x.x.x:10000
|
The Meta service listens on ports 8001 and 9001
 1
 2
 3
 4
 5
 6
 7
 8
 9
10
11
12
13
14
| nerdctl run --name 3fs_meta \
--privileged \
--security-opt apparmor=unconfined \
--security-opt seccomp=unconfined \
-d --restart always \
--network host \
--env CLUSTER_ID=${CLUSTER_ID} \
--env FDB_CLUSTER=${FDB_CLUSTER} \
--env MGMTD_SERVER_ADDRESSES=${MGMTD_SERVER_ADDRESSES} \
--env META_NODE_ID=${META_NODE_ID} \
--env DEVICE_FILTER=${DEVICE_FILTER} \
--env REMOTE_IP=${REMOTE_IP} \
${IMAGE} \
./3fs-entrypoint.sh meta
|
4.6 Multiple Storage
The Storage service must be kept separate from the Mgmtd service, since they use the same ports. If you deploy them together, you need to modify the Storage service’s ports.
- Set the environment variables
The STORAGE_NODE_ID set for each Storage should be different; TARGET_PATHS is the storage directory. Since this is a containerized deployment it can stay a fixed value, and the storage directory is configured by changing the mount arguments.
1
2
3
4
5
| export MGMTD_SERVER_ADDRESSES="RDMA://x.x.x.x:8000,RDMA://x.x.x.x:8000,RDMA://x.x.x.x:8000"
export STORAGE_NODE_ID="1001"
export TARGET_PATHS="/3fs/data"
export DEVICE_FILTER="mlx5_0,mlx5_1,mlx5_4,mlx5_5"
export REMOTE_IP=x.x.x.x:10000
|
- Modify the system parameters
1
| sysctl -w fs.aio-max-nr=67108864
|
The Storage service listens on ports 8000 and 9000
mkdir -p /data/3fs
 1
 2
 3
 4
 5
 6
 7
 8
 9
10
11
12
13
14
15
16
17
| nerdctl run --name 3fs_storage \
--privileged \
--security-opt apparmor=unconfined \
--security-opt seccomp=unconfined \
--ulimit nofile=1048576:1048576 \
-d --restart always \
--network host \
-v /data/3fs:/3fs/data \
--env CLUSTER_ID=${CLUSTER_ID} \
--env FDB_CLUSTER=${FDB_CLUSTER} \
--env MGMTD_SERVER_ADDRESSES=${MGMTD_SERVER_ADDRESSES} \
--env STORAGE_NODE_ID=${STORAGE_NODE_ID} \
--env TARGET_PATHS=${TARGET_PATHS} \
--env DEVICE_FILTER=${DEVICE_FILTER} \
--env REMOTE_IP=${REMOTE_IP} \
${IMAGE} \
./3fs-entrypoint.sh storage
|
4.7 Viewing Nodes with the Admin CLI
- Enter the Admin CLI container
1
| nerdctl exec -it 3fs_admin_cli bash
|
 1
 2
 3
 4
 5
 6
 7
 8
 9
10
11
12
13
14
| /opt/3fs/bin/admin_cli -cfg /opt/3fs/etc/admin_cli.toml list-nodes
Id Type Status Hostname Pid Tags LastHeartbeatTime ConfigVersion ReleaseVersion
1 MGMTD PRIMARY_MGMTD 58ca52320c3b 16 [] N/A 1(UPTODATE) 250228-dev-1-999999-8c9883c2
2 MGMTD HEARTBEAT_CONNECTED 391173a5a978 16 [] 2025-03-15 13:45:48 1(UPTODATE) 250228-dev-1-999999-8c9883c2
3 MGMTD HEARTBEAT_CONNECTED 8c05a1fbdf97 16 [] 2025-03-15 13:45:50 1(UPTODATE) 250228-dev-1-999999-8c9883c2
101 META HEARTBEAT_CONNECTED b3fea43900e6 202 [] 2025-03-15 13:45:48 4(UPTODATE) 250228-dev-1-999999-8c9883c2
102 META HEARTBEAT_CONNECTED fcebcb6ca5c3 192 [] 2025-03-15 13:45:52 4(UPTODATE) 250228-dev-1-999999-8c9883c2
103 META HEARTBEAT_CONNECTED fea159ba0bd6 194 [] 2025-03-15 13:45:49 4(UPTODATE) 250228-dev-1-999999-8c9883c2
1001 STORAGE HEARTBEAT_CONNECTED 919404e2891f 188 [] 2025-03-15 13:45:51 7(UPTODATE) 250228-dev-1-999999-8c9883c2
1002 STORAGE HEARTBEAT_CONNECTED e19b012d073c 180 [] 2025-03-15 13:45:51 7(UPTODATE) 250228-dev-1-999999-8c9883c2
1003 STORAGE HEARTBEAT_CONNECTED fd2423d5e695 173 [] 2025-03-15 13:45:52 7(UPTODATE) 250228-dev-1-999999-8c9883c2
1004 STORAGE HEARTBEAT_CONNECTED e8b6fbb9a774 184 [] 2025-03-15 13:45:52 7(UPTODATE) 250228-dev-1-999999-8c9883c2
1005 STORAGE HEARTBEAT_CONNECTED 283ae64fb9c4 168 [] 2025-03-15 13:45:53 7(UPTODATE) 250228-dev-1-999999-8c9883c2
|
5. Creating a 3FS Storage Instance
1
| nerdctl exec -it 3fs_admin_cli bash
|
1
| /opt/3fs/bin/admin_cli -cfg /opt/3fs/etc/admin_cli.toml "user-add --root --admin 0 root"
|
1
2
3
4
5
6
7
| Uid 0
Name root
Token AAA1+B5D8QCAeUKZ2wCBx/b5(Expired at N/A)
IsRootUser true
IsAdmin true
Gid 0
SupplementaryGids
|
The value AAA1+B5D8QCAeUKZ2wCBx/b5 here is the root user’s token.
1
2
3
| apt update
apt install -y python3-pip
pip install -r /opt/3fs/deploy/data_placement/requirements.txt -i https://pypi.tuna.tsinghua.edu.cn/simple
|
- Run the data_placement computation command
1
2
| python3 /opt/3fs/deploy/data_placement/src/model/data_placement.py \
-ql -relax -type CR --num_nodes 5 --replication_factor 3 --min_targets_per_disk 6
|
The replication_factor here must not be greater than num_nodes. Note down the output, since it is used in the next step.
1
| 2025-03-15 16:21:45.429 | SUCCESS | __main__:run:148 - saved solution to: output/DataPlacementModel-v_5-b_10-r_6-k_3-λ_2-lb_1-ub_1
|
The node_id_begin and node_id_end here must match the STORAGE_NODE_ID of the storage nodes above.
1
2
3
4
5
| python3 /opt/3fs/deploy/data_placement/src/setup/gen_chain_table.py \
--chain_table_type CR --node_id_begin 1001 --node_id_end 1005 \
--num_disks_per_node 1 --num_targets_per_disk 6 \
--target_id_prefix 1 --chain_id_prefix 9 \
--incidence_matrix_path output/DataPlacementModel-v_5-b_10-r_6-k_3-λ_2-lb_1-ub_1/incidence_matrix.pickle
|
- Create the Storage Targets
1
| /opt/3fs/bin/admin_cli --cfg /opt/3fs/etc/admin_cli.toml --config.user_info.token $(<"/opt/3fs/etc/token.txt") < output/create_target_cmd.txt
|
This outputs the distribution of each target across the nodes.
1
| /opt/3fs/bin/admin_cli --cfg /opt/3fs/etc/admin_cli.toml --config.user_info.token $(<"/opt/3fs/etc/token.txt") "upload-chains output/generated_chains.csv"
|
1
| /opt/3fs/bin/admin_cli --cfg /opt/3fs/etc/admin_cli.toml --config.user_info.token $(<"/opt/3fs/etc/token.txt") "upload-chain-table --desc stage 1 output/generated_chain_table.csv"
|
6. Fuse Mount
- Set the environment variables
The TOKEN here is the root user token created above.
1
2
3
4
5
6
7
| export CLUSTER_ID=stage
export FDB_CLUSTER="x:x@x.x.x.x:4500"
export MGMTD_SERVER_ADDRESSES="RDMA://x.x.x.x:8000,RDMA://x.x.x.x:8000,RDMA://x.x.x.x:8000"
export REMOTE_IP=x.x.x.x:x
export DEVICE_FILTER="mlx5_0,mlx5_1,mlx5_4,mlx5_5"
export TOKEN=xxx
export IMAGE=shaowenchen/demo:3fs
|
- Create the host mount point
 1
 2
 3
 4
 5
 6
 7
 8
 9
10
11
12
13
14
15
| nerdctl run --name 3fs_fuse \
--privileged \
--security-opt apparmor=unconfined \
--security-opt seccomp=unconfined \
-d --restart always \
--network host \
--mount type=bind,source=/mnt/3fs,target=/mnt/3fs,bind-propagation=shared \
--env CLUSTER_ID=${CLUSTER_ID} \
--env FDB_CLUSTER=${FDB_CLUSTER} \
--env MGMTD_SERVER_ADDRESSES=${MGMTD_SERVER_ADDRESSES} \
--env REMOTE_IP=${REMOTE_IP} \
--env DEVICE_FILTER=${DEVICE_FILTER} \
--env TOKEN=${TOKEN} \
${IMAGE} \
./3fs-entrypoint.sh fuse
|
-v can only mount a host directory into the container, but here we need to mount a container directory onto the host, so we use the --mount argument together with bind-propagation=shared.
- View the mount point on the host
1
2
3
4
| df -h /mnt/3fs/
Filesystem Size Used Avail Use% Mounted on
hf3fs.stage 57T 2.5T 55T 5% /mnt/3fs
|
 1
 2
 3
 4
 5
 6
 7
 8
 9
10
11
12
13
14
15
16
17
18
19
20
21
22
23
24
25
26
27
28
29
30
| tree /mnt/3fs
/mnt/3fs
└── 3fs-virt
├── get-conf
│ ├── sys.io_job_deq_timeout -> '1ms'
│ ├── sys.io_worker_coros.hi -> 8
│ ├── sys.io_worker_coros.lo -> 8
│ ├── sys.max_jobs_per_ioring -> 32
│ ├── sys.periodic_sync.enable -> true
│ ├── sys.periodic_sync.flush_write_buf -> true
│ ├── sys.periodic_sync.interval -> '30s'
│ ├── sys.storage.net_client.rdma_control.max_concurrent_transmission -> 64
│ ├── usr.attr_timeout -> 30.0
│ ├── usr.dryrun_bench_mode -> false
│ ├── usr.enable_read_cache -> true
│ ├── usr.entry_timeout -> 30.0
│ ├── usr.flush_on_stat -> true
│ ├── usr.negative_timeout -> 5.0
│ ├── usr.readonly -> false
│ ├── usr.symlink_timeout -> 5.0
│ └── usr.sync_on_stat -> true
├── iovs
│ ├── submit-ios -> /dev/shm/sem.hf3fs-submit-ios.c52d4079-b1c0-4684-9d08-6f2ee18d8a6e
│ ├── submit-ios.ph -> /dev/shm/sem.hf3fs-submit-ios.dd3eac7c-3802-422d-93a7-efaf56c6e2af
│ └── submit-ios.pl -> /dev/shm/sem.hf3fs-submit-ios.e8cf7b88-e65a-4cb5-a3ba-de71351bccee
├── rm-rf
└── set-conf
5 directories, 20 files
|
7. Summary
This post mainly describes how to deploy the DeepSeek 3FS storage system under containers, covering the following steps:
- Build the 3FS image
- Deploy the ClickHouse and FoundationDB middleware
- Start the Monitor, Admin CLI, MgmtD, Meta, and Storage services
Different services can be started depending on the startup parameters. The contents of the 3fs-entrypoint.sh script have been committed to https://github.com/shaowenchen/demo/blob/master/3fs-deploy/ for reference.
