1. What Django Is
Django is a web development framework written in Python. It was initially used by its developers to manage news-content-focused websites, was open-sourced under the BSD license in July 2005, and formally established its foundation on June 17, 2008. Other Python web frameworks alongside Django include Tornado and Flask.
Django provides a full set of solutions, including but not limited to middleware, caching, Session, ORM, Auth, the admin back office, templates, URL mapping, and so on.
2. How Django Works
First, an introduction to Django’s MTV pattern:
- M stands for Model: responsible for the relational mapping between business objects and the database (ORM).
- T stands for Template: responsible for how the page is presented to the user (html).
- V stands for View: responsible for business logic, and calls Model and Template at the appropriate time.
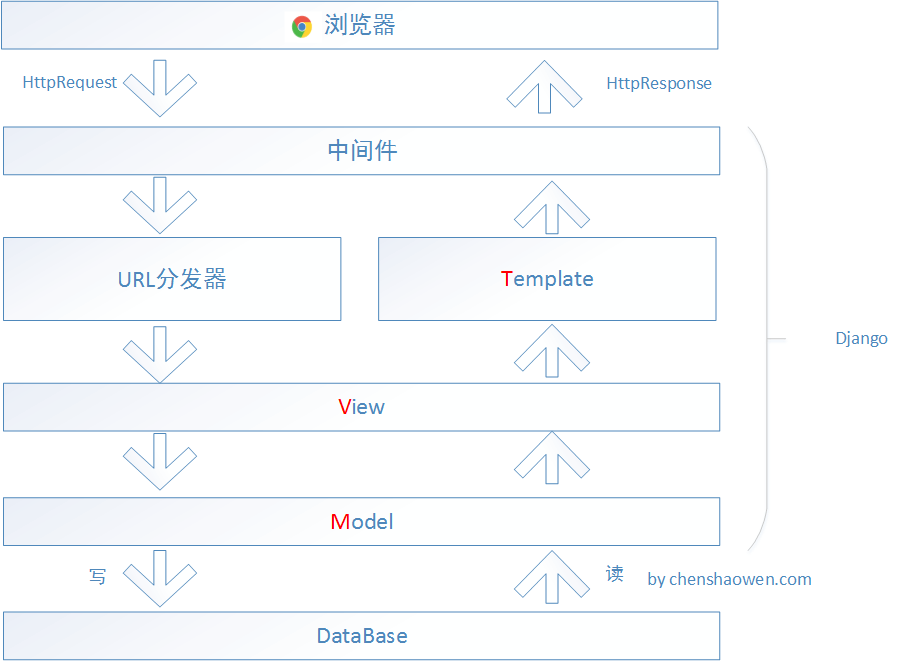
So when an http request is sent to a Django site, how does Django handle it?
Middleware receives an http request and processes it. For example, login state, escaping of parameters, validity checks, and so on. The parts of the processing logic common to the whole site can be handled in middleware.
Django matches the path of the http request against regular-expression rules in the URL dispatcher, and forwards the request to a view function for handling. For example, for the request http://localhost:8000/index/ , it will match the configured URL route
url(r’^index/$’, ‘myapp.views.index’), which means that the index function in the views.py file of the myapp package is designated to handle this kind of request.The index function in views handles this request and calls the methods provided by the Model layer to get data.
In the MTV model, data operations happen in the Model layer. It is enough to have the Model’s Manager class inherit from Django’s model.Manager class, and you can very conveniently expose interfaces to the view function. After the methods in the Model’s Manager class receive the call from the View layer, they use the ORM wrapped by Django to operate the database through objects, and then return the result to the View layer.
After the index function in the View layer obtains the data object returned by the Model layer, it passes it to the Template as a parameter.
The Template describes the format in which data is displayed, such as how many articles per page, whether they can be edited, and so on. Common syntax such as for and if can be used. After the Template layer receives the data object from the Model, it renders the data into html format and returns it to middleware for processing.
Middleware performs final processing on the Response. For example, the directory URL of static files, the URL of Media files, and some variables used by every page can all be written into the returned html through middleware.
It is returned to the browser and presented to the user.
3. Django’s Directory Structure
3.1 Creating a Django Project
After installing Django, use the following command to create a Django project named myproject
| |
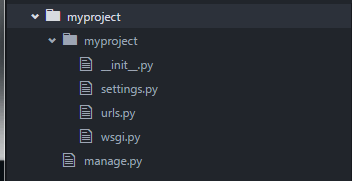
The manage.py script: used to manage the Django site
The myproject directory
. __init__.py: used to tell python that the current directory is a python module
. settings.py: contains all the configuration parameters of the project
. urls.py: the root URL configuration
. wsgi.py: the WSGI application configuration for the built-in runserver command
3.2 Creating a Django App
Run the command to create two Django Apps under the project directory.
| |
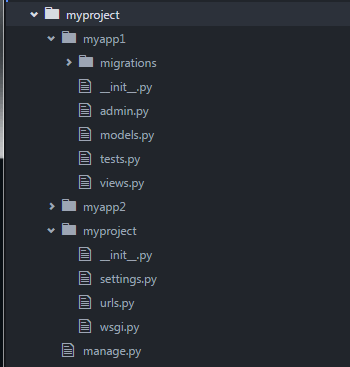
Then, in the settings.py file under the myproject directory, add ‘myapp1’,‘myapp2’ to INSTALLED_APPS, so that django creates database tables for these apps; in the urls.py file under the myproject directory, import myapp1, myapp2, and add url(r’^myapp1/’, include(myapp1.urls)), url(r’^myapp2/’, include(myapp2.urls)) to the urlpatterns field, telling django which url requests are dispatched to these two apps.
At this point, we can usually go ahead and fill in the business logic in myapp1 and myapp2, and finally run commands such as manager.py syncdb, makemigrations, and migrate to create the database tables, and the whole site can be up and running.
3.3 Why Django’s Directory Structure Should Be Standardized
If it is a business with no maintainability requirements and few iterations, reading the above part is enough. After all, what suits you is what is best; implementing a simple business with a complex system is unreasonable, and understanding and learning a system also has a cost.
But if you need not just to write one Django Project, but to write many Django Projects in the future and maintain them frequently, then you need to think carefully about the directory structure of a Django Project. If you have released a Django Project in a production environment, you will surely find that a part of the discussion is missing above — yes, that is multi-environment configuration, involving at least two environments: the local development environment and the production environment. How do you organize your project configuration files across multiple environments?
One person has to develop and maintain many Django Projects, and one Django Project has many Django Apps, and one App encapsulates a great deal of business logic, plus the multi-environment configuration files mentioned above. With so many files involved, I suddenly thought of management science — isn’t management science the study of how to plan, organize, lead, and control behavioral activities, integrating the resources at hand, and thereby reaching a goal? Our goal is to build an easy-to-maintain, reusable Django Project. And what management research produces is standards, which is why I want to standardize the Django directory structure
3.4 Practical Suggestions for Django’s Directory Structure
3.4.1 On Granularity — One Django App
A Django App is a complete functional unit that can handle a routing request and return a response. Dividing by the smallest unit that can provide a service reduces the cost of learning the internal logic when reusing it, and also achieves good isolation between units.
This granularity of division places a requirement on how we build a Django App: it must be able to independently complete a Request inside the App.
In a production environment, we rarely build a Django Project from scratch; at the very least we start from an existing internal Django Framework and fill in the business logic part. That consideration is reasonable, but under pressure from the PM, developers hastily fill in business logic without considering the division of Django Apps, which results in copying code from the original Django Project every time, or repeatedly re-implementing functionality starting from the Django Framework again and again.
3.4.2 How to Build a Django App That Can Complete a Request Independently
The key point is: use django-admin to create a Django App for every functional block
Django has already told us very clearly how to build a reusable Django App, namely to create it with the command line and then fill the business logic into it.
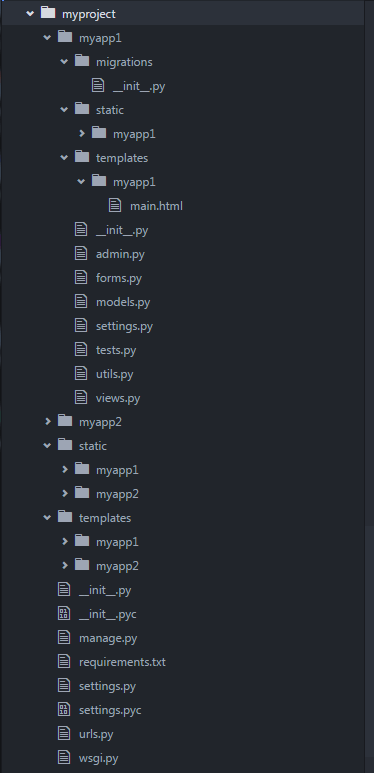
Using the command django-admin startapp myapp1, the created Django App mainly has admin.py, models.py, tests.py, and views.py, but that is not enough: forms.py is also needed to validate forms; settings.py is needed to configure the constants in the APP, and here it is suggested that constants start with the APP name, such as MYAPP1_XXX; utils.py is needed to hold some utility functions; template is needed to hold templates, and here it is suggested to create another folder with the same name as the APP inside template to hold templates, so that it can be copied directly into the Project’s Template directory; and requirements.txt is also needed to list the dependency files.
Since there are two myproject directories, and the inner myproject contains only a few files, copy it to the same level as the APP (you need to remove the myproject. package prefix in the settings.py file). With all that done, the Django directory structure looks like this:
Finally, the multi-environment configuration:
Django is usually deployed together with Nginx and uwsgi. You can get the value of the DJANGO_CONF_MODULE variable from uwsgi to determine the runtime environment.
In the setting.py file under the project directory, add the following:
| |
In the settings.py file under the app directory, add the following:
| |
