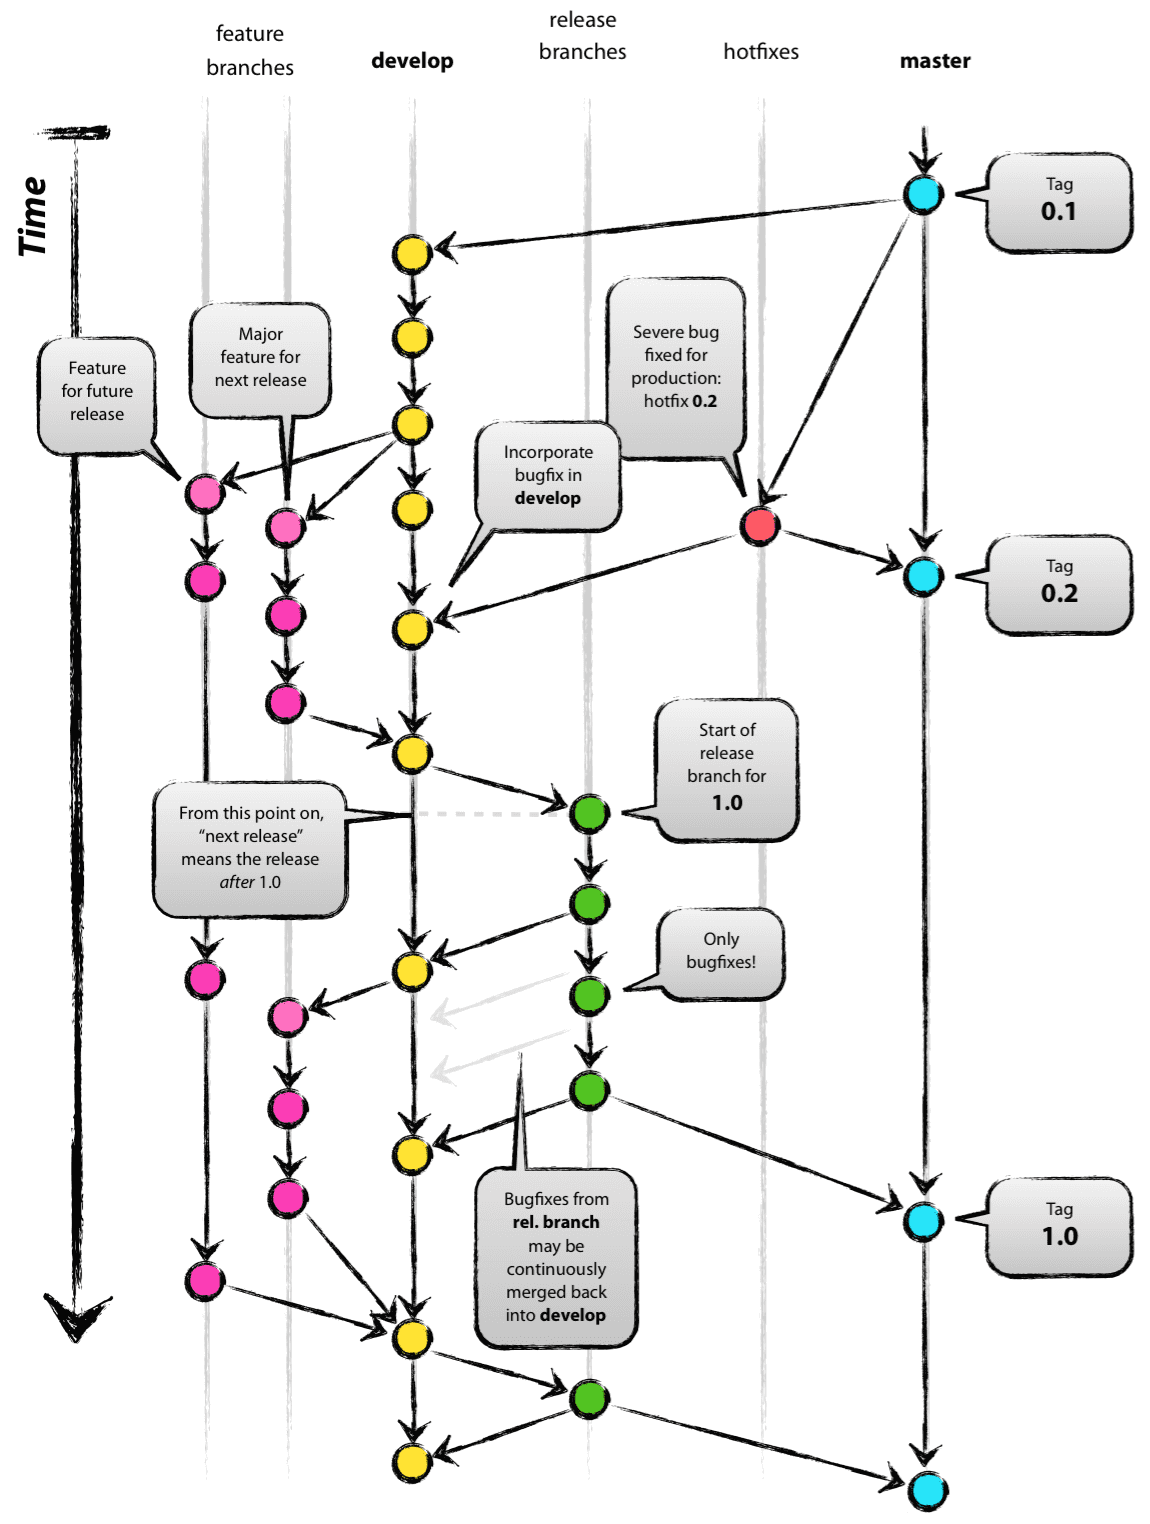
This article is built around Git, the tool that controls all of our source code.
1. Why Git?
For an in-depth discussion of the pros and cons of git versus centralized source control systems, see here. There has been far too much heated argument on this subject. As a developer, I currently prefer Git over other tools. Git really did change the way developers think about merging and branching. In the world of those classic CVS/Subversion management tools, merging/branching was considered somewhat scary (“watch out for merge conflicts, they’ll bite you!”), and occasionally you had to do some work to resolve problems.
But with Git, these operations become extremely simple, and they are considered a core part of your daily workflow. For example, in the CVS/Subversion book, branching and merging are first discussed much later in the book (for advanced users). But in every Git book, it is covered in chapter three (the basics section).
Because of its simplicity and the repeatability of its commands, branching and merging stop being frightening. A version control tool is considered to provide convenience in branching/merging above all else.
Enough has been said about the tools themselves; below we turn to the development model. The model I am about to describe is no more than a set of processes that every team member must follow, which makes the software development process easier to manage.
2. Both Distributed and Centralized
The repository we use, and which works very well with this branching model, has a “real” central repository. Note that this repository is only considered the central repository (because Git is a distributed version control tool, there is technically no such thing as a central repository). We will name this repository origin, because all Git users are familiar with that name.
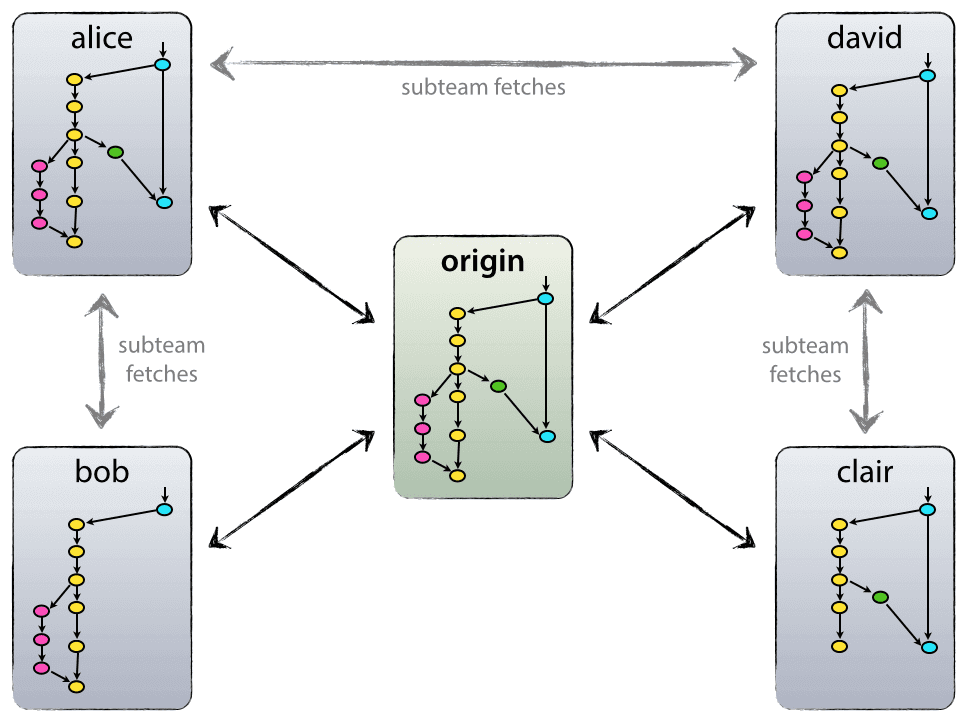
Every developer pulls from and pushes to origin. Beyond the centralized push-pull relationship, each developer may also pull code from other developers, forming their own sub-teams. This can be useful, for example, when working on a large feature with two or more people, or before pushing code to origin. In the diagram above, there are three sub-teams: Alice and Bob, Alice and David, and Clair and David.
Technically, this simply means that Alice has defined a remote Git repository named bob that actually points to Bob’s repository, and vice versa (Bob has defined a remote Git repository named alice that actually points to Alice’s repository).
3. The Main Branches
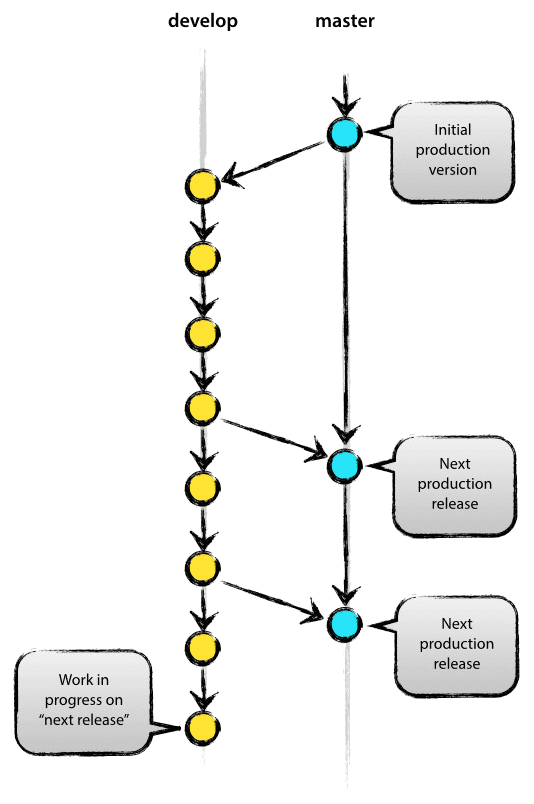
To be honest, the development model we are discussing is heavily inspired by existing models. The central repository has two main branches that exist permanently:
- the master branch
- the develop branch
The master branch of origin is familiar to every Git user. The other, parallel branch is called the develop branch.
We consider the code pointed to by the HEAD reference on the origin/master branch to be releasable.
We consider the code pointed to by the HEAD reference on the origin/develop branch to always reflect the latest code changes for the features to be delivered in the next release. Some people call it the “integration branch.” It is also the branch on which the automated build system runs its build commands.
When the code on the develop branch reaches a stable state and is ready for release, all code changes should be merged into the master branch and then tagged with a release version number. We will discuss exactly how to do this.
Therefore, every time code is merged into the master branch, it is by definition a new release product. In theory, we should be very strict here: when there is a new commit on the master branch, we should use a Git hook script to run the automated build and then push the software to the production servers for release.
4. Supporting Branches
Alongside the master and develop branches, our development model uses another kind of supporting branch to help with parallel development among team members, easy tracking of features, release preparation, and quickly fixing production issues. Unlike the main branches, these supporting branches usually have only a limited lifetime, because they are eventually deleted.
The different types of branches we use include:
- Feature branches
- Release branches
- Hotfix branches
Each of the branches above has its own special purpose and is bound by strict rules: which branch it is pulled from, and which branch is its merge target.
From a technical point of view, there is nothing more to the special nature of these branches. They are merely categorized according to how we use them. They are still just ordinary Git branches.
5. Feature Branches
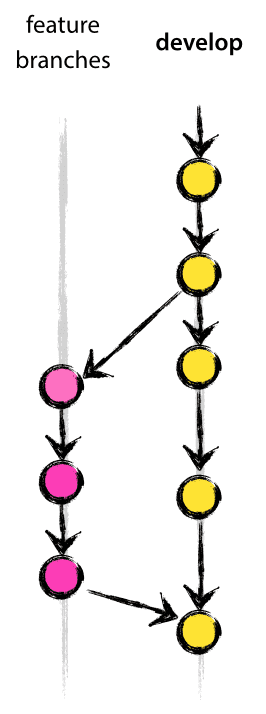
Feature branches may be branched off from develop and must eventually be merged back into develop. A feature branch may be named anything except master, develop, release-, or hotfix-.
Feature branches (sometimes also called topic branches) are used to develop new features for some future release. When development of a new feature begins, it is not yet known which target release that feature will ship in. The essential characteristic of a feature branch is that it should exist as long as the feature is still in development, but eventually these feature branches will be merged into develop (in order to add new functionality to a new release) or discarded (if it was just a disappointing experiment).
Feature branches exist only in the developer’s local repository, not in the remote repository.
5.1 Creating a Feature Branch
When starting development of a new feature, create the feature branch from the develop branch.
| |
5.2 Incorporating a Finished Feature into develop
A finished feature must be merged into the develop branch, that is, added to the upcoming release.
| |
The --no-ff flag causes the merge to create a new commit object, even when the merge could be a fast-forward. This avoids losing historical information about the feature branch as well as information about its commits. Compare the two:
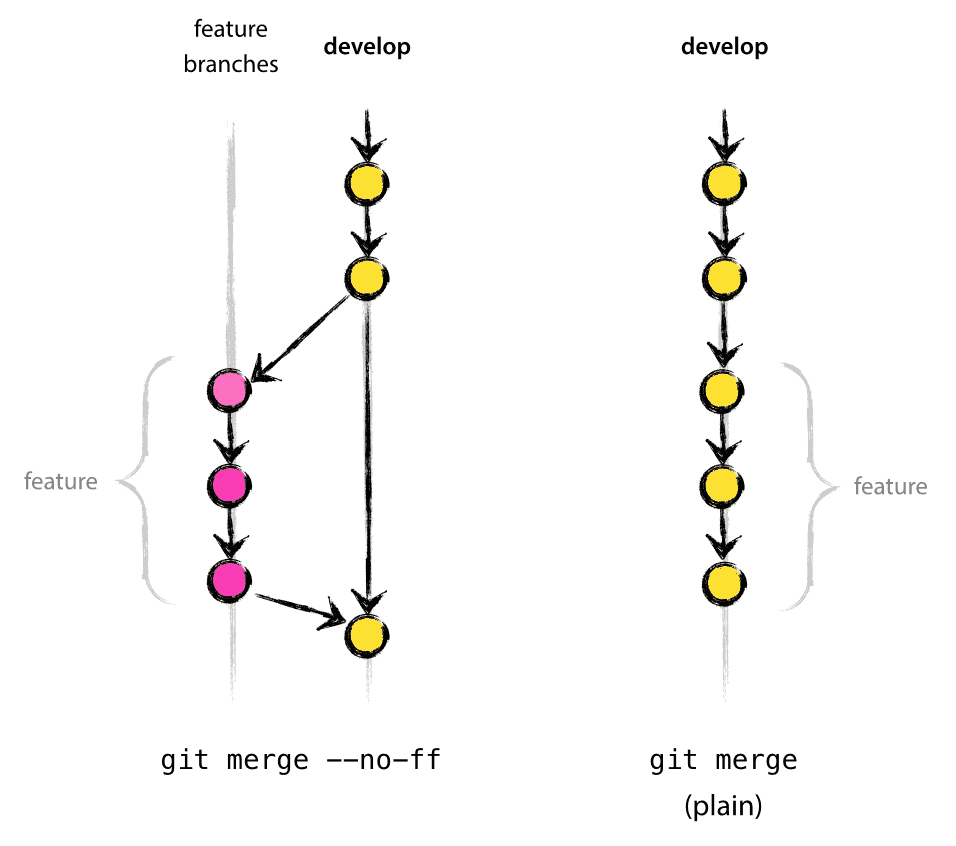
In the example on the right, it is impossible to see from the Git history all the commit objects for a feature that was implemented — unless you look through all the log messages. Retrieving the whole feature branch’s information really is a headache in the right-hand example, but with the --no-ff flag there is no such problem.
Using this flag does create some additional commit objects (even if they are empty commits), but it is well worth it.
Unfortunately, I have not yet found a way to make Git’s default merge operation use the --no-ff flag, but it really should.
6. Release Branches
Release branches are created from the develop branch.
A release branch must be merged into the develop branch and the master branch.
A release branch can be named like this: release-*
Release branches support the preparation of a new release. They allow for small last-minute adjustments. They even allow small bug fixes and the preparation of metadata for the new release (version number, build time, and so on). By doing this work on the release branch, the develop branch is left free to receive features for the next major release.
The point at which a new release branch is pulled from develop is when the development work has reached the desired state for the new release. At the very least, all the target features for the release being prepared must already have been merged into develop by this point. Target features for later releases do not have to be merged into develop. Those features must wait until after the feature branch is created before they can be merged back into develop.
Once the release branch has been created, it is assigned the version number for the upcoming release — not earlier, only at this point. Before that, the develop branch reflects the code changes for the next release, but whether that next release is 0.3 or 1.0 is not very clear until the release branch is created and everything is settled. These decisions are made once the release branch is started and the project’s version numbering and other project rules are established.
6.1 Creating a Release Branch
Create the release branch from the develop branch. For example, version 1.1.5 is the current release in production, and we are about to ship a bigger release. The develop branch is now ready for the next release, and we decide that the next version number is 1.2 (1.1.6 or 2.0 would also work). So we create the release branch and give the branch its new version number:
| |
After creating the branch and switching to it, we give the branch its version number. bump-version.sh is a fictional shell script that changes some files in the working copy to reflect the new version. (You can of course also change these files by hand.) The version is then committed.
The new branch will exist for a while, until the new release is finally shipped. During this time, bug fixes can be made on this branch (not on the develop branch). Adding new major features is strictly forbidden at this point. These changes must be merged back into the develop branch, after which we wait for the new release.
6.2 Finishing a Release Branch
When the release branch is ready to become a real release, some operations must be performed. First, merge the release branch back into master (because every commit on master is by definition a new release, remember). Then tag this commit, so that the version can be looked up later in history. Finally, merge the changes made on the release branch into develop as well, so that future releases will also include these bug fixes.
In Git this takes two steps:
| |
The release branch has now done its job, and the tag has been created.
Note: you can use -s or -uto sign your tag.
To preserve the changes made on the release branch, we need to merge them back into develop. Run the following Git commands:
| |
This step may produce merge conflicts (very likely, since we have changed the version number). If there are conflicts, resolve them and commit.
Now we have finished the work, and the release branch can be deleted, because we no longer need it:
git branch -d release-1.2
Deleted branch release-1.2 (was ff452fe).
7. Hotfix Branches
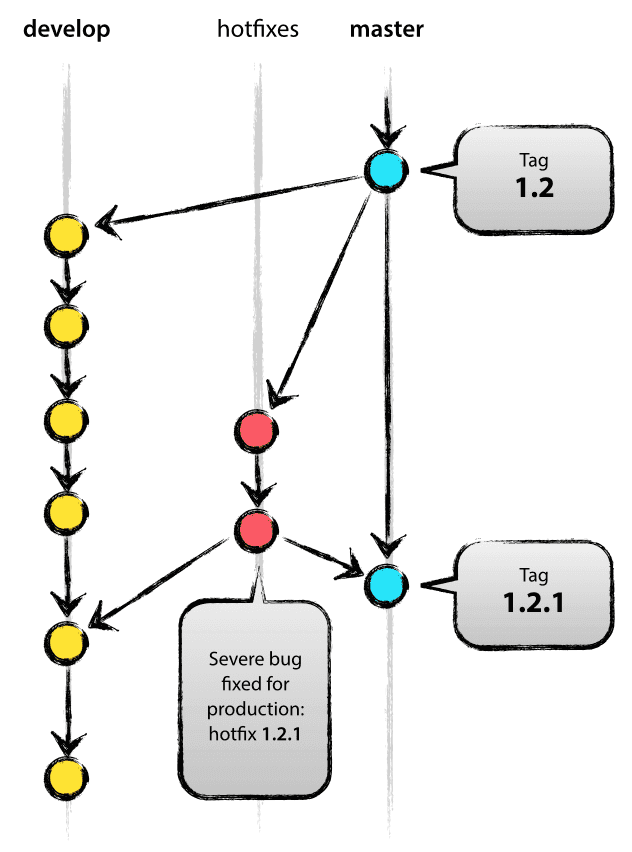
Hotfix branches are created from the master branch.
They must be merged back into the develop branch and the master branch.
A hotfix branch can be named like this: hotfix-*
Hotfix branches are in some ways very much like release branches: they both mean preparing for a new release, and neither is planned in advance. A hotfix branch must be created when a bug in the current production release urgently needs fixing. When a released version has a serious bug that must be fixed immediately, the hotfix branch needs to be created from the tag on the master branch that corresponds to that version, because that tag marks the release.
7.1 Creating a Hotfix Branch
A hotfix branch is created from the master branch. For example, the current version 1.2 in production has a problem caused by a bug on the server side. But it is not reliable to make the change on the develop branch, so we need to create a hotfix branch and start fixing the problem:
git checkout -b hotfix-1.2.1 master
Switched to a new branch "hotfix-1.2.1"
./bump-version.sh 1.2.1
Files modified successfully, version bumped to 1.2.1.
git commit -a -m "Bumped version number to 1.2.1"
[hotfix-1.2.1 41e61bb] Bumped version number to 1.2.1
1 files changed, 1 insertions(+), 1 deletions(-)
Do not forget to change the version number after creating the branch.
Then fix the bug and commit once or several times.
git commit -m "Fixed severe production problem"
[hotfix-1.2.1 abbe5d6] Fixed severe production problem
5 files changed, 32 insertions(+), 17 deletions(-)
7.2 Finishing a Hotfix Branch
When the work is done, the code with the fix must be merged back into the master branch, but also merged into the develop branch, to guarantee that the bug is already fixed in the next release. This is so much like a release branch.
First, merge into master and then tag it.
| |
Note: you can use -s or -uto sign your tag.
Next, merge the bugfix code into the develop branch.
| |
There may be an exceptional case here: when a release branch exists, the hotfix branch needs to be merged into the release branch rather than the develop branch. When the release branch has completed its mission, the bugfix code merged back into the release branch will eventually be merged into develop as well. (If develop urgently needs these bug fixes and cannot wait for the release branch to finish, you can safely merge these bugfixes into develop; doing so is also fine.)
Finally, delete these temporary branches.
| |
8. Summary
This branching model really contains nothing earth-shattering or new, but the “big picture” at the start of this article has already proven its enormous value in our engineering projects. It forms an elegant, ideal model that is also easy to understand, and it allows team members to share a common understanding of the branching and release process.
