1. 关于 Prow
在 Kubernetes、Istio 等知名项目的 Github 仓库中,我们经常会看到 xxx-bot 用户,给 issues 添加标签、合并 PR 。这个机器人账户就是被 Prow 驱动的。
Prow 是 Kubernetes 测试特别兴趣小组的项目,目前是 kubernetes/test-infra 的一部分。Prow 是一个基于 Kubernetes 使用各类事件驱动执行 Job 的 CI/CD 系统。
除了执行 Job ,Prow 还能通过以下方式,实现 GitHub 的自动化功能:
- 策略配置,权限控制等
- /label 形式的 chat-ops 命令
- 自动合并 PR
使用 Prow ,我们可以将研发流程自动化,极大地提升了开发体验。
2. 工作原理
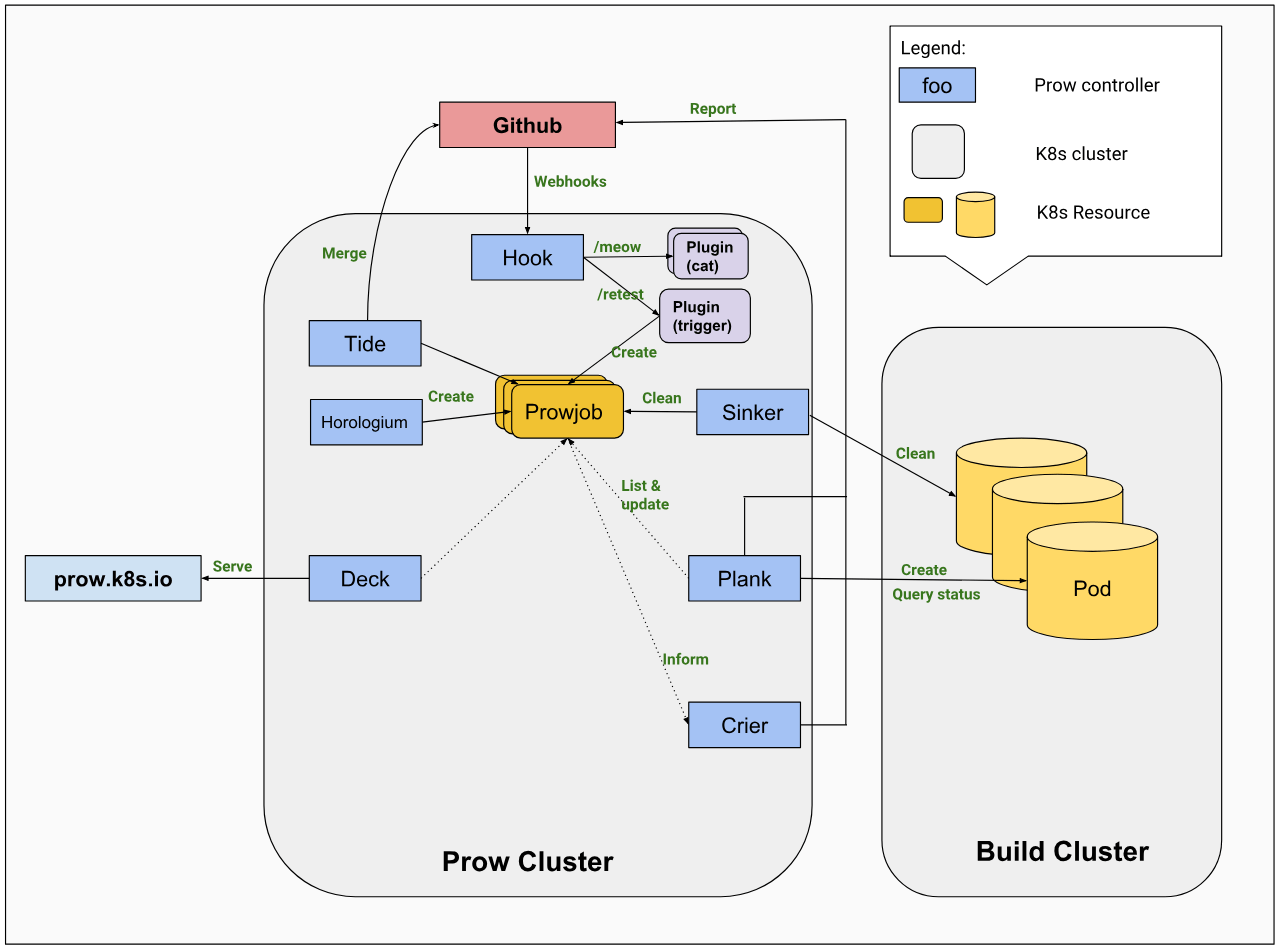
Prow 采用的是微服务架构。核心组件如下:
- hook 是核心无状态服务,负责监听 Github Webhook 并将其分发到指定的插件
- plank 是控制器,负责管理作业的生命周期
- deck 是系统的 Dashboard
- horologium 用来创建周期型的 Job
- sinker 定时清理无用的 Job
工作流程:
在 issues 中,评论 /assign @someone 。Github 通过 Webhook 将该事件发送给 Prow 。事件到达 hook 组件,再传给各个 PlugIn 。 PlugIn 通过解析事件的 body 数据,判断是否需要创建 ProwJob 。Prowjob 是一个 Job 的 CRD 。最终执行 Job ,将相关的内容指派给 someone ,将文本转换为行为。
关于插件:
在 prow/plugins 仓库中,我们可以找到一些内置的插件。当然,我们也可以通过扩展插件定制 Prow 的行为。
3. 在 Kubernetes 集群部署 Prow
- 准备机器人账户
在生产环境,通常会使用一个类似 xxx-bot 的账户专用于 Prow 的行为,以区分人的操作。如果仅是测试,使用个人账户也可以。
将机器人账户添加为仓库管理员。
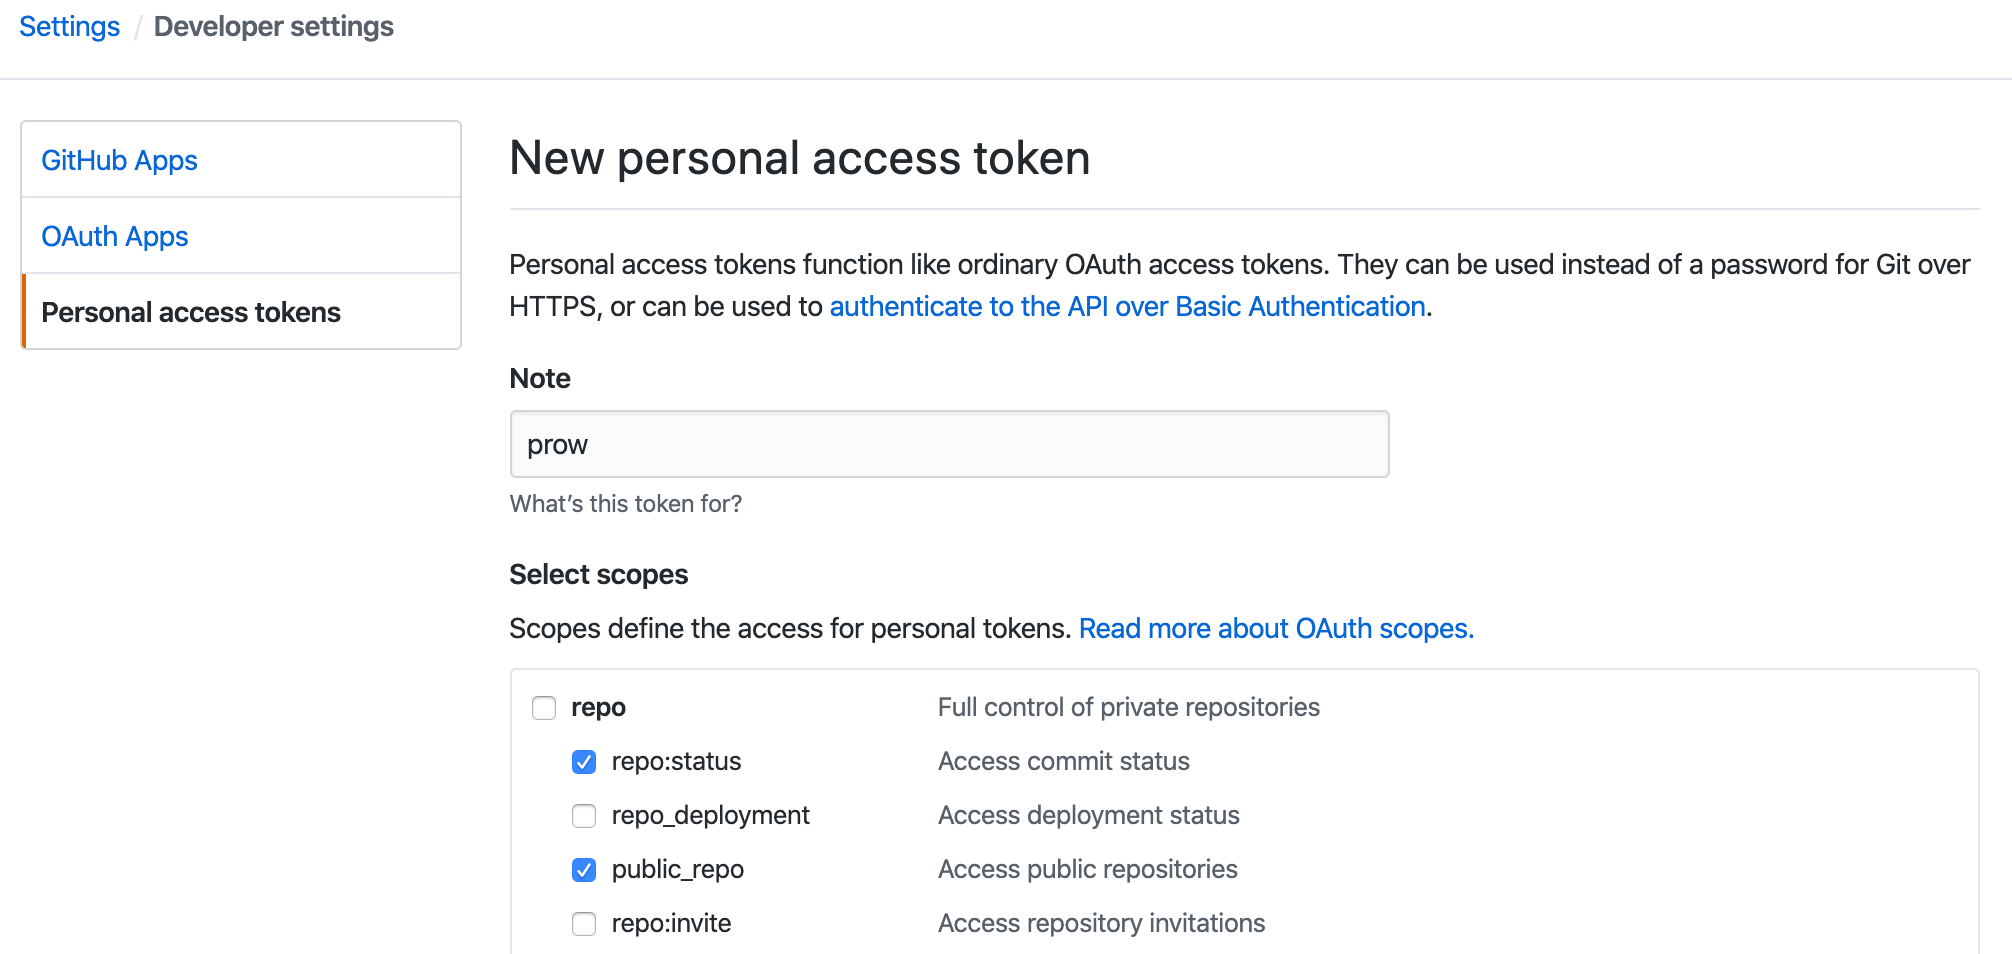
- 生成用于 Github 访问的 token
登陆机器人账户,在 settings/tokens 页面,新建一个 token: xxxTokenxxx ,勾选 repo:status 和 public_repo 权限。
- 使用 Github token 创建集群 secret
| |
- 在集群生成 hmac ,用于 Github 的 Webhook 认证
| |
查看 hmac 值,将用于 Github 中 Webhook 的配置。
| |
- 部署 Prow
| |
- 查看全部 Pod 是否全部 Running
| |
- 查看服务访问的端口
| |
这里由于仅用于测试,没有配置 Ingress ,下面会以 ServiceIp + NodePort 的形式进行配置,其中 ServiceIp 为部署的主机 IP 。
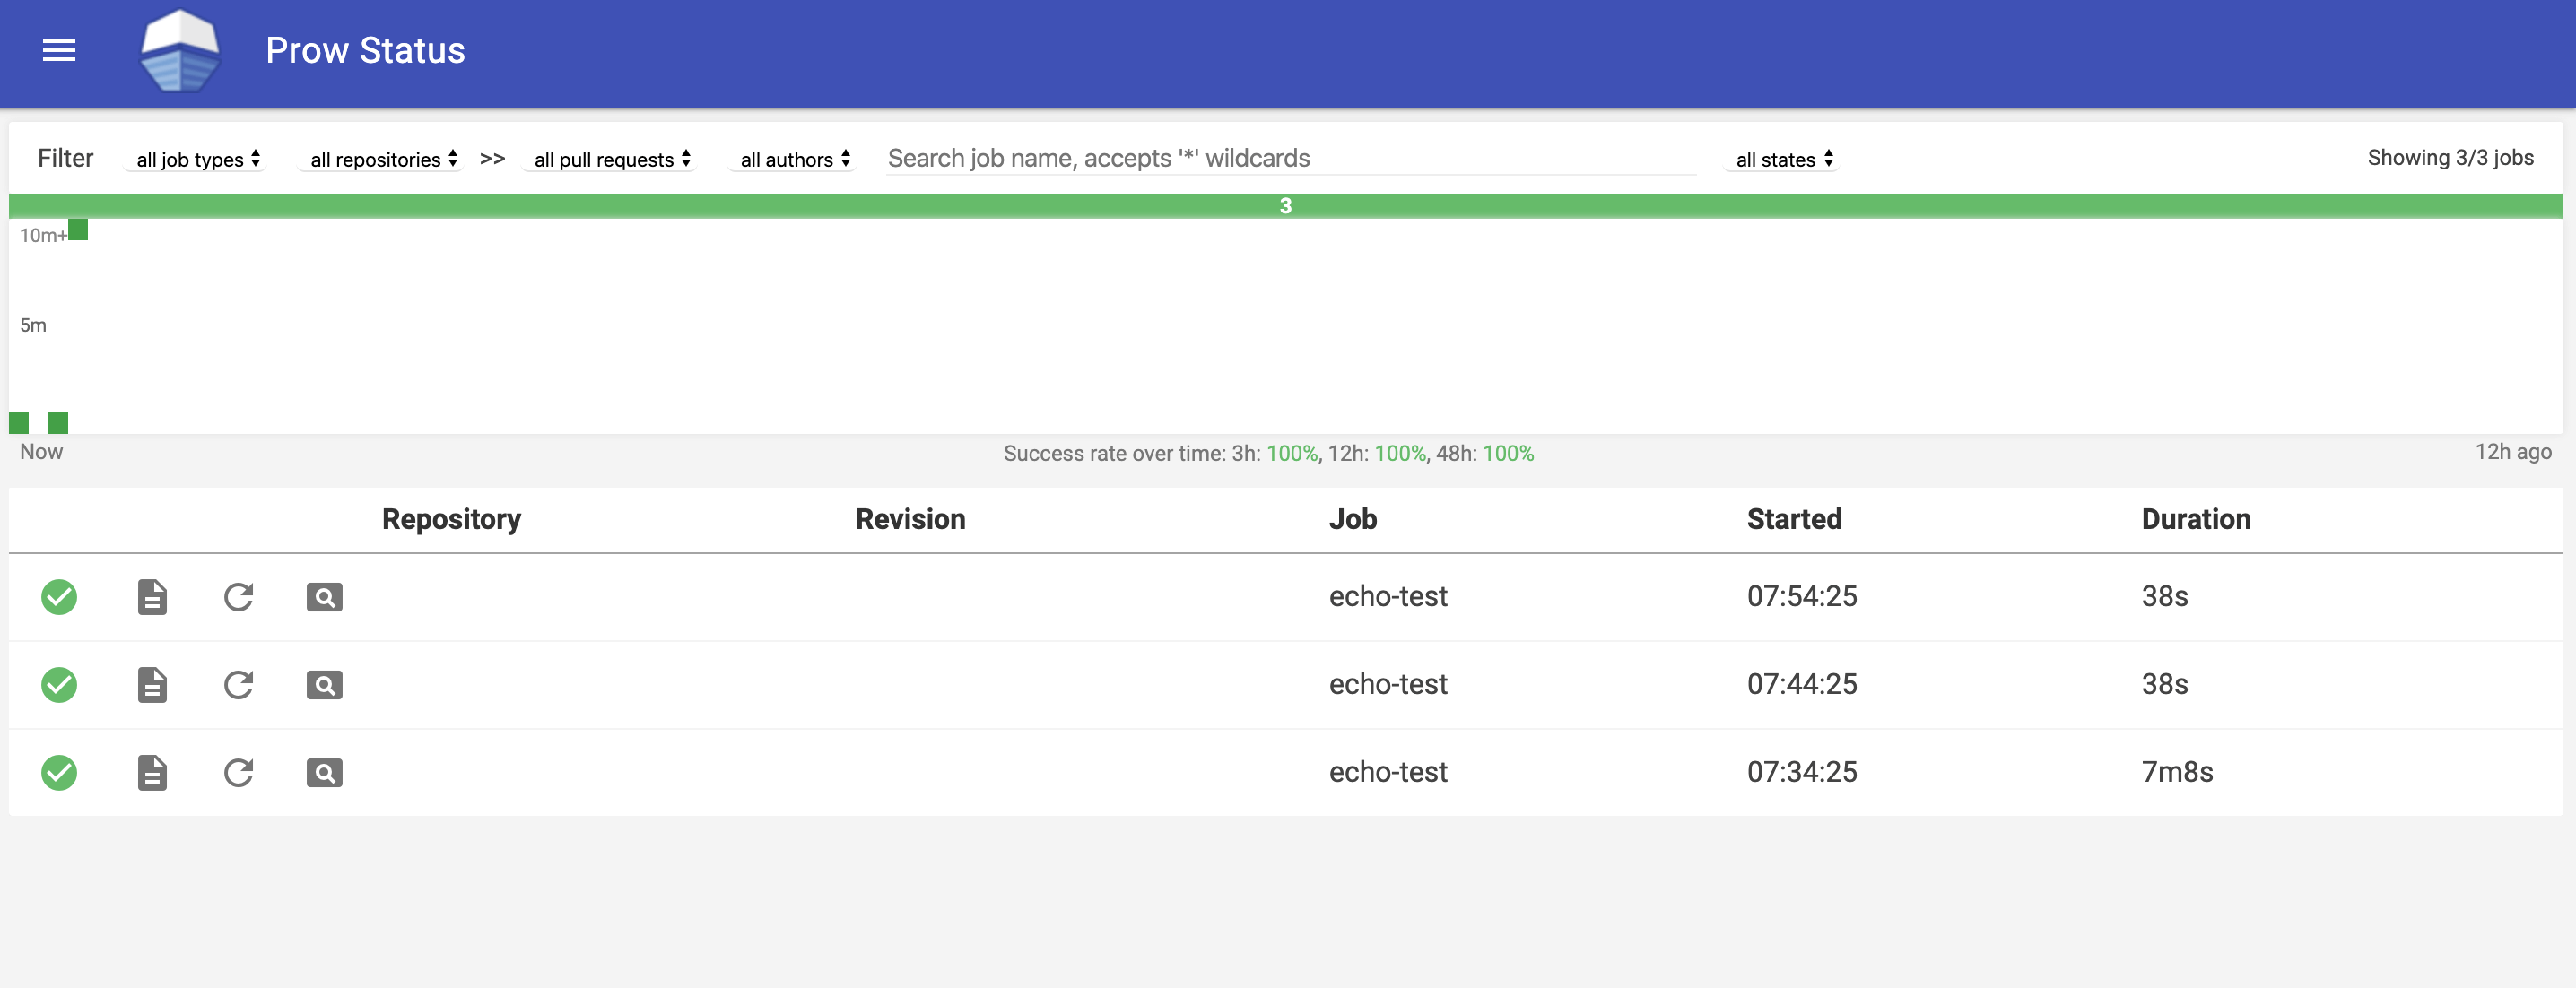
- 查看页面
访问 deck 组件提供的 Dashboard :http://ServiceIP:32284/
4. 新仓库配置
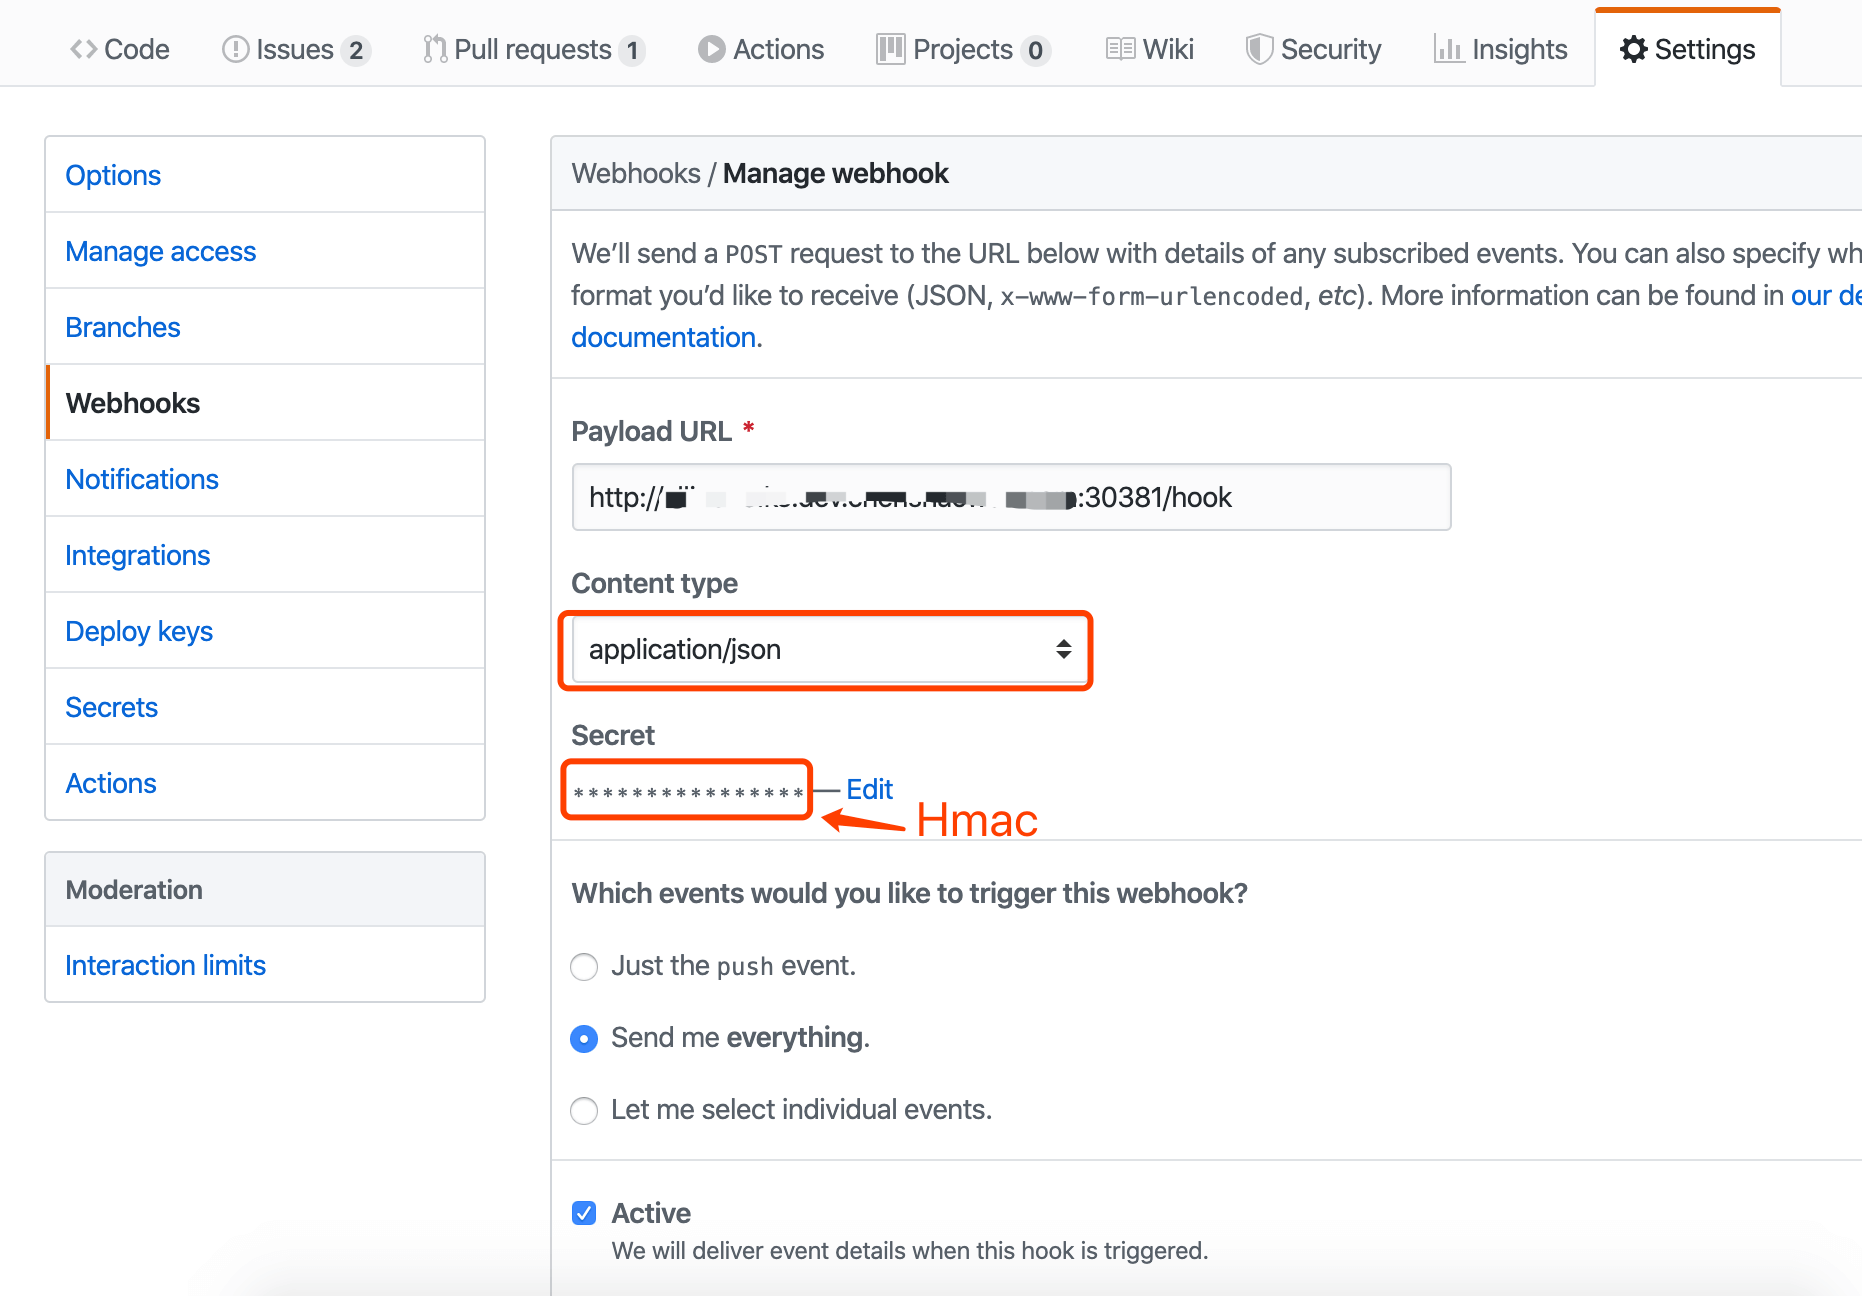
- 给 Github 仓库添加 Webhook 配置
Payload URL 需要带上 /hook 路由。Content Type 需要选择 application/json 。Secret 是上面生成的 xxxHmacxxx 值。
- 给 Github 仓库添加 OWNERS 文件
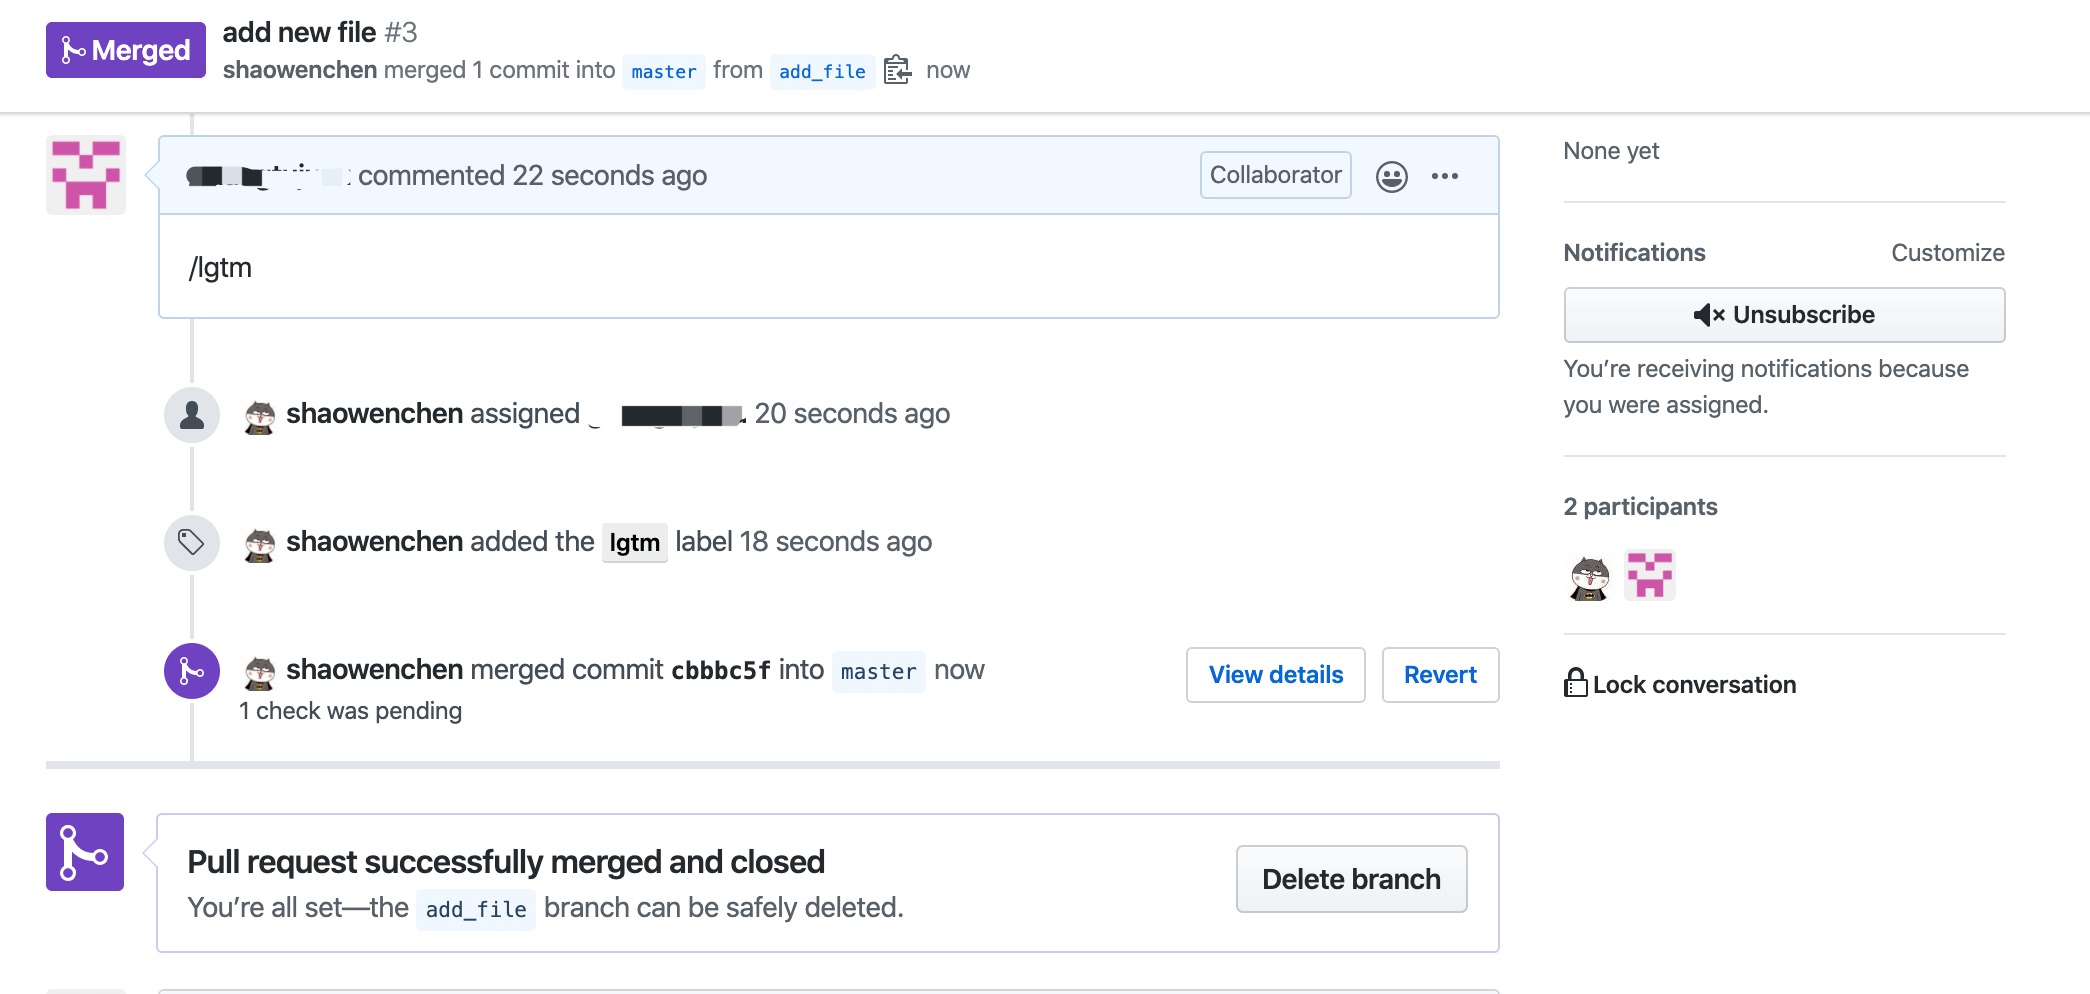
OWNERS 文件用于申明模块的 approvers 和 reviewers ,在 PR 流程中会用到。每个目录都可以使用 OWNERS 进行控制,这里在仓库根目录下添加该文件并提交。其中的 someone 用户,将可以通过评论 /lgtm ,合并 PR 。这里 Prow 中定义的规则是,同时存在 /lgtm 和 /approve 标签时,PR 将会被合并。但是存在一个特例,approver 可以省略 /approve 而直接使用 /lgtm 合并 PR,同时 approver 提交的 PR 会被加上 /approve 。
OWNERS 文件:
| |
- 启用指定插件
创建插件描述文件 plugins.yaml ,这里以 shaowenchen/prow-test 仓库为例。如果是多个仓库,可以按照 yaml 语法,列在 plugins 下。
plugins.yaml 文件
| |
执行命令:
| |
- 配置 Tide
Tide 用于 PR 的合并,多个仓库可以按照 yaml 语法新增在 repos 字段下。prowjob_namespace 用于配置 deck、tide 等组件查询 prowjob 的 namespace。如果不是使用 default 进行部署,则需要进行配置。没有配置时,会出现 cannot list resource "prowjobs" in default namespace 的错误提示。
config.yaml
| |
执行命令:
| |
- 定制标签(可选)
通过 /xxx xxx 评论,能够给 issues 或 PR 添加标签。前提是仓库中已经新建了相关的二维标签。 如果需要定制标签,可以参考 内置标签 定义自己的 labels.yaml 。
执行命令:
| |
- checkconfig 工具
克隆 Prow 的代码仓库 kubernetes/test-infra/prow ,使用 Go 命令执行内置的命令。
| |
| |
5. 使用测试
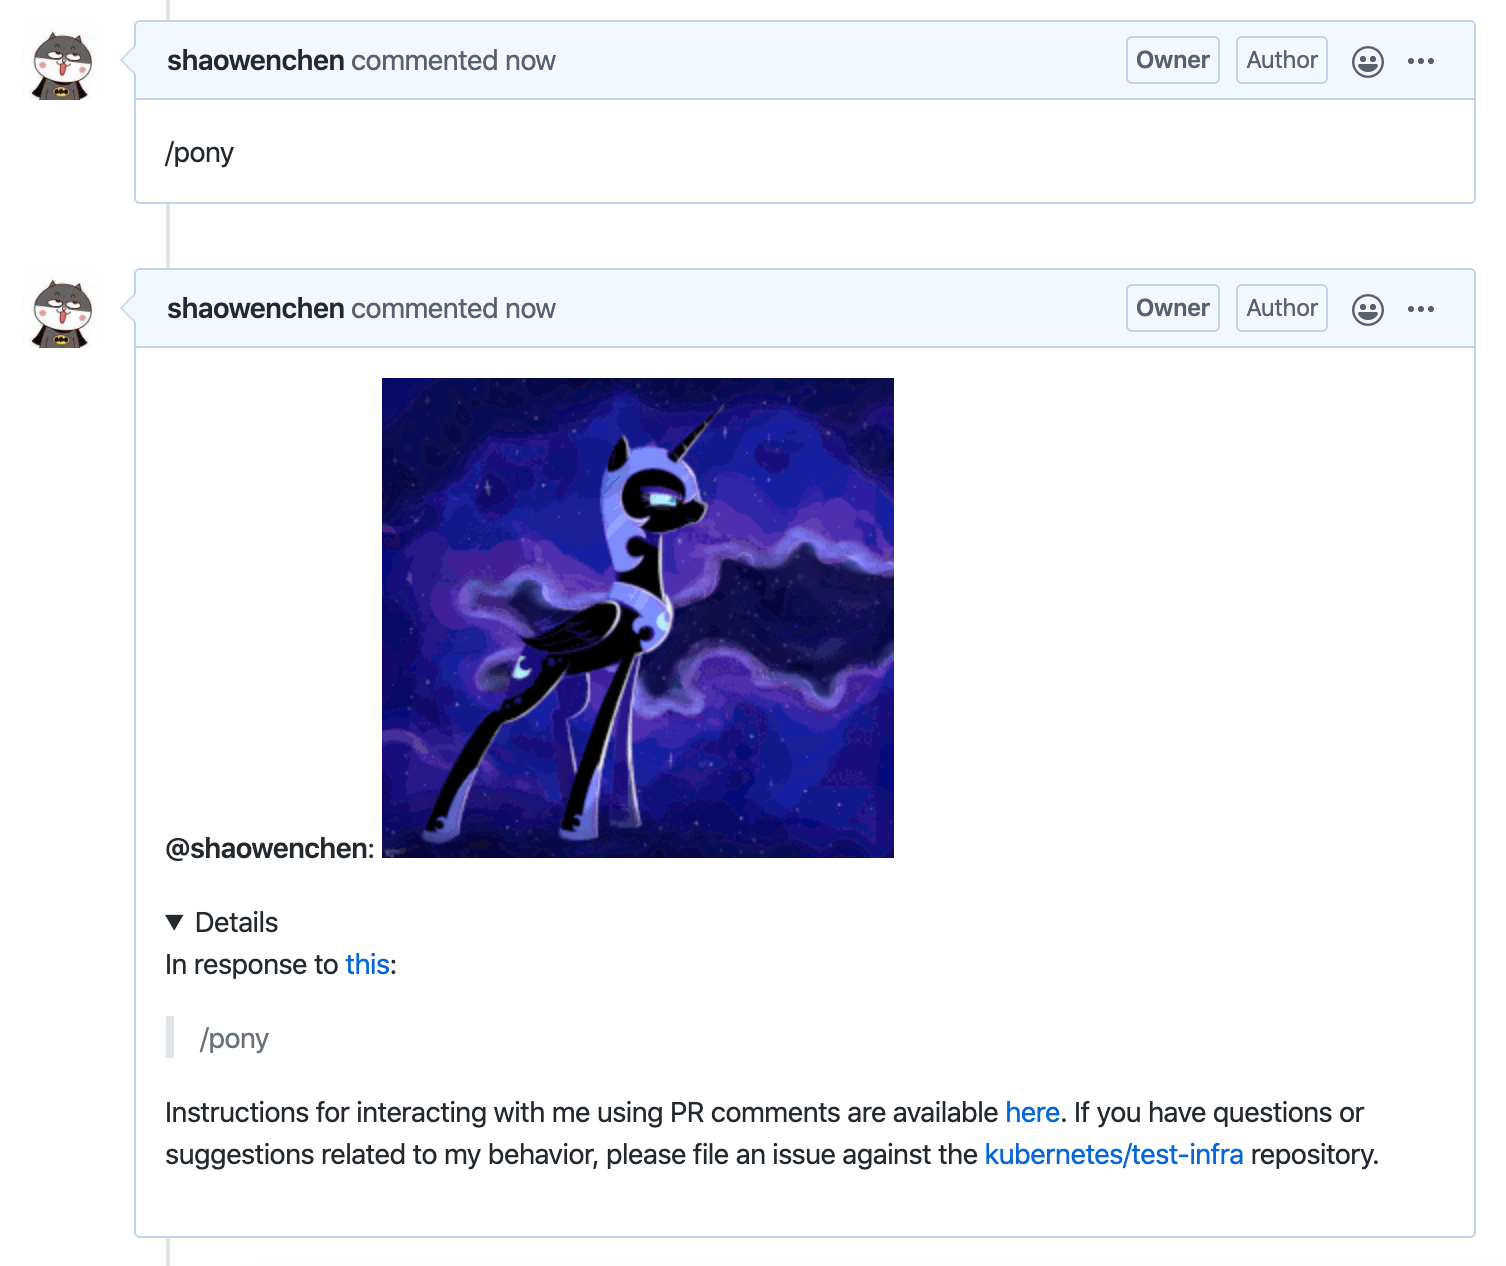
- Pony 插件测试
- Tide 合并 PR 测试