据统计容器中的大部分文件不会被使用。根据这一特征,Nydus 自定义了 Rafs 格式的文件系统,实现了镜像文件的按需加载,以解决大镜像导致的启动慢和占用存储的问题。而在 AI 场景下,无论是推理还是训练,镜像常常都是几个 G 起步,甚至几十个 G,Nydus 非常适用。
本篇主要是一些具体操作步骤,用于快速配置镜像懒加载方案 Nydus,以及常见问题的处理方法。
1. 安装 nerdctl 和 nydus
1
| curl -sfL https://raw.githubusercontent.com/shaowenchen/ops/main/getcli.sh |VERSION=latest sh -
|
如果已经安装,可以更新 Opscli 到最新版本。
1
| opscli task -f ~/.ops/tasks/install-nerdctl.yaml
|
通过 -i ~/.kube/config 参数指定整个集群。
1
| opscli task -f ~/.ops/tasks/install-nydus.yaml
|
通过 -i ~/.kube/config 参数指定整个集群。
2. 启动 nydus-snapshotter
在文档 https://github.com/containerd/nydus-snapshotter/tree/main/misc/snapshotter 中有很多示例配置。我们线上 Linux Kernel 并不是都高于 5.19 ,这里选择了 fuse 的方式。
2.1 创建配置文件 /etc/nydus/config.toml
1
2
| mkdir -p /etc/nydus
wget https://raw.githubusercontent.com/shaowenchen/demo/master/nydus/config.toml -O /etc/nydus/config.toml
|
2.2 创建配置文件 /etc/nydus/nydusd-config.fusedev.json
1
| wget https://raw.githubusercontent.com/shaowenchen/demo/master/nydus/nydusd-config.fusedev.json -O /etc/nydus/nydusd-config.fusedev.json
|
1
| wget https://raw.githubusercontent.com/shaowenchen/demo/master/nydus/nydus-snapshotter.service -O /etc/systemd/system/nydus-snapshotter.service
|
1
| mkdir -p /data/containerd/io.containerd.snapshotter.v1.nydus
|
1
2
3
| systemctl enable nydus-snapshotter
systemctl start nydus-snapshotter
systemctl status nydus-snapshotter
|
1
| journalctl -u nydus-snapshotter -f
|
3. Containerd 集成 Nydus
编辑配置文件
1
| vim /etc/containerd/config.toml
|
添加如下内容
 1
 2
 3
 4
 5
 6
 7
 8
 9
10
11
12
13
| [plugins]
[plugins."io.containerd.grpc.v1.cri"]
[plugins."io.containerd.grpc.v1.cri".containerd]
default_runtime_name = "runc"
ignore_rdt_not_enabled_errors = false
no_pivot = false
discard_unpacked_layers = false
disable_snapshot_annotations = false
snapshotter = "nydus"
[proxy_plugins]
[proxy_plugins.nydus]
type = "snapshot"
address = "/run/containerd-nydus/containerd-nydus-grpc.sock"
|
1
| systemctl restart containerd
|
1
2
3
| ctr -a /run/containerd/containerd.sock plugin ls | grep nydus
io.containerd.snapshotter.v1 nydus - ok
|
4. 直接将 OCI 镜像转换成 Nydus 镜像
1
| nerdctl login https://index.docker.io/v1/
|
nerdctl 的用法和 docker 一样,如果有使用到其他仓库,就登录其他仓库。
1
2
3
4
5
6
7
8
| nydusify convert --source shaowenchen/demo:ubuntu:latest --target shaowenchen/demo:ubuntu:latest-nydus
pulling image docker.io/shaowenchen/demo:ubuntu:latest module=converter
pulled image docker.io/shaowenchen/demo:ubuntu:latest, elapse 9.743015898s module=converter
converting image docker.io/shaowenchen/demo:ubuntu:latest module=converter
converted image docker.io/shaowenchen/demo:ubuntu:latest-nydus, elapse 4.002142728s module=converter
pushing image docker.io/shaowenchen/demo:ubuntu:latest-nydus module=converter
pushed image docker.io/shaowenchen/demo:ubuntu:latest-nydus, elapse 1m25.054493982s module=converter
|
可以通过 --backend-config-file ~/.docker/config.json 指定镜像仓库的凭证。
5. 使用 Buildkit 构建 Dockerfile 生成 Nydus 镜像
除了使用 Nydusify 转换,还可以直接构建 Dockerfile 生成 Nydus 镜像。
https://github.com/moby/buildkit 提供的源码不支持 Nydus,需要使用 https://github.com/nydusaccelerator/buildkit 提供的版本,但后者又没有 release 版本,需要下载编译。这里,我编译好了一个版本,可以直接下载使用。
1
| wget https://github.com/shaowenchen/nydusaccelerator-buildkit/releases/download/latest/buildkit-linux-amd64.tar.gz
|
1
2
| tar xvf buildkit-linux-amd64.tar.gz
mv bin/* /usr/local/bin/
|
1
| mkdir -p /etc/buildkit /data/buildkit
|
 1
 2
 3
 4
 5
 6
 7
 8
 9
10
11
12
13
14
15
| cat > /etc/buildkit/buildkitd.toml <<EOF
debug = true
root = "/data/buildkit"
[worker.oci]
enabled = false
[worker.containerd]
address = "/run/containerd/containerd.sock"
enabled = true
platforms = [ "linux/amd64", "linux/arm64" ]
namespace = "buildkit"
gc = true
gckeepstorage = 9000
cniPoolSize = 16
EOF
|
生成 Systemd Unit 文件
 1
 2
 3
 4
 5
 6
 7
 8
 9
10
11
12
| cat > /etc/systemd/system/buildkitd.service << EOF
[Unit]
Description=buildkitd service
Documentation=https://github.com/moby/buildkit
[Service]
Environment="NYDUS_BUILDER=/usr/local/bin/nydus-image"
ExecStart=/usr/local/bin/buildkitd --config /etc/buildkit/buildkitd.toml
[Install]
WantedBy=multi-user.target
EOF
|
1
2
3
| systemctl enable buildkitd
systemctl start buildkitd
systemctl status buildkitd
|
1
2
3
4
| cat << EOF >Dockerfile
FROM ubuntu
RUN touch 123
EOF
|
1
2
3
4
| buildctl build --frontend=dockerfile.v0 \
--local context=. \
--local dockerfile=. \
--output type=image,name=demo:nydus,push=true,compression=nydus,force-compression=true,oci-mediatypes=true
|
也可以使用 nerdctl 进行构建,nerdctl 会自动调用 buildkit 进行构建。
1
| nerdctl build -f Dockerfile --output type=image,name=demo:nydus,push=true,compression=nydus,force-compression=true,oci-mediatypes=true .
|
推送使用的凭证是 ~/.docker/config.json,可使用 nerdctl login 登录。
1
| nerdctl --snapshotter nydus run --rm -it demo:nydus
|
6. 应用层验证 Nydus
6.1 Containerd
1
| nerdctl --snapshotter nydus run --rm -it demo:nydus
|
其他 Nydus 镜像还有
- dragonflyoss/python:3.9.15-nydus
- ghcr.io/dragonflyoss/image-service/ubuntu:nydus-nightly-v5
6.2 Kubernetes
1
| kubectl create deployment nydus-test --image=demo:nydus
|
也可以直接创建 DaemonSet 在每个节点上进行测试。
 1
 2
 3
 4
 5
 6
 7
 8
 9
10
11
12
13
14
15
16
17
18
19
20
21
22
23
| cat << EOF | kubectl apply -f -
apiVersion: apps/v1
kind: DaemonSet
metadata:
name: nydus-test-daemonset
spec:
selector:
matchLabels:
app: nydus-test-daemonset
template:
metadata:
labels:
app: nydus-test-daemonset
name: nydus-test-daemonset
spec:
tolerations:
- key: "node-role.kubernetes.io/control-plane"
operator: "Exists"
effect: "NoSchedule"
containers:
- image: demo:nydus
name: nydus-test-daemonset
EOF
|
1
| kubectl get deployment nydus-test -o wide
|
1
| kubectl patch deployment nydus-test -p '{"spec":{"template":{"spec":{"nodeName":"node1"}}}}'
|
1
| kubectl delete deployment nydus-test
|
7. 配置 Grafana 监控面板查看 Nydus 指标
1
| kubectl -n monitor edit cm prometheus-server
|
1
2
3
4
5
6
7
| scrape_configs:
- job_name: nydus
metrics_path: /v1/metrics
static_configs:
- targets:
- x.x.x.x:9110
- x.x.x.x:9110
|
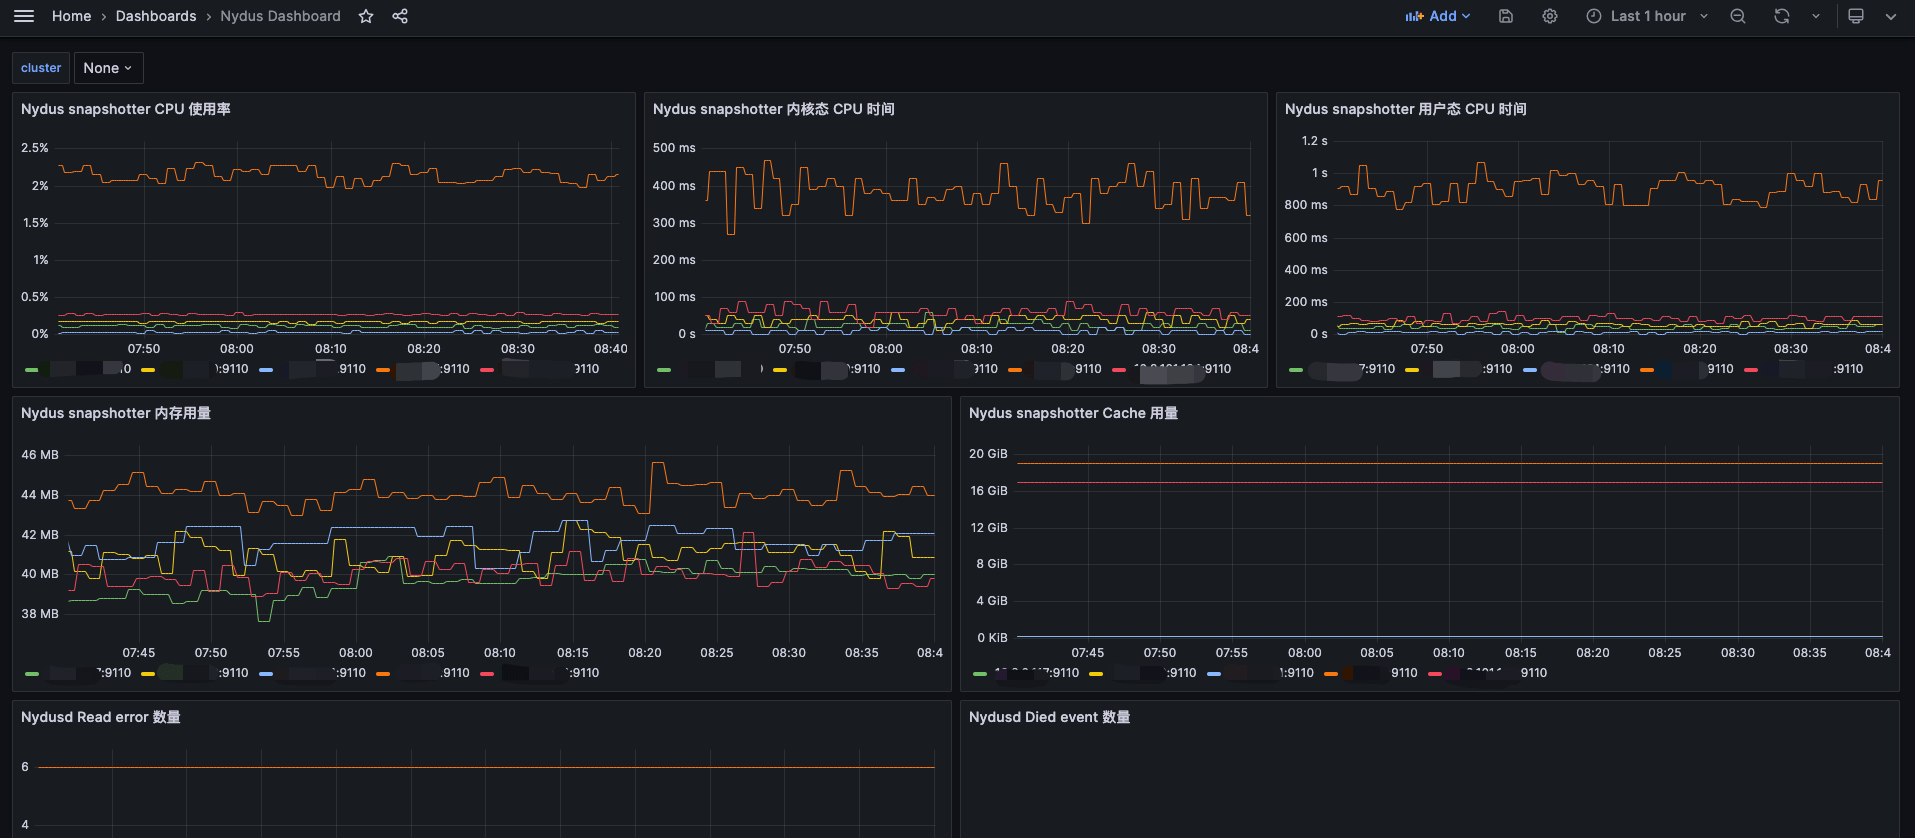
我绘制了一个简单的面板,已经分享到 Grafana 官网,可以直接导入,ID 为 20245 ,链接地址 https://grafana.com/grafana/dashboards/20245-nydus-dashboard/ 。
最终效果如下:
8. 常见错误处理
使用 Nydus 时,可能会遇到各种问题,这里记录我遇到的问题和处理方式,持续更新。最好能使用干净的环境,一次性配置成功,反复配置可能会出现一些奇怪的问题。
1
| FATA[0000] failed to extract layer sha256:58e33caaf7a78562cc25629ed0414320c3d755b66bf1f313fdcff75748102013: failed to get stream processor for application/vnd.oci.image.layer.nydus.blob.v1: no processor for media-type: unknown
|
1
| failed to register layer: Error processing tar file(exit status 1): archive/tar: invalid tar header
|
nydus-snapshotter 服务异常,需要查看服务日志,或者在没有配置 Nydus 的情况下拉取镜像。
1
| journalctl -u nydus-snapshotter.service -f
|
8.2 应用起不来,snapshot already exists
1
| FATA[0001] unable to prepare extraction snapshot: target snapshot "sha256:58e33caaf7a78562cc25629ed0414320c3d755b66bf1f313fdcff75748102013": already exists
|
1
| create snapshot: missing parent "k8s.io/14/sha256:e3e5579ddd43c08e4b5c74dc12941a4ef656fab070b1087a1fd5a8a836b71e7d" bucket: not found
|
先删除应用的镜像,清理缓存之后,再次重试。
1
| nerdctl image prune --force --all
|
8.3 nydus-snapshotter 起不来,failed to initialize snapshotter: initialize filesystem
1
2
3
| level=error msg="Process 770795 has been a zombie"
...
level=fatal msg="failed to start nydus-snapshotter" error="failed to initialize snapshotter: initialize filesystem thin layer: wait for daemon cmb35s0g2p2n0dt9tqag: wait until daemon is RUNNING: get daemon state: daemon socket /data/containerd/io.containerd.snapshotter.v1.nydus/socket/cmb35s0g2p2n0dt9tqag/api.sock: not found"
|
可能还有另外一个 containerd-nydus-grpc 没有彻底退出。
1
| ps aux |grep containerd-nydus-grpc
|
找到并杀掉另外一个进程,然后重启 nydus-snapshotter 服务。
1
2
3
4
5
6
7
| "failed to parse configuration information"
containerd-nydus-grpc[21763]: at api/src/config.rs:243
containerd-nydus-grpc[21763]: note: enable `RUST_BACKTRACE=1` env to display a backtrace
containerd-nydus-grpc[21763]: [2024-01-04 17:19:49.125269 +08:00] ERROR [/src/error.rs:22] Error:
containerd-nydus-grpc[21763]: Rafs(LoadConfig(Os { code: 22, kind: InvalidInput, message: "Invalid argument" }))
containerd-nydus-grpc[21763]: at service/src/lib.rs:121
containerd-nydus-grpc[21763]: note: enable `RUST_BACKTRACE=1` env to display a backtrace
|
根据提示是配置文件有问题,包括,配置格式、键值、目录是否存在等。我遇到的问题是 root 目录不存在。
1
| mkdir -p /data/containerd/io.containerd.snapshotter.v1.nydus
|
1
| systemctl restart nydus-snapshotter
|
8.5 Kubelet 报错,找不到目录
1
| Failed to get the info of the filesystem with mountpoint" err="failed to get device for dir "/var/lib/containerd/io.containerd.snapshotter.v1.nydus": stat failed on /var/lib/containerd/io.containerd.snapshotter.v1.nydus with error: no such file or directory" mountpoint="/var/lib/containerd/io.containerd.snapshotter.v1.nydus"
|
根据 https://github.com/containerd/nydus-snapshotter/issues/288 ,Nydus 目前的 root 目录需要为 $containerd_root_dir/io.containerd.snapshotter.v1.nydus。
查看 containerd 的 root 目录
1
2
3
| cat /etc/containerd/config.toml |grep root
root = "/var/lib/containerd"
|
编辑 Nydus 配置文件
1
| vim /etc/nydus/config.toml
|
修改 root 目录为 containerd 的 root 目录下的子目录 io.containerd.snapshotter.v1.nydus 。创建一下这个目录,然后重启 nydus-snapshotter 服务。
8.6 重启之后 Containerd 托管的 Pod 无法启动、Init:CreateContainerError 报错
先关闭 containerd 中的 nydus 配置
1
2
| sed -i 's/snapshotter = "nydus"/snapshotter = ""/g' /etc/containerd/config.toml
systemctl restart containerd.service
|
等待一会儿,再打开 nydus 配置。
1
2
| sed -i 's/snapshotter = ""/snapshotter = "nydus"/g' /etc/containerd/config.toml
systemctl restart containerd.service
|
8.7 应用起不来,报错 bucket: not found
1
| containerd[937]: time="2024-01-07T08:17:13.044578960+08:00" level=error msg="RunPodSandbox for &PodSandboxMetadata{Name:kube-scheduler-k8s-master-03,Uid:d63b14268dcd89918c2eba5fa110d396,Namespace:kube-system,Attempt:2,} failed, error" error="rpc error: code = NotFound desc = failed to create containerd container: create snapshot: missing parent \"k8s.io/14/sha256:e3e5579ddd43c08e4b5c74dc12941a4ef656fab070b1087a1fd5a8a836b71e7d\" bucket: not found"
|
去主机上直接拉取镜像,看看是否能拉取成功。
如果依然失败,尝试清理一下镜像再试。
清空 Containerd 的 root 目录,重启机器,实测可行。
1
| FATA[0001] mount callback failed on /run/user/0/containerd-mount3967735320: read /run/user/0/containerd-mount3967735320/etc/group: input/output error
|
清理 Containerd 的 root 目录,重启机器,实测可行。
1
2
3
| systemctl disable nydus-snapshotter
systemctl disable containerd
systemctl disable kubelet
|
1
2
3
4
| rm -rf /data/containerd/*
systemctl enable nydus-snapshotter
systemctl enable containerd
systemctl enable kubelet
|
8.9 nydus-snapshotter 启动时报错
1
2
3
| journalctl -u nydus-snapshotter.service | grep error
Aug 08 19:15:01 k8s-4090-10 containerd-nydus-grpc[5151]: time="2024-08-08T19:15:01.311252782+08:00" level=error msg="failed to destroy cgroup, err cgroups: unable to remove path \"/sys/fs/cgroup/system.slice/nydusd\": still contains running processes"
|
先停掉 nydus-snapshotter 和 nydus 相关的进程
1
2
3
| systemctl stop nydus-snapshotter
ps aux |grep nydus
|
删除报错的 cgroup
1
| rmdir /sys/fs/cgroup/system.slice/nydusd
|
重启 Nydus-snapshotter
1
| systemctl restart nydus-snapshotter
|
