1. 背景
微服务架构下,服务与服务的依赖关系复杂。在开发过程中,多个服务之间经常需要联调。此时有两种方式:
- 将服务部署到线上开发环境 Kubernetes 集群
使用 telepresence 打通本地与线上集群的通信,这样能获得一个比较稳定的联调环境。
缺点是,需要生成足够权限的凭证、需要研发人员熟悉 Kubernetes 的使用。每人一套成本又比较高。
内网是互通的,直接调用也是可行的。但有些服务依赖是写死 Https 和 域名的,这样就需要在本地搭建一个 Https 代理服务。
本篇主要是介绍如何使用 Nodejs 搭建一个 Https 代理服务,用于转发依赖的服务请求。
2. 代理逻辑
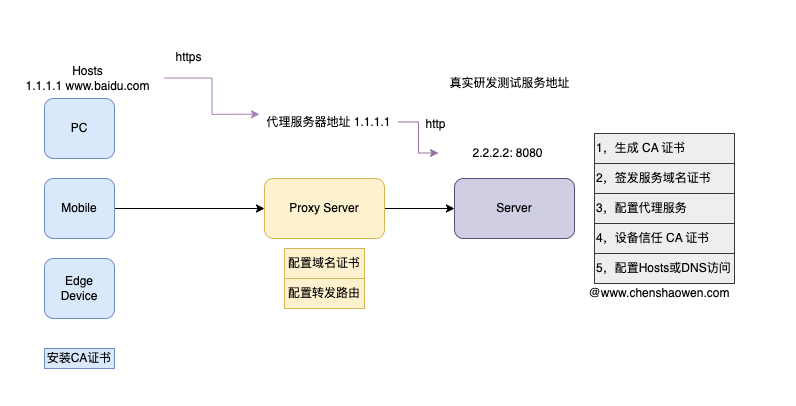
如上图,是代理 Https 请求的示意图。主要步骤如下:
生成 CA 证书
签发服务域名证书
配置代理服务
设备信任 CA 证书
配置 Hosts 或 DNS 访问
生成 CA 证书、签发服务域名证书的具体操作,可以参考 Harbor 使用自签证书支持 Https 访问。
3. 配置代理
1
| npm install express http-proxy-middleware
|
 1
 2
 3
 4
 5
 6
 7
 8
 9
10
11
12
13
14
15
16
17
18
19
20
21
22
23
| const https = require("https");
const express = require("express");
const { createProxyMiddleware } = require("http-proxy-middleware");
const fs = require("fs");
const options = {
cert: fs.readFileSync("www.baidu.com.cert"),
key: fs.readFileSync("www.baidu.com.key"),
};
const app = express();
app.use(
"/",
createProxyMiddleware({
target: "http://2.2.2.2:8080",
changeOrigin: true,
}),
);
https.createServer(options, app).listen(443, () => {
console.log("Proxy server listening on port 443");
});
|
此时,通过配置 Hosts 或 DNS (1.1.1.1 www.baidu.com) 访问 https://www.baidu.com,就能访问到 http://2.2.2.2:8080 服务了。
如果你想 tagert 配置成域名,并且解析也自行指定,那么可以加上 DNS 片段,仅在当前服务生效。
 1
 2
 3
 4
 5
 6
 7
 8
 9
10
11
12
13
| const dns = require("dns");
const customLookup = (hostname, options, callback) => {
const customIP = "2.2.2.2";
const family = options.family || 4;
if (hostname === "target.domain.com") {
const address = family === 6 ? "::1" : customIP;
return callback(null, address, family);
}
dns.lookup(hostname, options, callback);
};
dns.lookup = customLookup;
|
