1. Argo Events 工作原理

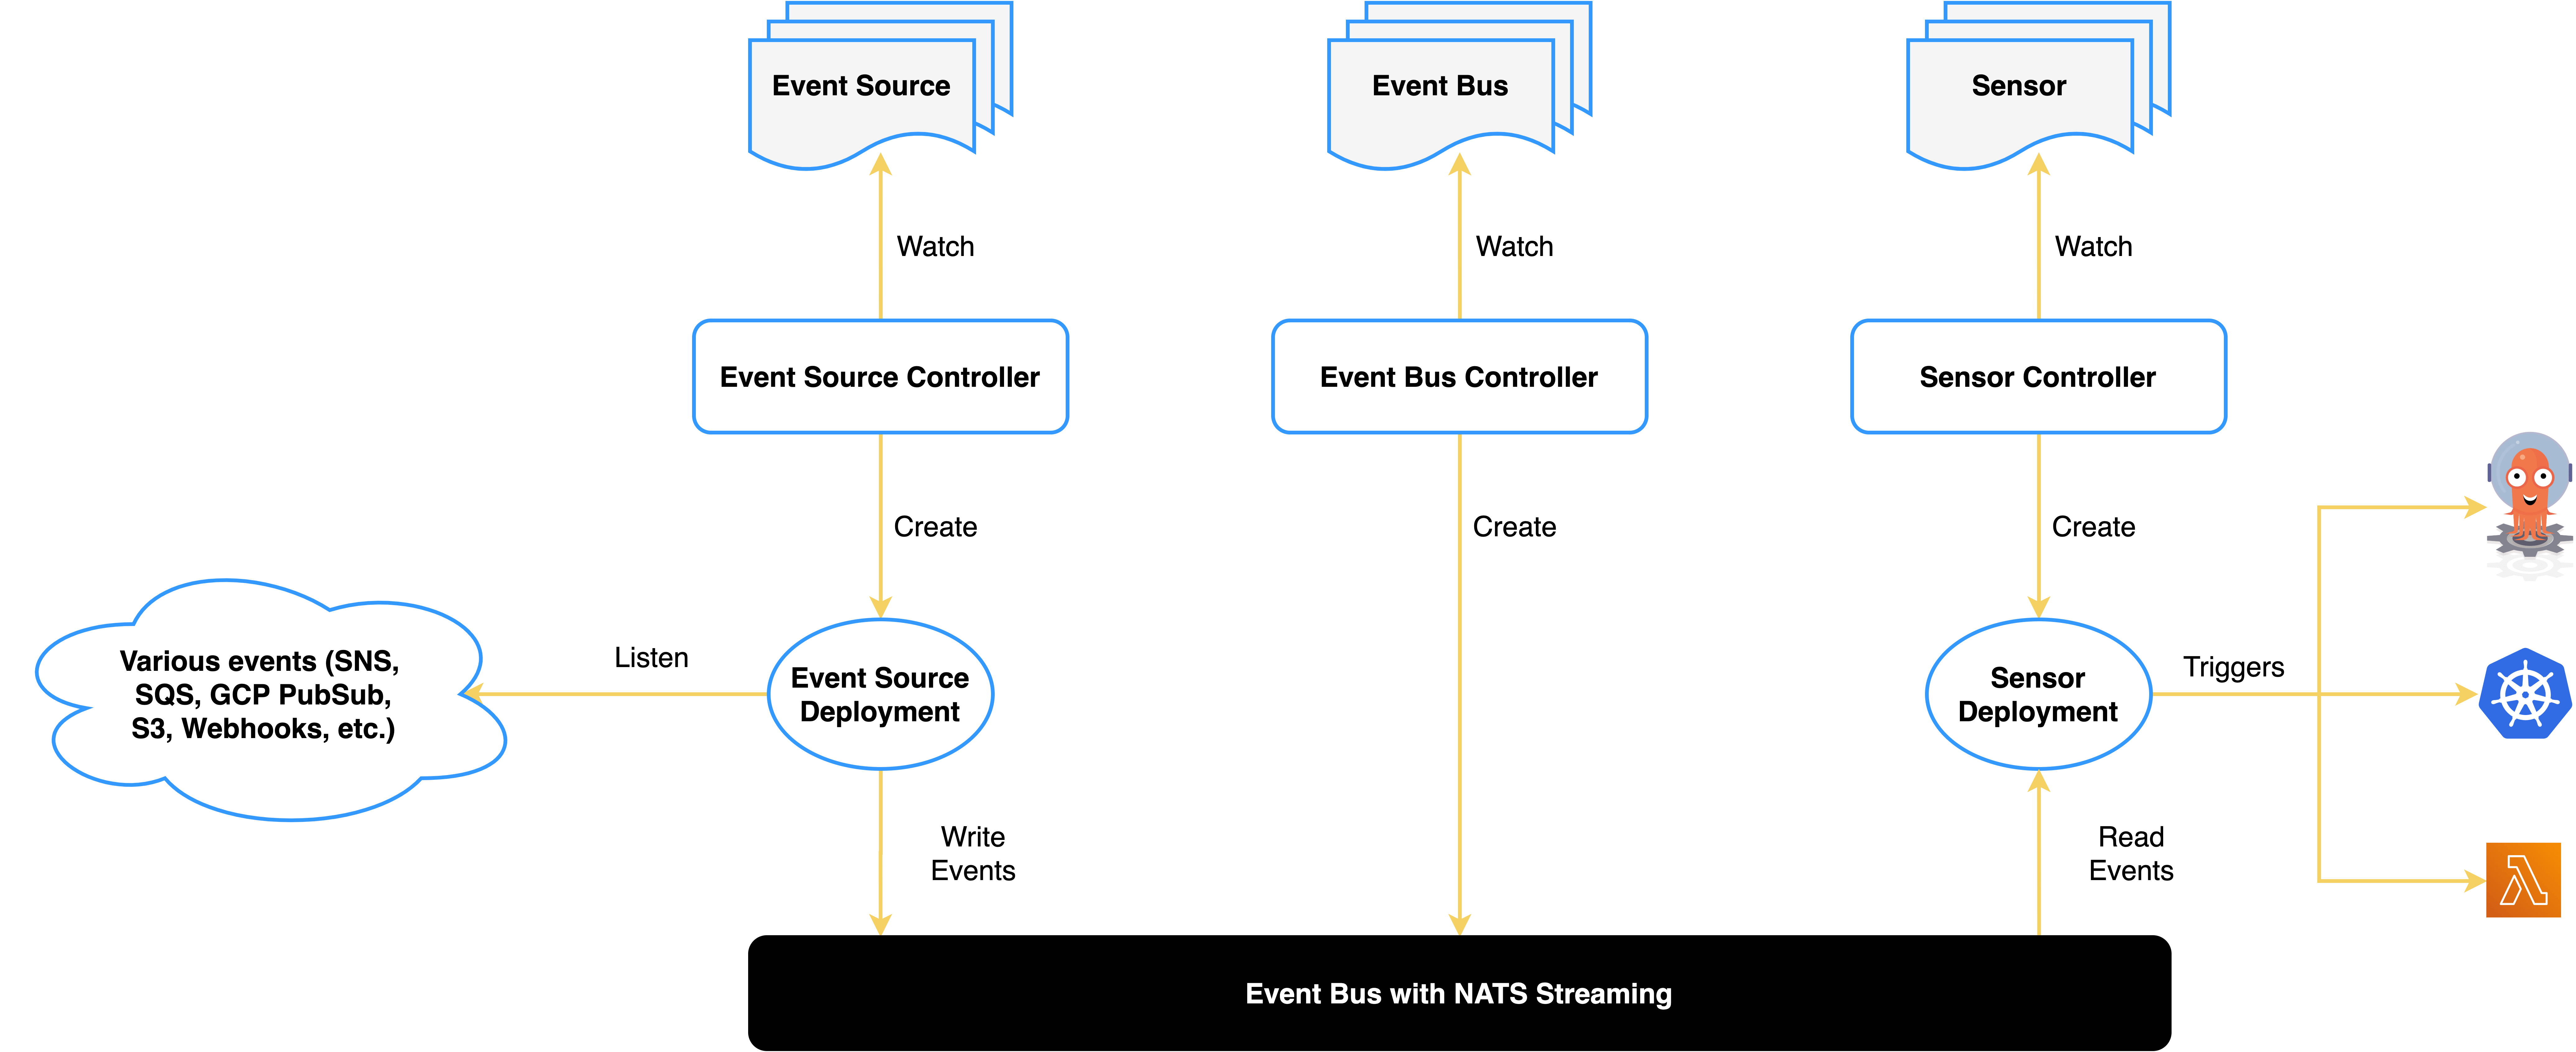
上面是 Argo Events 官方网站上的架构图,对于事件处理系统,有三个重要的组成
- 事件源的接入,对应于 Event Source
- 事件的分发,对应于 Event Sensor
- 事件的消费,对应于 Event Trigger
事件消息存储在 EventBus 中,默认使用的 NATS。
2. 创建 ServiceAccount 给 Sensor 和 Workflow
operate-workflow-sa 用来授权 Sensor 操作 Workflow 。
 1
 2
 3
 4
 5
 6
 7
 8
 9
10
11
12
13
14
15
16
17
18
19
20
21
22
23
24
25
26
27
28
29
30
31
32
33
34
| kubectl apply -f - <<EOF
apiVersion: v1
kind: ServiceAccount
metadata:
namespace: argo-events
name: operate-workflow-sa
---
apiVersion: rbac.authorization.k8s.io/v1
kind: Role
metadata:
name: operate-workflow-role
namespace: argo-events
rules:
- apiGroups:
- argoproj.io
verbs:
- "*"
resources:
- workflows
---
apiVersion: rbac.authorization.k8s.io/v1
kind: RoleBinding
metadata:
name: operate-workflow-role-binding
namespace: argo-events
roleRef:
apiGroup: rbac.authorization.k8s.io
kind: Role
name: operate-workflow-role
subjects:
- kind: ServiceAccount
name: operate-workflow-sa
namespace: argo-events
EOF
|
workflow-pods-sa 用来授权 Workflow 操作 Pod。
 1
 2
 3
 4
 5
 6
 7
 8
 9
10
11
12
13
14
15
16
17
18
19
20
21
22
23
24
25
26
27
28
29
30
31
32
33
34
| kubectl apply -f - <<EOF
apiVersion: v1
kind: ServiceAccount
metadata:
namespace: argo-events
name: workflow-pods-sa
---
apiVersion: rbac.authorization.k8s.io/v1
kind: Role
metadata:
namespace: argo-events
name: workflow-pods-role
rules:
- apiGroups:
- ""
verbs:
- "*"
resources:
- pods
---
apiVersion: rbac.authorization.k8s.io/v1
kind: RoleBinding
metadata:
namespace: argo-events
name: workflow-pods-role-binding
roleRef:
apiGroup: rbac.authorization.k8s.io
kind: Role
name: workflow-pods-role
subjects:
- kind: ServiceAccount
name: workflow-pods-sa
namespace: argo-events
EOF
|
值得注意的是 operate-workflow-sa 和 workflow-pods-sa 都是命名空间级别,在不同的命名空间下,需要分别授权。
3. 创建一个 eventbus 存储事件
 1
 2
 3
 4
 5
 6
 7
 8
 9
10
11
12
| kubectl apply -f - <<EOF
apiVersion: argoproj.io/v1alpha1
kind: EventBus
metadata:
name: default
namespace: argo-events
spec:
nats:
native:
replicas: 3
auth: token
EOF
|
1
2
3
4
5
| kubectl -n argo-events get pod | grep eventbus
eventbus-default-stan-0 2/2 Running 0 95s
eventbus-default-stan-1 2/2 Running 0 93s
eventbus-default-stan-2 2/2 Running 0 92s
|
4. 创建一个 API 触发的 webhook
 1
 2
 3
 4
 5
 6
 7
 8
 9
10
11
12
13
14
15
16
17
18
| kubectl apply -f - <<EOF
apiVersion: argoproj.io/v1alpha1
kind: EventSource
metadata:
name: myproject-webhook
namespace: argo-events
spec:
eventBusName: default
service:
ports:
- port: 80
targetPort: 80
webhook:
myproject-start:
endpoint: /myproject/start
method: POST
port: "80"
url: ""
|
这里在 80 端口,/myproject/start 路径下,创建了一个 POST 请求的接口,用于触发事件。如果有多个 APi 定义,可以继续添加在 spec.webhook 下。
1
2
3
| kubectl -n argo-events get pod | grep myproject
myproject-webhook-eventsource-4ws29-697b776fb7-6n9dx 1/1 Running 0 26s
|
Argo Events 会给每个 EventSource 创建一个 pod,用于接收事件; 创建一个 Service 作为触发事件的入口。
1
2
3
| kubectl -n argo-events get svc | grep myproject
myproject-webhook-eventsource-svc ClusterIP 10.96.129.232 <none> 80/TCP 26s
|
为了方便待会儿测试,这里将 Service 服务的 type 设置为 NodePort。
1
| kubectl patch svc myproject-webhook-eventsource-svc -n argo-events -p '{"spec":{"type":"NodePort"}}'
|
1
2
3
| kubectl -n argo-events get svc | grep myproject
myproject-webhook-eventsource-svc NodePort 10.96.129.232 <none> 80:30001/TCP 14h
|
5. 创建一个 sensor 用于处理事件
 1
 2
 3
 4
 5
 6
 7
 8
 9
10
11
12
13
14
15
16
17
18
19
20
21
22
23
24
25
26
27
28
29
30
31
32
33
34
35
36
37
38
39
40
41
42
43
44
45
46
47
48
49
50
51
52
53
54
55
56
57
58
59
60
61
62
63
| kubectl apply -f - <<EOF
apiVersion: argoproj.io/v1alpha1
kind: Sensor
metadata:
name: myproject-start
namespace: argo-events
spec:
template:
serviceAccountName: operate-workflow-sa
dependencies:
- name: myproject-start
eventSourceName: myproject-webhook
eventName: myproject-start
triggers:
- template:
name: webhook-workflow-trigger
argoWorkflow:
group: argoproj.io
version: v1alpha1
resource: workflows
operation: submit
source:
resource:
apiVersion: argoproj.io/v1alpha1
kind: Workflow
metadata:
generateName: webhook-
spec:
serviceAccountName: workflow-pods-sa
ttlStrategy:
secondsAfterCompletion: 600
secondsAfterSuccess: 600
secondsAfterFailure: 600
entrypoint: whalesay
arguments:
parameters:
- name: message
- name: who
templates:
- name: whalesay
inputs:
parameters:
- name: message
value: "hello(input)"
- name: who
value: "world(input)"
container:
image: docker/whalesay:latest
command: [cowsay]
args:
[
"{{inputs.parameters.message}} {{inputs.parameters.who}}",
]
parameters:
- src:
dataTemplate: "{{ .Input.body.message }}"
dependencyName: myproject-start
dest: spec.arguments.parameters.0.value
- src:
dataTemplate: "{{ .Input.body.who }}"
dependencyName: myproject-start
dest: spec.arguments.parameters.1.value
EOF
|
此时,Argo Events 也会创建一个 Pod 用于处理事件。
1
2
3
| kubectl -n argo-events get pod | grep sensor
myproject-start-sensor-pzkf9-658cbd5c7d-xv9zf 1/1 Running 0 56s
|
这里有几个配置需要注意:
1
2
3
4
| dependencies:
- name: myproject-start
eventSourceName: myproject-webhook
eventName: myproject-start
|
应该与 EventSource 中的定义关联,这样才能接收事件。
如果 operation 是 create,那么 parameters 中获取到的会是一个完整的事件描述,数据采用 Base64 编码。如果 operation 是 submit,那么 parameters 中获取到的会是一个 payload,能直接使用。
1
2
3
4
| ttlStrategy:
secondsAfterCompletion: 600
secondsAfterSuccess: 600
secondsAfterFailure: 600
|
Workflow 在执行完成之后,并不会立即删除,而是根据 ttlStrategy 的定义进行删除。
entrypoint 是指定 Workflow 执行的入口,如果不指定,则默认为 main,即 spec.entrypoint 的值。
1
2
3
4
5
6
7
8
9
| parameters:
- src:
dataTemplate: "{{ .Input.body.message }}"
dependencyName: myproject-start
dest: spec.arguments.parameters.0.value
- src:
dataTemplate: "{{ .Input.body.who }}"
dependencyName: myproject-start
dest: spec.arguments.parameters.1.value
|
dataTemplate 用于指定依赖的事件数据,dest 用于指定 Workflow 中的参数,dependencyName 用于指定依赖的事件的名字。这里是用于将 API Body 中的参数提取出来,传递给 Workflow 中的参数,覆盖掉默认值。
6. 调用 API Webhook 触发事件
1
| curl -d '{"message":"hello", "who": "world"}' -H "Content-Type: application/json" -X POST http://localhost:30001/myproject/start -v
|
1
2
3
4
| kubectl -n argo-events get workflows
NAME STATUS AGE MESSAGE
webhook-5z7k5 Succeeded 119s
|
 1
 2
 3
 4
 5
 6
 7
 8
 9
10
11
12
13
14
15
| kubectl -n argo-events logs webhook-5z7k5 -f
_____________
< hello world >
-------------
\
\
\
## .
## ## ## ==
## ## ## ## ===
/""""""""""""""""___/ ===
~~~ {~~ ~~~~ ~~~ ~~~~ ~~ ~ / ===- ~~~
\______ o __/
\ \ __/
\____\______/
|
触发成功,符合预期。
7. 使用 WorkflowTemplate 创建 Workflow
每次将全部定义放在 Workflow 的 templates 中非常繁琐,Argo 提供了 WorkflowTemplate 用于编排 Workflow。
 1
 2
 3
 4
 5
 6
 7
 8
 9
10
11
12
13
14
15
16
17
18
19
20
21
22
23
24
25
26
27
28
29
30
31
32
33
34
35
36
37
38
39
40
41
42
43
44
45
46
47
| kubectl apply -f - <<EOF
apiVersion: argoproj.io/v1alpha1
kind: WorkflowTemplate
metadata:
name: whalesay-template
namespace: argo-events
spec:
templates:
- name: whalesay
inputs:
parameters:
- name: message
container:
image: docker/whalesay
command: [cowsay]
args: ["{{inputs.parameters.message}}"]
---
apiVersion: argoproj.io/v1alpha1
kind: WorkflowTemplate
metadata:
name: congratulations-template
namespace: argo-events
spec:
templates:
- name: congratulations
container:
image: shaowenchen/demo:ubuntu
command: [sh, -c]
args: ["echo Congratulations!"]
---
apiVersion: argoproj.io/v1alpha1
kind: WorkflowTemplate
metadata:
name: random-status-template
namespace: argo-events
spec:
templates:
- name: random-status
script:
image: python:alpine3.6
command: [python]
source: |
import random
exit_code = 0 if random.choice([True, False]) else 1
import sys
sys.exit(exit_code)
EOF
|
这里定义了三个 WorkflowTemplate,分别是 whalesay-template 打印输入参数,congratulations-template 打印固定字符串,random-status-template 产生随机的状态。
 1
 2
 3
 4
 5
 6
 7
 8
 9
10
11
12
13
14
15
16
17
18
19
20
21
22
23
24
| kubectl apply -f - <<EOF
apiVersion: argoproj.io/v1alpha1
kind: Workflow
metadata:
name: combined-workflow
namespace: argo-events
spec:
entrypoint: combined-template
serviceAccountName: workflow-pods-sa
templates:
- name: combined-template
steps:
- - name: whalesay
templateRef:
name: whalesay-template
template: whalesay
arguments:
parameters:
- name: message
value: hello world
- - name: congratulations
templateRef:
name: congratulations-template
template: congratulations
|
现在的 Workflow 看起来就简单了许多,因为每个任务具体的操作定义在 WorkflowTemplate 中,Workflow 中只需要指定 WorkflowTemplate 的名称和参数即可。
8. 复杂依赖编排 DAG Workflow
普通的 Workflow 只能用于任务的顺序执行,而 DAG Workflow 可以处理复杂的任务依赖和状态依赖,对任务进行编排。下面提供一个例子:
 1
 2
 3
 4
 5
 6
 7
 8
 9
10
11
12
13
14
15
16
17
18
19
20
21
22
23
24
25
26
27
28
29
30
31
32
33
34
35
36
37
38
39
40
41
42
43
44
45
46
47
| apiVersion: argoproj.io/v1alpha1
kind: Workflow
metadata:
name: status-workflow
namespace: argo-events
spec:
entrypoint: dag
serviceAccountName: workflow-pods-sa
templates:
- name: dag
dag:
tasks:
- name: whalesay
templateRef:
name: whalesay-template
template: whalesay
arguments:
parameters:
- name: message
value: hello world
- name: check-status
templateRef:
name: random-status-template
template: random-status
dependencies: [whalesay]
continueOn:
failed: true
- name: success-path
templateRef:
name: whalesay-template
template: whalesay
arguments:
parameters:
- name: message
value: success-path
dependencies: [check-status]
when: "{{tasks.check-status.status}} == 'Succeeded'"
- name: failure-path
templateRef:
name: whalesay-template
template: whalesay
arguments:
parameters:
- name: message
value: failure-path
dependencies: [check-status]
when: "{{tasks.check-status.status}} == 'Failed'"
|
这里定义了一个 DAG Workflow:
- 先执行 whalesay
- check-status 会等待 whalesay 执行完毕,随机产生一个状态
- 如果状态为成功,则会执行 success-path,否则会执行 failure-path
1
2
3
4
5
| kubectl get pod -n argo-events |grep status
status-workflow-random-status-2060967154 0/2 Error 0 40s
status-workflow-whalesay-261193263 0/2 Completed 0 60s
status-workflow-whalesay-437390993 0/2 Completed 0 30s
|
status-workflow-random-status-2060967154 产生了错误的随机状态,因此会执行 failure-path。
1
2
3
4
| kubectl get workflow -n argo-events
NAME STATUS AGE MESSAGE
status-workflow Failed 56s
|
由于有任务执行失败,Workflow 会被标记为 Failed。
9. 总结
最近需要结合 Argo 给 AI Infra 做一个工作流,本篇主要是对 Argo Events\Workflow 学习相关的一些笔记,主要内容如下:
- 介绍 Argo Events 工作原理
- 一个基于 webhook 触发 Workflow 的示例
- 一个基于 WorkflowTemplate 编排 Workflow 的示例
- 一个基于 WorkflowTemplate 编排 DAG Workflow 的示例
在 Argo 中还有一个与 WorkflowTemplate 非常类似的对象 ClusterWorkflowTemplate, 即集群级别的 WorkflowTemplate,在每个命名空间下都可以复用。
对于平台方,Argo 主要有两大能力:
- 快速集成功能,基于 EventSource - Sensor - Workflow 进行事件触发,快速用 yaml 堆砌 API 功能
- Workflow 编排,基于 ClusterWorkflowTemplate 来编排 Workflow,提供上层编排的能力
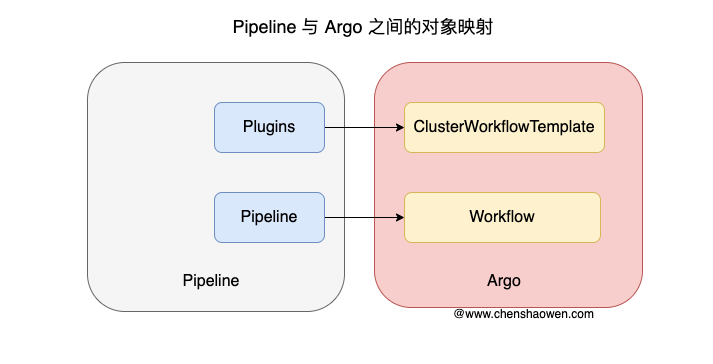
下面是我的一个建模:

ClusterWorkflowTemplate 对应 Plugin, Workflow 对应 Pipeline。虽然 Workflow 一旦被创建就会被立即执行,但业务系统通常都有自己的数据库,我们只需要将 Workflow 暂存在数据库中,当运行时下发到 Argo 中即可执行流水线。


