1. 在主机上挂载内存存储目录
1
| mkdir /mnt/memory_storage
|
1
| mount -t tmpfs -o size=800G tmpfs /mnt/memory_storage
|
存储空间会按需使用,也就是使用 100G 存储时才会占用 100G 内存。主机节点上有 2T 内存,这里分配 800G 内存用于存储 Elasticsearch 数据。
1
2
3
| mkdir /mnt/memory_storage/elasticsearch-data-es-jfs-prod-es-default-0
mkdir /mnt/memory_storage/elasticsearch-data-es-jfs-prod-es-default-1
mkdir /mnt/memory_storage/elasticsearch-data-es-jfs-prod-es-default-2
|
如果没有提前创建好目录,并赋予读写权限,会导致 Elasticsearch 组件起不来,提示多个节点使用了相同的数据目录。
1
| chmod -R 777 /mnt/memory_storage
|
1
2
3
4
5
| dd if=/dev/zero of=/mnt/memory_storage/dd.txt bs=4M count=2500
2500+0 records in
2500+0 records out
10485760000 bytes (10 GB, 9.8 GiB) copied, 3.53769 s, 3.0 GB/s
|
清理文件
1
| rm -rf /mnt/memory_storage/dd.txt
|
1
2
3
4
| fio --name=test --filename=/mnt/memory_storage/fio_test_file --size=10G --rw=write --bs=4M --numjobs=1 --runtime=60 --time_based
Run status group 0 (all jobs):
WRITE: bw=2942MiB/s (3085MB/s), 2942MiB/s-2942MiB/s (3085MB/s-3085MB/s), io=172GiB (185GB), run=60001-60001msec
|
清理文件
1
| rm -rf /mnt/memory_storage/fio_test_file
|
 1
 2
 3
 4
 5
 6
 7
 8
 9
10
11
12
13
14
15
16
17
18
19
20
21
22
23
24
25
26
27
28
29
30
31
32
33
34
35
36
37
38
| mbw 10000
Long uses 8 bytes. Allocating 2*1310720000 elements = 20971520000 bytes of memory.
Using 262144 bytes as blocks for memcpy block copy test.
Getting down to business... Doing 10 runs per test.
0 Method: MEMCPY Elapsed: 1.62143 MiB: 10000.00000 Copy: 6167.380 MiB/s
1 Method: MEMCPY Elapsed: 1.63542 MiB: 10000.00000 Copy: 6114.656 MiB/s
2 Method: MEMCPY Elapsed: 1.63345 MiB: 10000.00000 Copy: 6121.997 MiB/s
3 Method: MEMCPY Elapsed: 1.63715 MiB: 10000.00000 Copy: 6108.161 MiB/s
4 Method: MEMCPY Elapsed: 1.64429 MiB: 10000.00000 Copy: 6081.667 MiB/s
5 Method: MEMCPY Elapsed: 1.62772 MiB: 10000.00000 Copy: 6143.574 MiB/s
6 Method: MEMCPY Elapsed: 1.60684 MiB: 10000.00000 Copy: 6223.379 MiB/s
7 Method: MEMCPY Elapsed: 1.62499 MiB: 10000.00000 Copy: 6153.876 MiB/s
8 Method: MEMCPY Elapsed: 1.63967 MiB: 10000.00000 Copy: 6098.770 MiB/s
9 Method: MEMCPY Elapsed: 2.97213 MiB: 10000.00000 Copy: 3364.588 MiB/s
AVG Method: MEMCPY Elapsed: 1.76431 MiB: 10000.00000 Copy: 5667.937 MiB/s
0 Method: DUMB Elapsed: 1.01521 MiB: 10000.00000 Copy: 9850.140 MiB/s
1 Method: DUMB Elapsed: 0.85378 MiB: 10000.00000 Copy: 11712.605 MiB/s
2 Method: DUMB Elapsed: 0.82487 MiB: 10000.00000 Copy: 12123.167 MiB/s
3 Method: DUMB Elapsed: 0.84520 MiB: 10000.00000 Copy: 11831.463 MiB/s
4 Method: DUMB Elapsed: 0.83050 MiB: 10000.00000 Copy: 12040.968 MiB/s
5 Method: DUMB Elapsed: 0.84932 MiB: 10000.00000 Copy: 11774.194 MiB/s
6 Method: DUMB Elapsed: 0.82491 MiB: 10000.00000 Copy: 12122.505 MiB/s
7 Method: DUMB Elapsed: 1.44235 MiB: 10000.00000 Copy: 6933.144 MiB/s
8 Method: DUMB Elapsed: 2.68656 MiB: 10000.00000 Copy: 3722.225 MiB/s
9 Method: DUMB Elapsed: 8.44667 MiB: 10000.00000 Copy: 1183.898 MiB/s
AVG Method: DUMB Elapsed: 1.86194 MiB: 10000.00000 Copy: 5370.750 MiB/s
0 Method: MCBLOCK Elapsed: 4.52486 MiB: 10000.00000 Copy: 2210.013 MiB/s
1 Method: MCBLOCK Elapsed: 4.82467 MiB: 10000.00000 Copy: 2072.683 MiB/s
2 Method: MCBLOCK Elapsed: 0.84797 MiB: 10000.00000 Copy: 11792.870 MiB/s
3 Method: MCBLOCK Elapsed: 0.84980 MiB: 10000.00000 Copy: 11767.516 MiB/s
4 Method: MCBLOCK Elapsed: 0.87665 MiB: 10000.00000 Copy: 11407.113 MiB/s
5 Method: MCBLOCK Elapsed: 0.85952 MiB: 10000.00000 Copy: 11634.468 MiB/s
6 Method: MCBLOCK Elapsed: 0.84132 MiB: 10000.00000 Copy: 11886.154 MiB/s
7 Method: MCBLOCK Elapsed: 0.84970 MiB: 10000.00000 Copy: 11768.915 MiB/s
8 Method: MCBLOCK Elapsed: 0.86918 MiB: 10000.00000 Copy: 11505.150 MiB/s
9 Method: MCBLOCK Elapsed: 0.85996 MiB: 10000.00000 Copy: 11628.434 MiB/s
AVG Method: MCBLOCK Elapsed: 1.62036 MiB: 10000.00000 Copy: 6171.467 MiB/s
|
看起来将内存挂载为文件系统的 IO 带宽只能达到内存的 IO 带宽的一半。
2. 在 Kubernetes 集群上创建 PVC
1
2
| export NAMESPACE=data-center
export PVC_NAME=elasticsearch-data-es-jfs-prod-es-default-0
|
 1
 2
 3
 4
 5
 6
 7
 8
 9
10
11
12
13
14
15
16
17
18
19
20
21
22
23
24
25
26
| kubectl create -f - <<EOF
apiVersion: v1
kind: PersistentVolume
metadata:
name: ${PVC_NAME}
namespace: ${NAMESPACE}
spec:
accessModes:
- ReadWriteMany
capacity:
storage: 800Gi
hostPath:
path: /mnt/memory_storage/${PVC_NAME}
---
apiVersion: v1
kind: PersistentVolumeClaim
metadata:
name: ${PVC_NAME}
namespace: ${NAMESPACE}
spec:
accessModes:
- ReadWriteMany
resources:
requests:
storage: 800Gi
EOF
|
通过修改 PVC_NAME 变量创建至少 3 个 PVC 应用,最终我创建了 10 个 PVC,总共提供了 15+ TB 的存储 。
3. 部署 Elasticsearch 相关组件
此处省略了部分内容,详情参考 使用 JuiceFS 存储 Elasticsearch 数据。
 1
 2
 3
 4
 5
 6
 7
 8
 9
10
11
12
13
14
15
16
17
18
19
20
21
22
23
24
25
26
27
28
29
30
31
32
33
34
35
36
37
38
39
40
41
42
43
44
45
46
47
48
49
50
51
52
53
54
55
56
57
58
59
60
61
62
63
64
65
| cat <<EOF | kubectl apply -f -
apiVersion: elasticsearch.k8s.elastic.co/v1
kind: Elasticsearch
metadata:
namespace: $NAMESPACE
name: es-jfs-prod
spec:
version: 8.12.0
image: elasticsearch:8.12.0
http:
tls:
selfSignedCertificate:
disabled: true
nodeSets:
- name: default
count: 3
config:
node.store.allow_mmap: false
index.store.type: niofs
podTemplate:
spec:
nodeSelector:
servertype: Ascend910B-24
initContainers:
- name: sysctl
securityContext:
privileged: true
runAsUser: 0
command: ['sh', '-c', 'sysctl -w vm.max_map_count=262144']
- name: install-plugins
command:
- sh
- -c
- |
bin/elasticsearch-plugin install --batch https://get.infini.cloud/elasticsearch/analysis-ik/8.12.0 &&
bin/elasticsearch-plugin install --batch repository-s3 &&
bin/elasticsearch-plugin install --batch analysis-icu &&
echo xxx | bin/elasticsearch-keystore add --stdin --force s3.client.default.secret_key &&
echo xxx | bin/elasticsearch-keystore add --stdin --force s3.client.default.access_key
securityContext:
runAsUser: 0
runAsGroup: 0
containers:
- name: elasticsearch
readinessProbe:
exec:
command:
- bash
- -c
- /mnt/elastic-internal/scripts/readiness-probe-script.sh
failureThreshold: 10
initialDelaySeconds: 30
periodSeconds: 30
successThreshold: 1
timeoutSeconds: 30
env:
- name: "ES_JAVA_OPTS"
value: "-Xms31g -Xmx31g"
- name: "NSS_SDB_USE_CACHE"
value: "no"
resources:
requests:
cpu: 8
memory: 64Gi
EOF
|
1
2
3
| kubectl -n $NAMESPACE get secret es-jfs-prod-es-elastic-user -o go-template='{{.data.elastic | base64decode}}'
xxx
|
默认用户名是 elastic
 1
 2
 3
 4
 5
 6
 7
 8
 9
10
11
12
13
14
15
16
17
18
19
20
21
22
23
24
25
26
27
28
29
30
31
32
33
34
35
36
37
38
39
40
41
42
43
44
| kubectl apply -f - <<EOF
apiVersion: beat.k8s.elastic.co/v1beta1
kind: Beat
metadata:
name: es-jfs-prod
namespace: $NAMESPACE
spec:
type: metricbeat
version: 8.12.0
elasticsearchRef:
name: es-jfs-prod
config:
metricbeat:
autodiscover:
providers:
- type: kubernetes
scope: cluster
hints.enabled: true
templates:
- config:
- module: kubernetes
metricsets:
- event
period: 10s
processors:
- add_cloud_metadata: {}
logging.json: true
deployment:
podTemplate:
spec:
serviceAccountName: metricbeat
automountServiceAccountToken: true
securityContext:
runAsUser: 0
containers:
- name: metricbeat
resources:
requests:
cpu: 1
memory: 1Gi
limits:
cpu: 4
memory: 4Gi
EOF
|
 1
 2
 3
 4
 5
 6
 7
 8
 9
10
11
12
13
14
15
16
17
| cat <<EOF | kubectl apply -f -
apiVersion: kibana.k8s.elastic.co/v1
kind: Kibana
metadata:
namespace: $NAMESPACE
name: es-jfs-prod
spec:
version: 8.12.0
count: 1
image: elastic/kibana:8.12.0
elasticsearchRef:
name: es-jfs-prod
http:
tls:
selfSignedCertificate:
disabled: true
EOF
|
主要用来备份和恢复索引
 1
 2
 3
 4
 5
 6
 7
 8
 9
10
| PUT /_snapshot/ks3
{
"type": "s3",
"settings": {
"bucket": "xxx",
"base_path": "datalake/prod/elastic-snapshot",
"region": "BEIJING",
"endpoint": "ks3-cn-beijing-internal.ksyuncs.com"
}
}
|
4. 导入数据
在 Elasticsearch Management 的 Dev Tools 页面中执行:
 1
 2
 3
 4
 5
 6
 7
 8
 9
10
11
12
13
14
15
16
17
18
19
20
21
| PUT /bayou_tt_articles
{
"settings": {
"index": {
"number_of_shards": 30,
"number_of_replicas": 1,
"refresh_interval": "120s",
"translog.durability": "async",
"translog.sync_interval": "120s",
"translog.flush_threshold_size": "2048M"
}
},
"mappings": {
"properties": {
"text": {
"type": "text",
"analyzer": "ik_smart"
}
}
}
}
|
有两个注意事项:
- 保持每个分片大小在 10-50G 之间,这里
number_of_shards 设置为 30,因为一共有几百 GB 的数据需要导入。 - 副本数至少为 1,是为了保障 Pod 在滚动更新时不会丢失数据。当 Pod 的 IP 发生变化时,Elasticsearch 会认为是一个新的节点,不能复用之前的数据,此时如果没有副本重建分片,会导致数据丢失。
也可以采用 elasticdump 容器导入,下面也会有示例。这里采用 npm 安装。
1
| npm install elasticdump -g
|
1
2
| export DATAPATH=./bayou_tt_articles_0.jsonl
nohup elasticdump --limit 20000 --input=${DATAPATH} --output=http://elastic:xxx@x.x.x.x:31391/ --output-index=bayou_tt_articles --type=data --transform="doc._source=Object.assign({},doc)" > elasticdump-${DATAPATH}.log 2>&1 &
|
limit 表示每次导入的数据条数,默认值是 100 太小,建议在保障导入成功的前提下尽可能大一点。
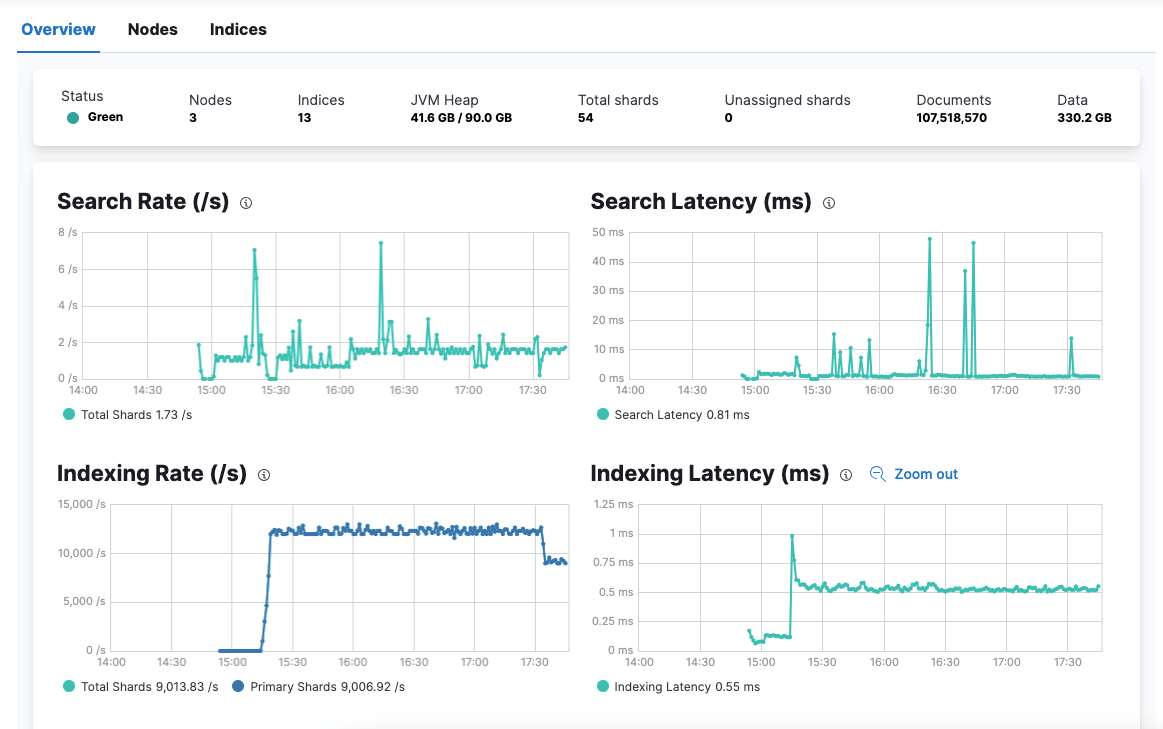
索引速率达到 1w+/s,但上限远不止于此。因为,根据社区文档的压力测试结果显示,单个节点至少能提供 2W/s 的索引速率。
5. 测试与验证
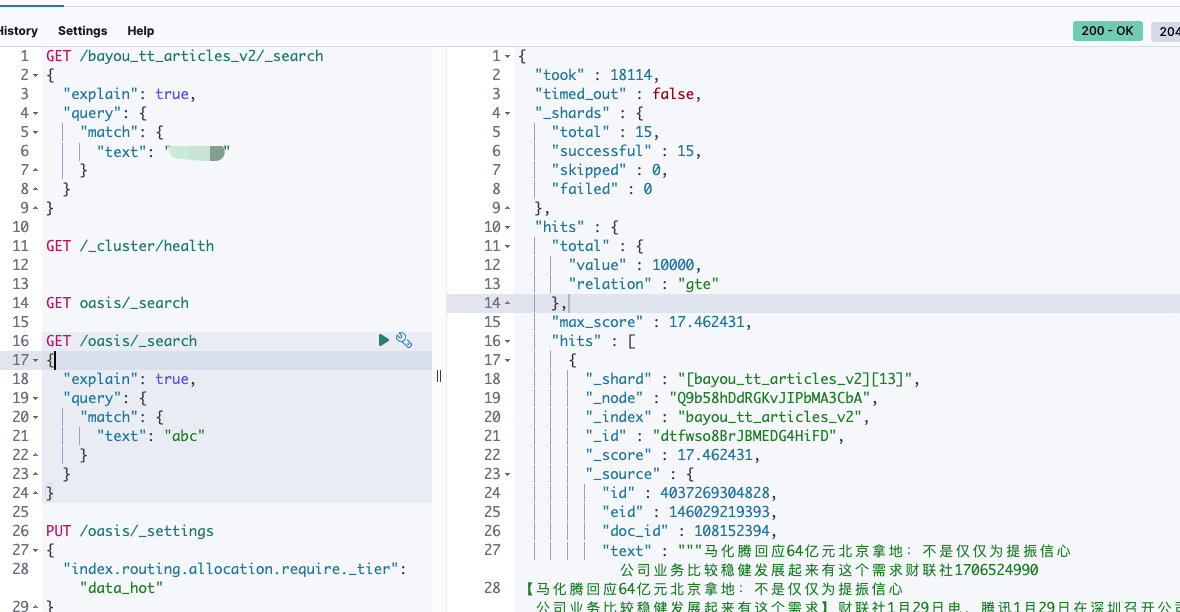
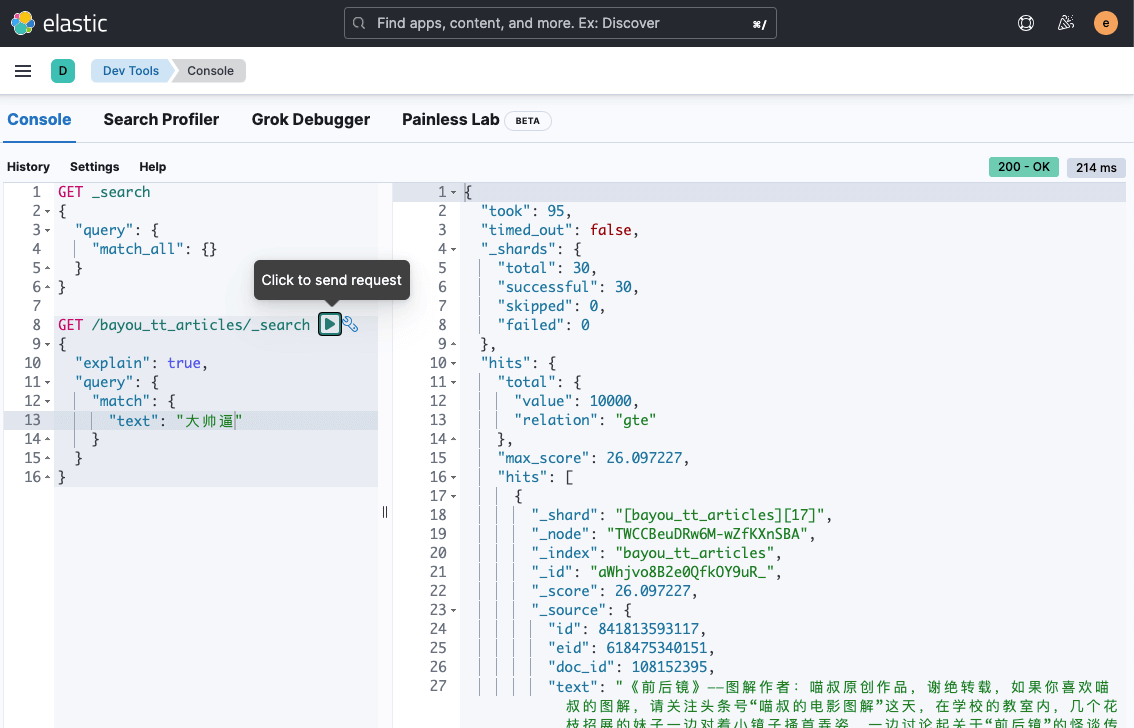
上图是使用 JuiceFS 存储的全文检索速度为 18s,使用 SSD 节点的 Elasticsearch 的全文检索速度为 5s。下图是使用内存存储的 Elasticsearch 的全文检索速度为 100ms 左右。
之前给 Elasticsearch Pod 分配的 CPU 和 Memory 太多,调整为 CPU 32C,Memory 64 GB。在滚动更新过程中,Elasticsearch 始终可用,并且数据没有丢失。
但务必注意设置 replicas > 1,尽量不要自行重启 Pod,虽然 Pod 是原节点更新。
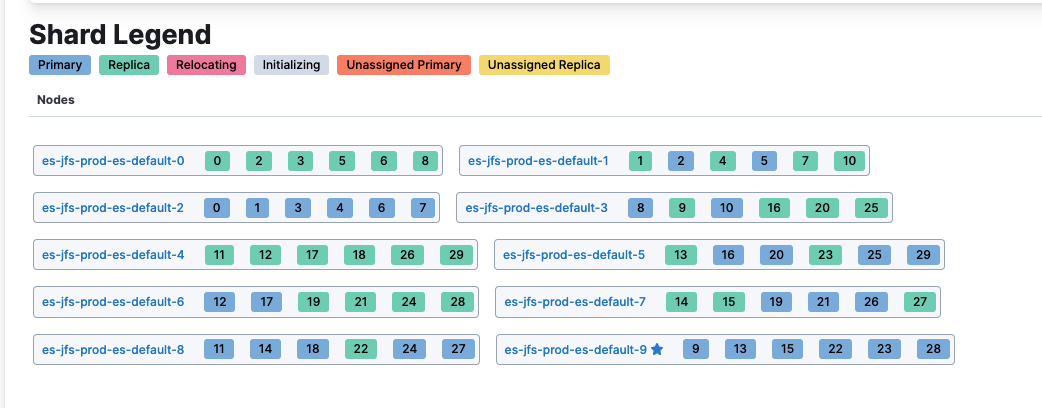
由于业务总的 Elasticsearch 存储需求是 10T 左右,我继续增加节点到 10 个,Elasticsearch 的索引分片会自动迁移,均匀分布在这些节点上。
1
| docker run --rm -ti elasticdump/elasticsearch-dump --limit 10000 --input=http://elastic:xxx@x.x.x.x:31391/bayou_tt_articles --output=/data/es-bayou_tt_articles-output.json --type=data
|
1
2
3
4
5
6
7
| Wed, 29 May 2024 01:41:23 GMT | got 10000 objects from source elasticsearch (offset: 0)
Wed, 29 May 2024 01:41:23 GMT | sent 10000 objects to destination file, wrote 10000
Wed, 29 May 2024 01:41:24 GMT | got 10000 objects from source elasticsearch (offset: 10000)
Wed, 29 May 2024 01:41:24 GMT | sent 10000 objects to destination file, wrote 10000
Wed, 29 May 2024 01:41:25 GMT | got 10000 objects from source elasticsearch (offset: 20000)
Wed, 29 May 2024 01:41:25 GMT | sent 10000 objects to destination file, wrote 10000
Wed, 29 May 2024 01:41:25 GMT | got 10000 objects from source elasticsearch (offset: 30000)
|
导出速度能达到 1w 条每秒,一亿条数据大约需要 3h,基本也能满足索引的备份、迁移需求。
- Elasticsearch 节点 Pod 更新时,不会发生漂移
更新之前的 Pod 分布节点如下:
 1
 2
 3
 4
 5
 6
 7
 8
 9
10
11
12
13
| NAME READY STATUS RESTARTS AGE IP NODE NOMINATED NODE READINESS GATES
es-jfs-prod-beat-metricbeat-7fbdd657c4-djgg6 1/1 Running 6 (32m ago) 18h 10.244.54.5 ascend-01 <none> <none>
es-jfs-prod-es-default-0 1/1 Running 0 28m 10.244.46.82 ascend-07 <none> <none>
es-jfs-prod-es-default-1 1/1 Running 0 29m 10.244.23.77 ascend-53 <none> <none>
es-jfs-prod-es-default-2 1/1 Running 0 31m 10.244.49.65 ascend-20 <none> <none>
es-jfs-prod-es-default-3 1/1 Running 0 32m 10.244.54.14 ascend-01 <none> <none>
es-jfs-prod-es-default-4 1/1 Running 0 34m 10.244.100.239 ascend-40 <none> <none>
es-jfs-prod-es-default-5 1/1 Running 0 35m 10.244.97.201 ascend-39 <none> <none>
es-jfs-prod-es-default-6 1/1 Running 0 37m 10.244.101.156 ascend-38 <none> <none>
es-jfs-prod-es-default-7 1/1 Running 0 39m 10.244.19.101 ascend-49 <none> <none>
es-jfs-prod-es-default-8 1/1 Running 0 40m 10.244.16.109 ascend-46 <none> <none>
es-jfs-prod-es-default-9 1/1 Running 0 41m 10.244.39.119 ascend-15 <none> <none>
es-jfs-prod-kb-75f7bbd96-6tcrn 1/1 Running 0 18h 10.244.1.164 ascend-22 <none> <none>
|
更新之后的 Pod 分布节点如下:
 1
 2
 3
 4
 5
 6
 7
 8
 9
10
11
12
13
| NAME READY STATUS RESTARTS AGE IP NODE NOMINATED NODE READINESS GATES
es-jfs-prod-beat-metricbeat-7fbdd657c4-djgg6 1/1 Running 6 (50m ago) 18h 10.244.54.5 ascend-01 <none> <none>
es-jfs-prod-es-default-0 1/1 Running 0 72s 10.244.46.83 ascend-07 <none> <none>
es-jfs-prod-es-default-1 1/1 Running 0 2m35s 10.244.23.78 ascend-53 <none> <none>
es-jfs-prod-es-default-2 1/1 Running 0 3m59s 10.244.49.66 ascend-20 <none> <none>
es-jfs-prod-es-default-3 1/1 Running 0 5m34s 10.244.54.15 ascend-01 <none> <none>
es-jfs-prod-es-default-4 1/1 Running 0 7m21s 10.244.100.240 ascend-40 <none> <none>
es-jfs-prod-es-default-5 1/1 Running 0 8m44s 10.244.97.202 ascend-39 <none> <none>
es-jfs-prod-es-default-6 1/1 Running 0 10m 10.244.101.157 ascend-38 <none> <none>
es-jfs-prod-es-default-7 1/1 Running 0 11m 10.244.19.102 ascend-49 <none> <none>
es-jfs-prod-es-default-8 1/1 Running 0 13m 10.244.16.110 ascend-46 <none> <none>
es-jfs-prod-es-default-9 1/1 Running 0 14m 10.244.39.120 ascend-15 <none> <none>
es-jfs-prod-kb-75f7bbd96-6tcrn 1/1 Running 0 18h 10.244.1.164 ascend-22 <none> <none>
|
这点打消了我的一个顾虑, Elasticsearch 的 Pod 重启时,发生了漂移,那么节点上是否会残留分片的数据,导致内存使用不断膨胀?答案是,不会。ECK Operator 似乎能让 Pod 在原节点进行重启,挂载的 Hostpath 数据依然对新的 Pod 有效,仅当主机节点发生重启时,才会丢失数据。
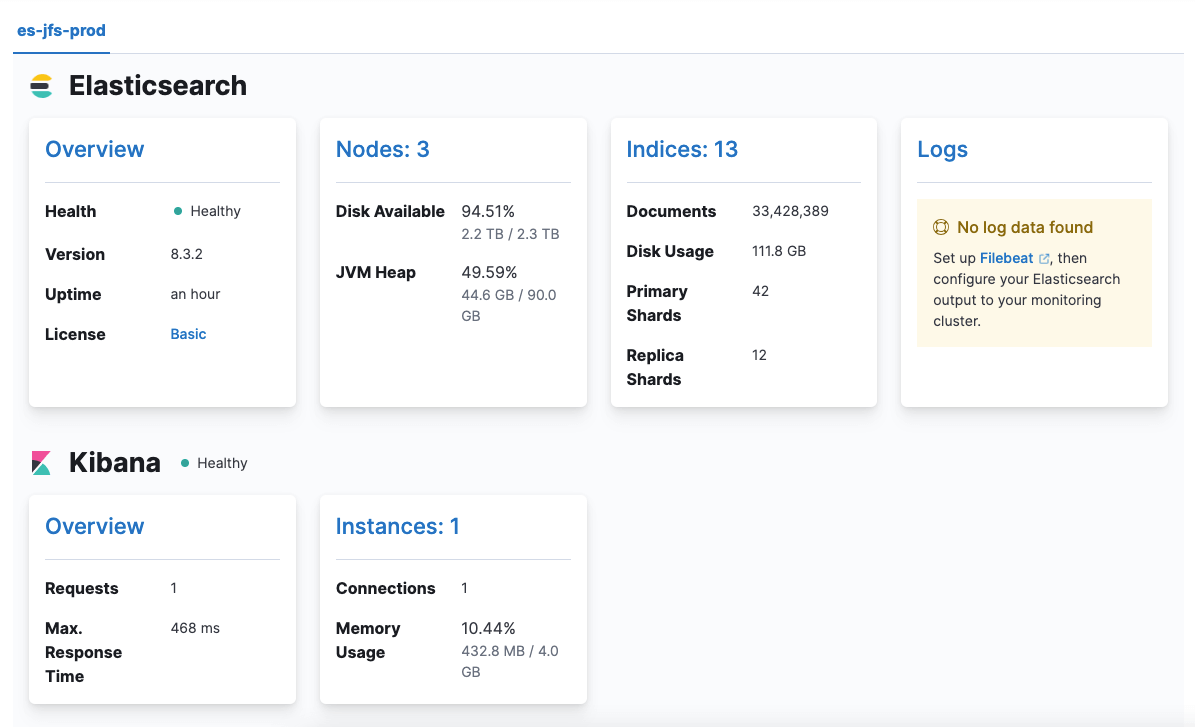
6. 总结
AI 的算力节点有大量空闲的 CPU 和 Memory 资源,使用这些大内存的主机节点,部署一些短生命周期的基于内存存储的高性能应用,有利于提高资源的使用效率。
本篇主要介绍了借助于 Hostpath 的内存存储部署 Elasticsearch 提供高性能查询能力的方案,具体内容如下:
- 将内存
mount 目录到主机上 - 创建基于 Hostpath 的 PVC,将数据挂载到上述目录
- 使用 ECK Operator 部署 Elasticsearch
- Elasticsearch 更新时,数据并不会丢失,但不能同时重启多个主机节点
- 300+GB、一亿+条数据,全文检索响应场景中,基于 JuiceFS 存储的速度为 18s, SSD 节点的速度为 5s,内存节点的速度为 100ms
